Getting started: setting up your practice step by step
A written set-up checklist in the same order as the Setup guide: your practice details, logo, brand colour, profile, locations, services and hours, then the client portal, booking, payments, invoices, notifications, clients, forms, security, your clinical will and calendar sync.
Updated 4 November 2026
A written checklist for setting up your practice, in order. The first seven steps match the Setup guide inside Therasee, with the same names, so you can follow either. The rest are what most practitioners do next, before their first client. Each step links to a full article for the detail.
Your plan
Every new practice starts on the Free plan, which has no time limit: up to 3 clients, 1 practitioner and 1 admin user, with unlimited appointments, secure messaging, 1:1 video calls and a branded client portal. Premium adds unlimited clients, group video calls, free admin users and room for up to 25 practitioners. It costs £19 a month for your first practitioner, and each further practitioner costs less: £15 for the second, £10 each for the third to fifth, £8 each for the sixth to twelfth and £6 each after that. Paying annually gives you two months free, so your first practitioner is £190 a year. You can upgrade at any time under Settings, Practice settings, Subscription; see Managing your Therasee plan.
Open the Setup guide
- At the bottom of the menu on the left, select Setup (the rocket icon). The number beside it, such as 3/7, shows how many of the seven steps are done.
- A panel headed Set up your practice slides in, with the steps listed in order and a progress bar at the top.
- Select a step to open it and fill it in. Where a step has a Save button, select it when you are done. Finished steps show a Done badge, and you can select them again later to make changes.
- If a step does not apply to you yet, select Skip this step. If you have already set it up in Settings, select Mark as done. Both tick the step off.
- Select Finish later to close the panel. Your progress is kept, and the Setup button stays in the menu until you finish or dismiss it.
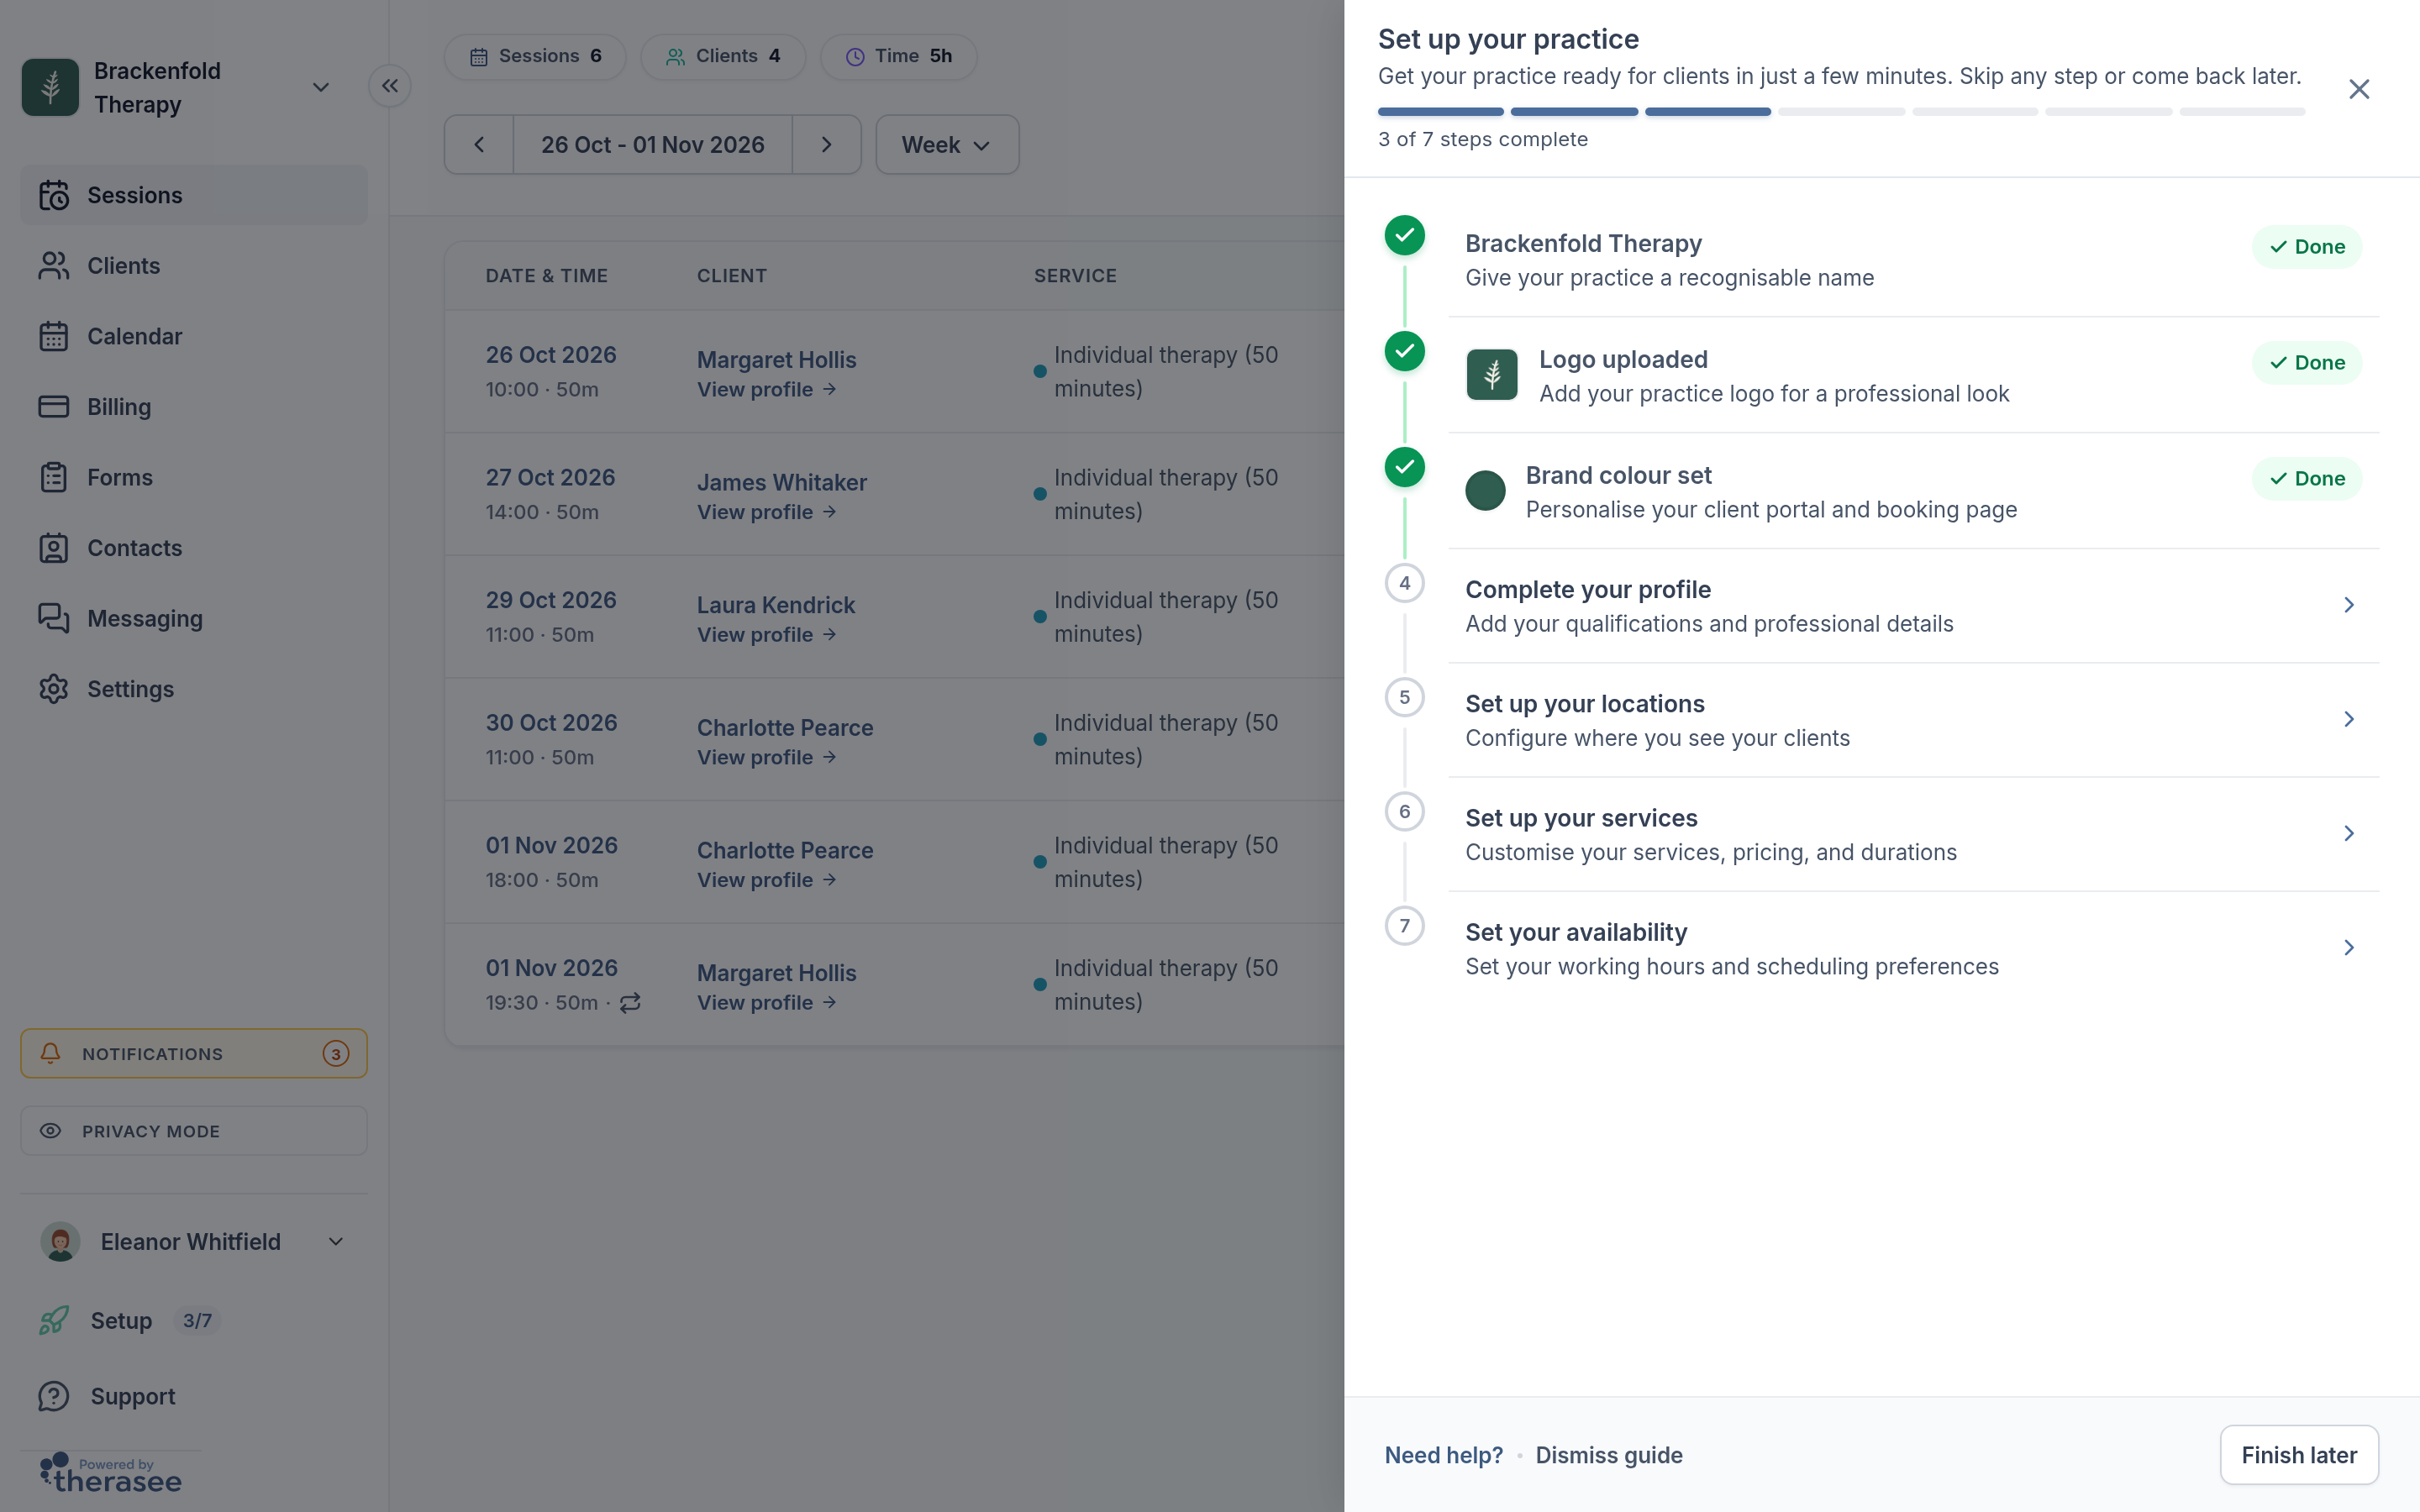
The Setup guide is shown to the person who owns the practice account. Dismiss guide at the bottom of the panel, or the small cross on the Setup button, hides it for good; everything it covers stays available in Settings, and this article lists where. Need help? opens a chat with our support team if you have a question while you set up.
The seven Setup guide steps
1. Name your practice
What: the name your clients will know you by. Where: the guide, or Settings, Practice profile, Overview, in the Practice Identity card. Why: it heads your client portal, booking page, emails and invoices. On Overview, also add your support email, phone number and business address.
2. Upload your logo
What: a Logo and, if you have one, a Square icon (images up to 5MB). Where: the guide, or the Practice Identity card on Overview. Why: clients see it at the top of your portal, on your booking page and on invoices.
3. Choose your brand colour
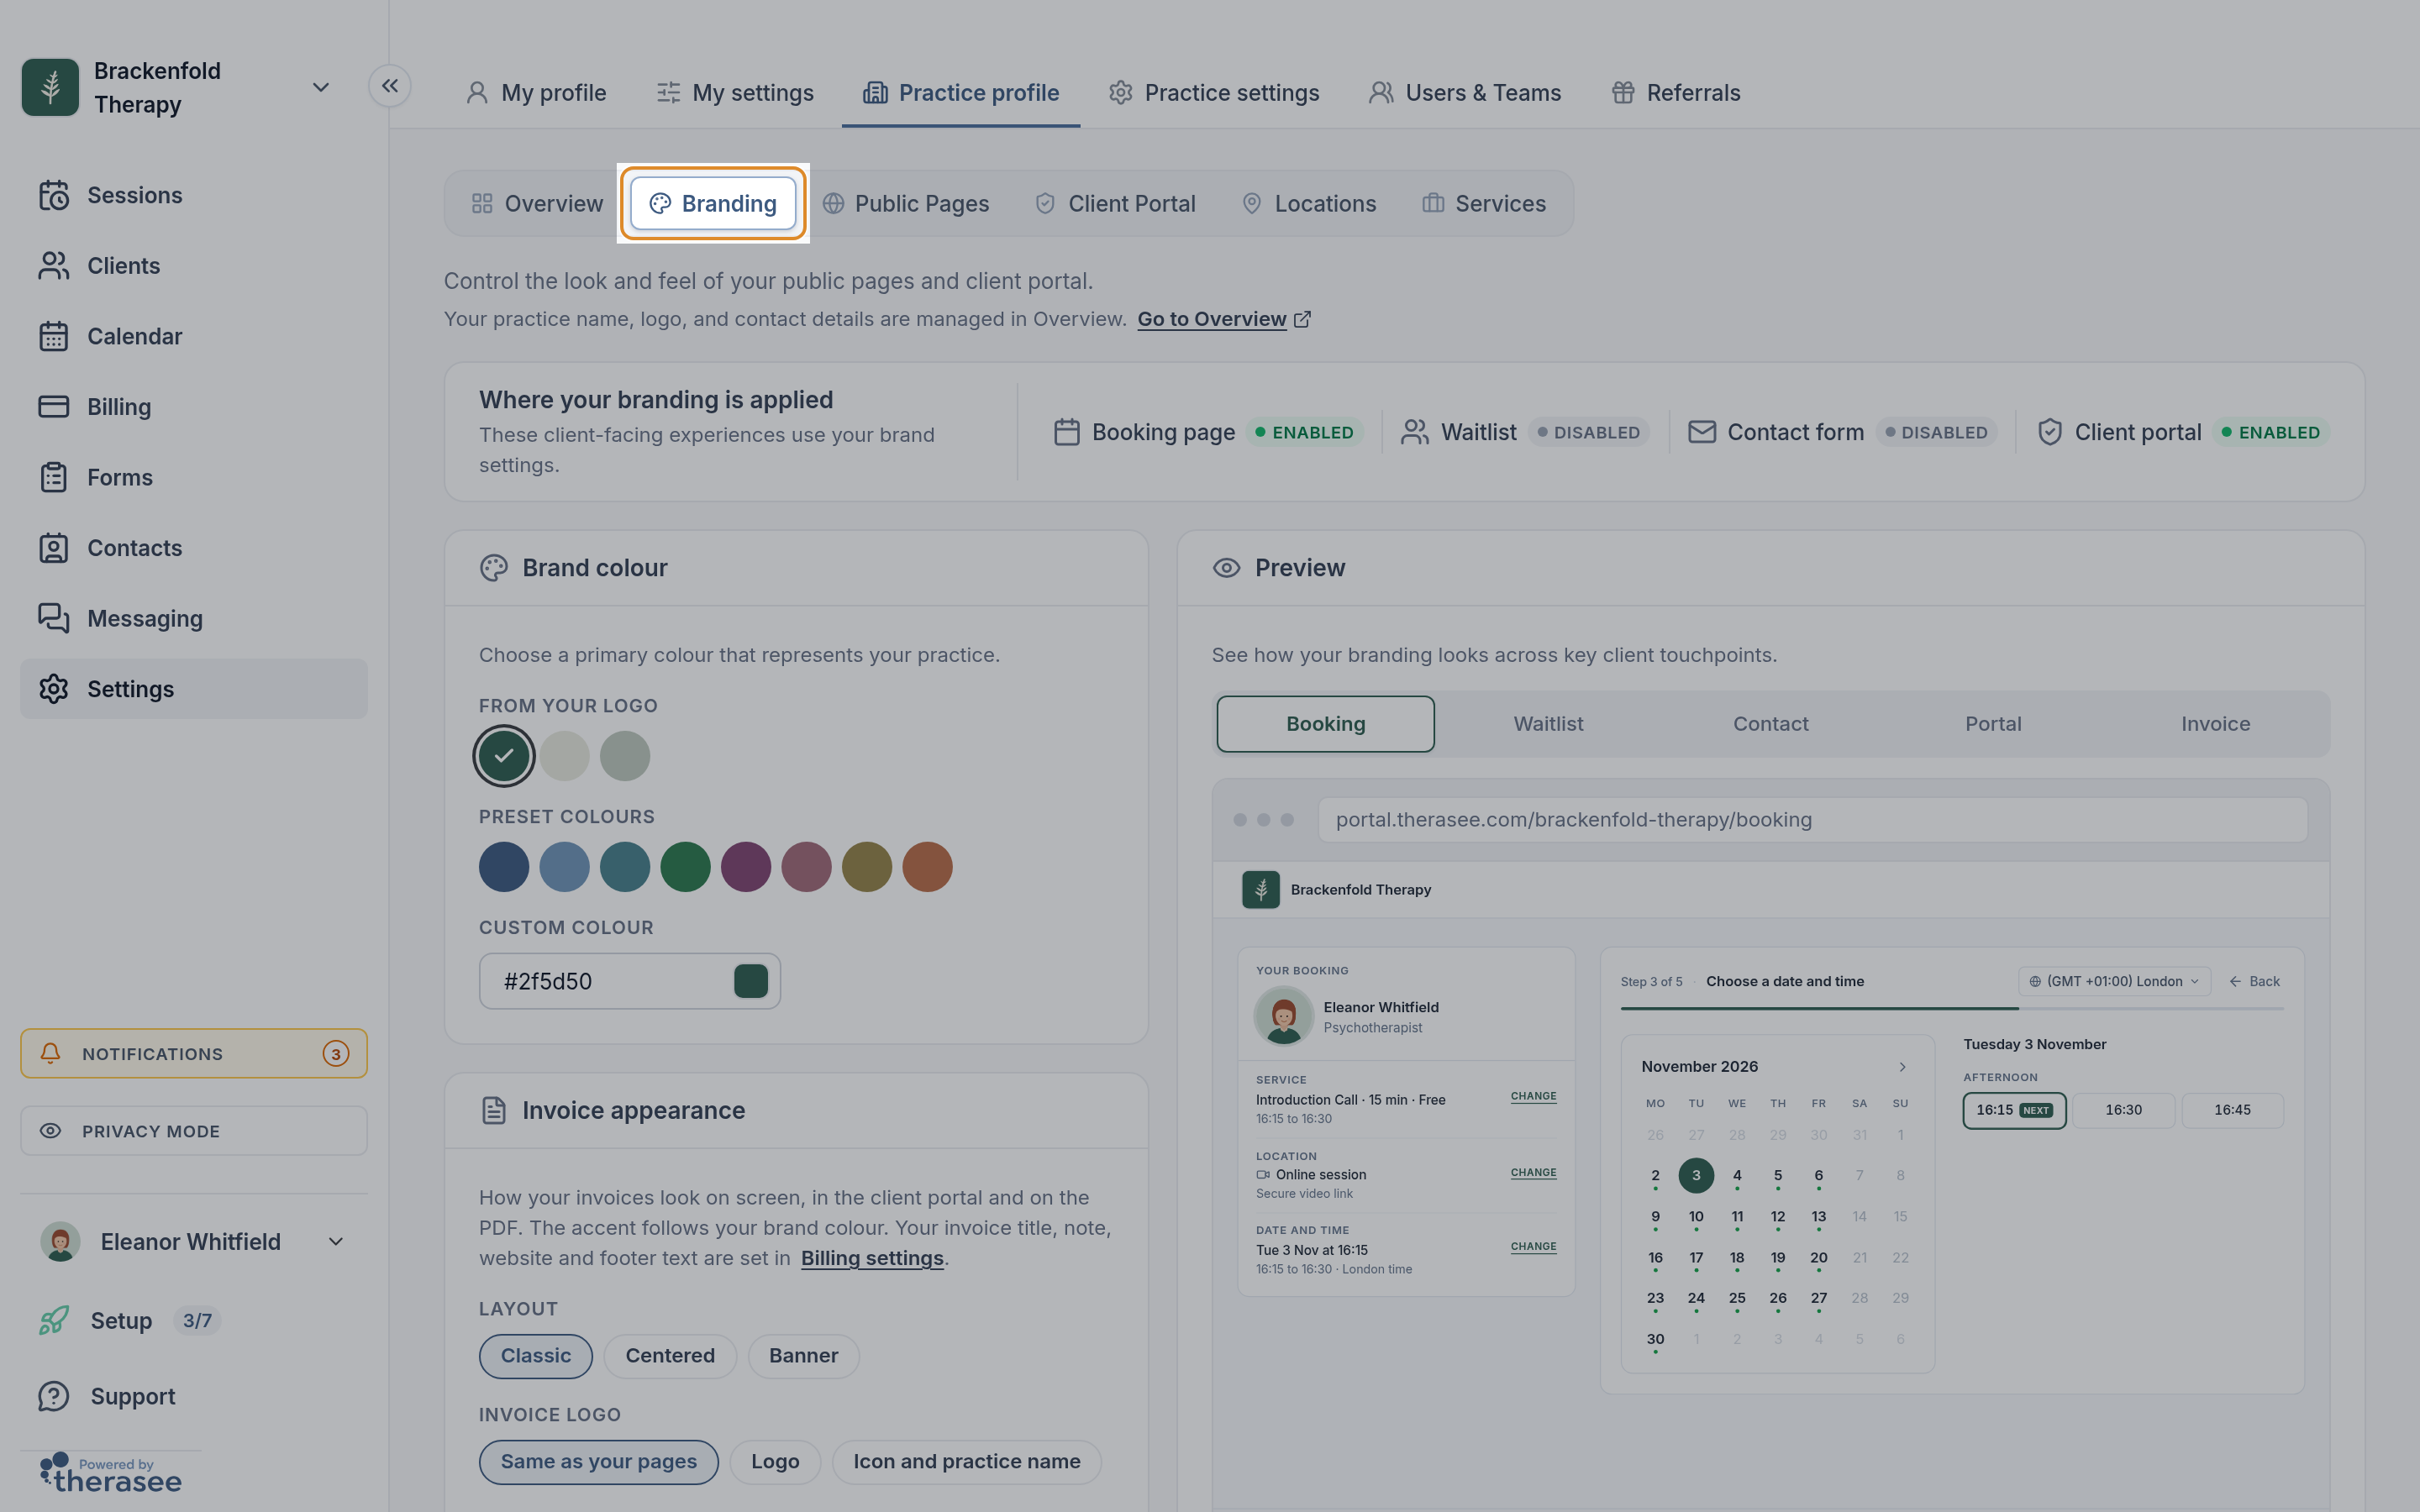
What: pick a preset, a colour taken from your logo, or type your own hex code, then Save. Where: the guide, or Settings, Practice profile, Branding. Why: it colours your client portal and booking page, so they look like yours. In the guide, select Click to preview your client portal and booking page to see the result first. The Branding page is also where you choose how your invoices look, under Invoice appearance.
4. Complete your profile
What: your photo, Professional title, an About me introduction and your Specialisations (type each one and press Enter). Where: the guide, or Settings, My profile. Why: clients see these details about you when they book online.
5. Set up your locations
What: turn on Online sessions if you see clients by video, Telephone if you work by phone, and select Add for each room or address where you see clients in person. Where: the guide, or Settings, Practice profile, Locations. Why: every session has a location, and online booking only offers the locations you make available. Video sessions use the built-in video call, with clients waiting until you let them in; see Running a video session, which also covers using Zoom or Google Meet instead.
6. Set up your services
What: the sessions you offer, each with its length and price. Select Add for each one. Where: the guide, or Settings, Practice profile, Services. Why: the service sets how long a booking lasts and what goes on the invoice. See Setting up your services and prices.
7. Set your availability
What: your Weekly schedule: the days and times you work, and which services and locations each stretch of time is for. Where: the guide (select Edit), or Settings, My settings, Availability. Why: these hours decide which times clients can book online. See Setting your working hours.
When all seven steps are done, the guide shows You're all set!. Select Start working to close it; the Setup button then leaves the menu.
Next: get ready for clients
8. Turn on the client portal
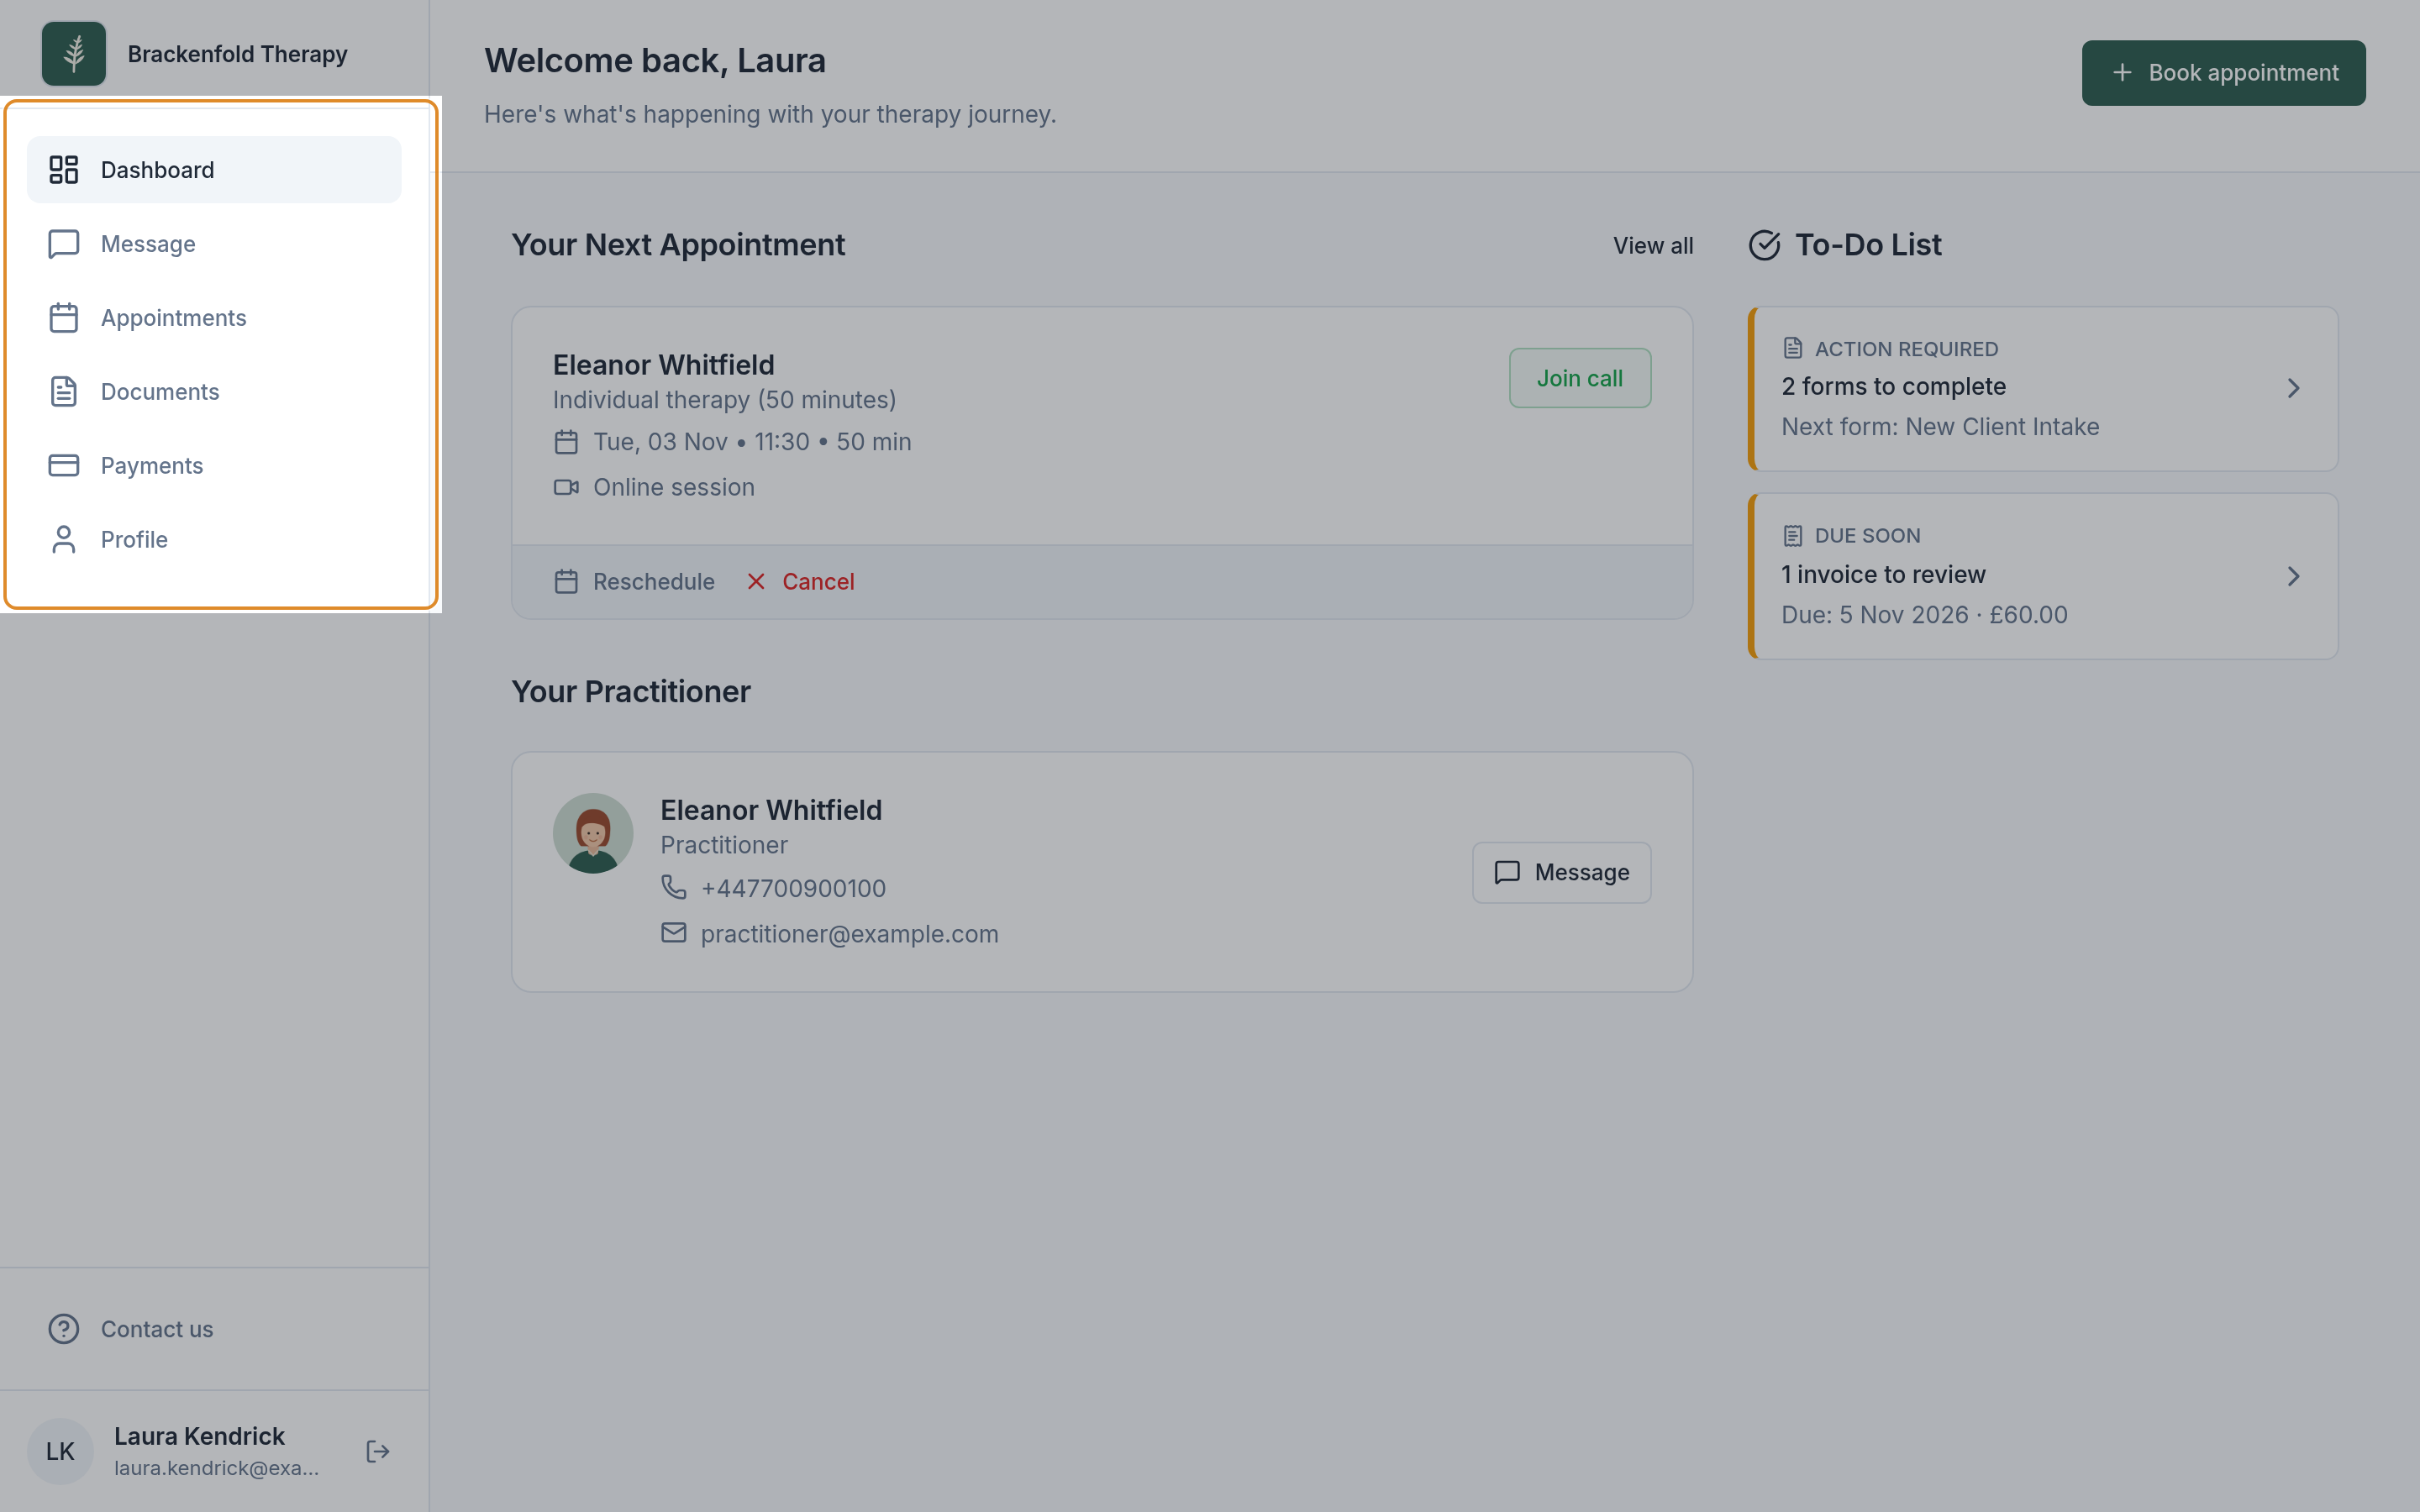
What: switch on the portal and choose which sections clients see. Where: Settings, Practice profile, Client Portal. Why: it is where clients see appointments, message you, fill in forms and pay invoices, under your practice's name and branding. See Turning on the client portal.
Once your portal is on and a client is invited, this is what they see when they sign in: your branding, their next appointment and anything they need to do.
9. Let clients book online
What: turn on your booking page, set your booking rules, such as how much notice you need, and choose which services clients can book. Where: Settings, Practice profile, Public Pages and Settings, My settings, Booking. Why: clients can then book times that suit you without emailing back and forth. If a client sees no times, the checklist in Letting clients book online shows what to check.
10. Connect Stripe
What: check your billing currency, then select Connect Stripe. Where: Settings, Practice settings, Billing. Why: clients can then pay invoices by card, and pay when they book if you choose. Stripe is optional; you can record payments made another way yourself. See Connecting Stripe.
11. Set up your invoices
What: your billing address, invoice wording, tax or VAT details and payment terms. Where: the same Billing page. Why: these fill in every invoice, and the currency is fixed once your first invoice is issued. See Creating and sending an invoice.
12. Check your notifications
What: choose which confirmations, reminders and invoice emails or texts clients get, and when. Where: Settings, Practice settings, Notifications. Why: you know what clients will receive before you book anyone. See What your clients are sent.
13. Add or import your clients
What: add clients one at a time with the + button, or import a spreadsheet of them. The Free plan holds up to 3 clients; Premium has no limit. Where: Clients. Why: you can only book, invoice and message clients who are on your list. See Adding a client, and Moving to Therasee if you are bringing clients over from another system.
14. Prepare your forms
What: build your intake form, contract or consent form, or bring in the ones you already use. Where: Forms. Why: clients can then fill in and sign them online before their first session. See Creating and sending forms.
15. Turn on two-factor authentication
What: under Two-factor authentication (2FA), select Enable and link an authenticator app on your phone. Where: Settings, My settings, Security. Why: your account holds clinical records, and a code as well as your password keeps it safe. See Signing in and two-factor authentication.
16. Set up your clinical will
What: name who contacts your clients if you cannot practise, and what they can reach. Where: Settings, My settings, Clinical Will. Why: many professional bodies expect you to have one. See Setting up your clinical will.
17. Sync your calendar
What: connect Google Calendar or Outlook. Where: Settings, My settings, Integrations. Why: your sessions show in your own calendar, and your personal events stop clients booking over them. See Syncing Google Calendar or Outlook.
Your first session
With the steps above in place, you are ready to book. Go to Calendar, click an empty slot, choose your client, service and location, and save. If confirmations are on, your client is sent one (with a join link for a video session), and the session appears in their portal. See Booking an appointment for every option, including repeating sessions.
You do not need to finish everything in one sitting: the rest can follow as you need it.
Was this helpful?