Setting up your services and prices
Add the services you offer with their length, price and colour, choose who offers them, where, and which clients can book them online, set a client's own fee, and change your prices from a date, including what happens to sessions and invoices already booked.
Updated 4 November 2026
A service is something your practice offers, with a name, a length and a price, such as "Individual therapy, 50 minutes, £70". Services fill in the length and rate when you book a session, they are what clients choose from when they book online, and they appear on your invoices. Set them up before you start booking.
Where your services live
Go to Settings, Practice profile, Services. The table lists every service with its Service name (next to a dot in its calendar colour), Fee, Length, Where it is offered (online, by phone or in person) and, in a practice with more than one practitioner, the Practitioners who offer it (Everyone when every practitioner does).
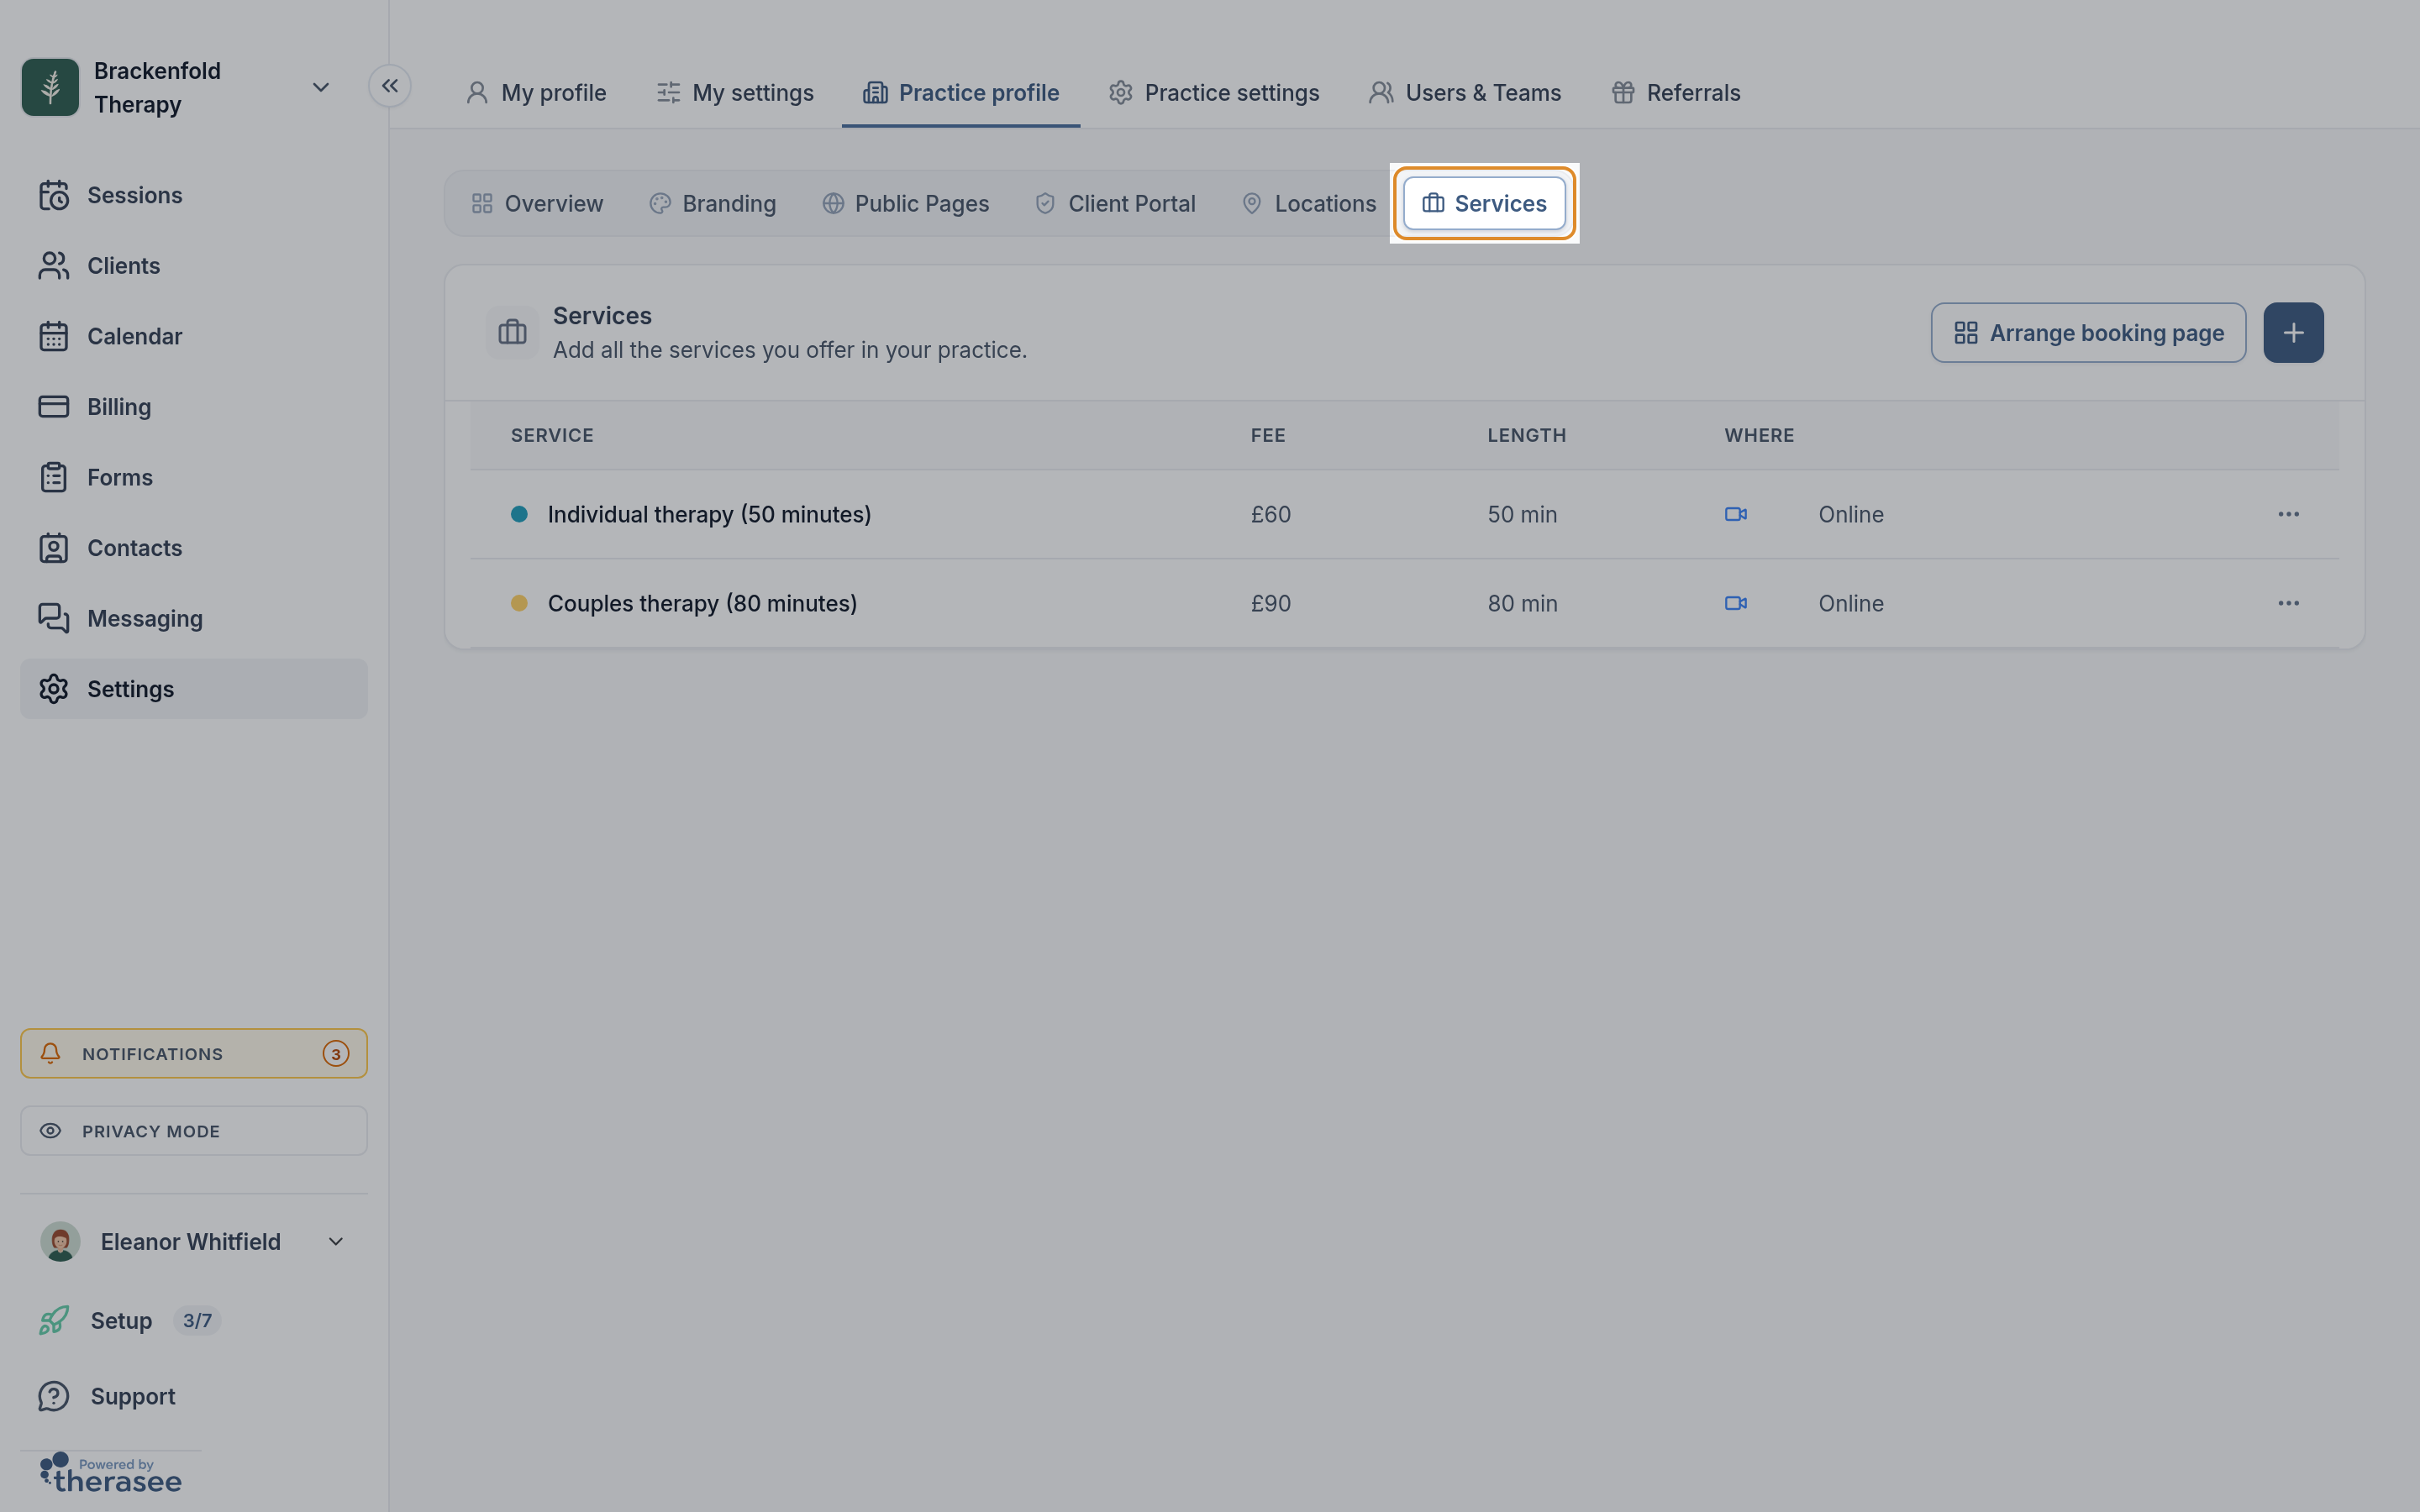
Adding, editing and deleting services needs permission to change practice settings. If you do not have it, the list is read-only and hovering a service name says so; ask whoever manages your practice.
Adding a service
- On the Services tab, click the + button at the top right of the table (its tooltip reads Add service). If you have no services yet, click Add service in the middle of the page instead.
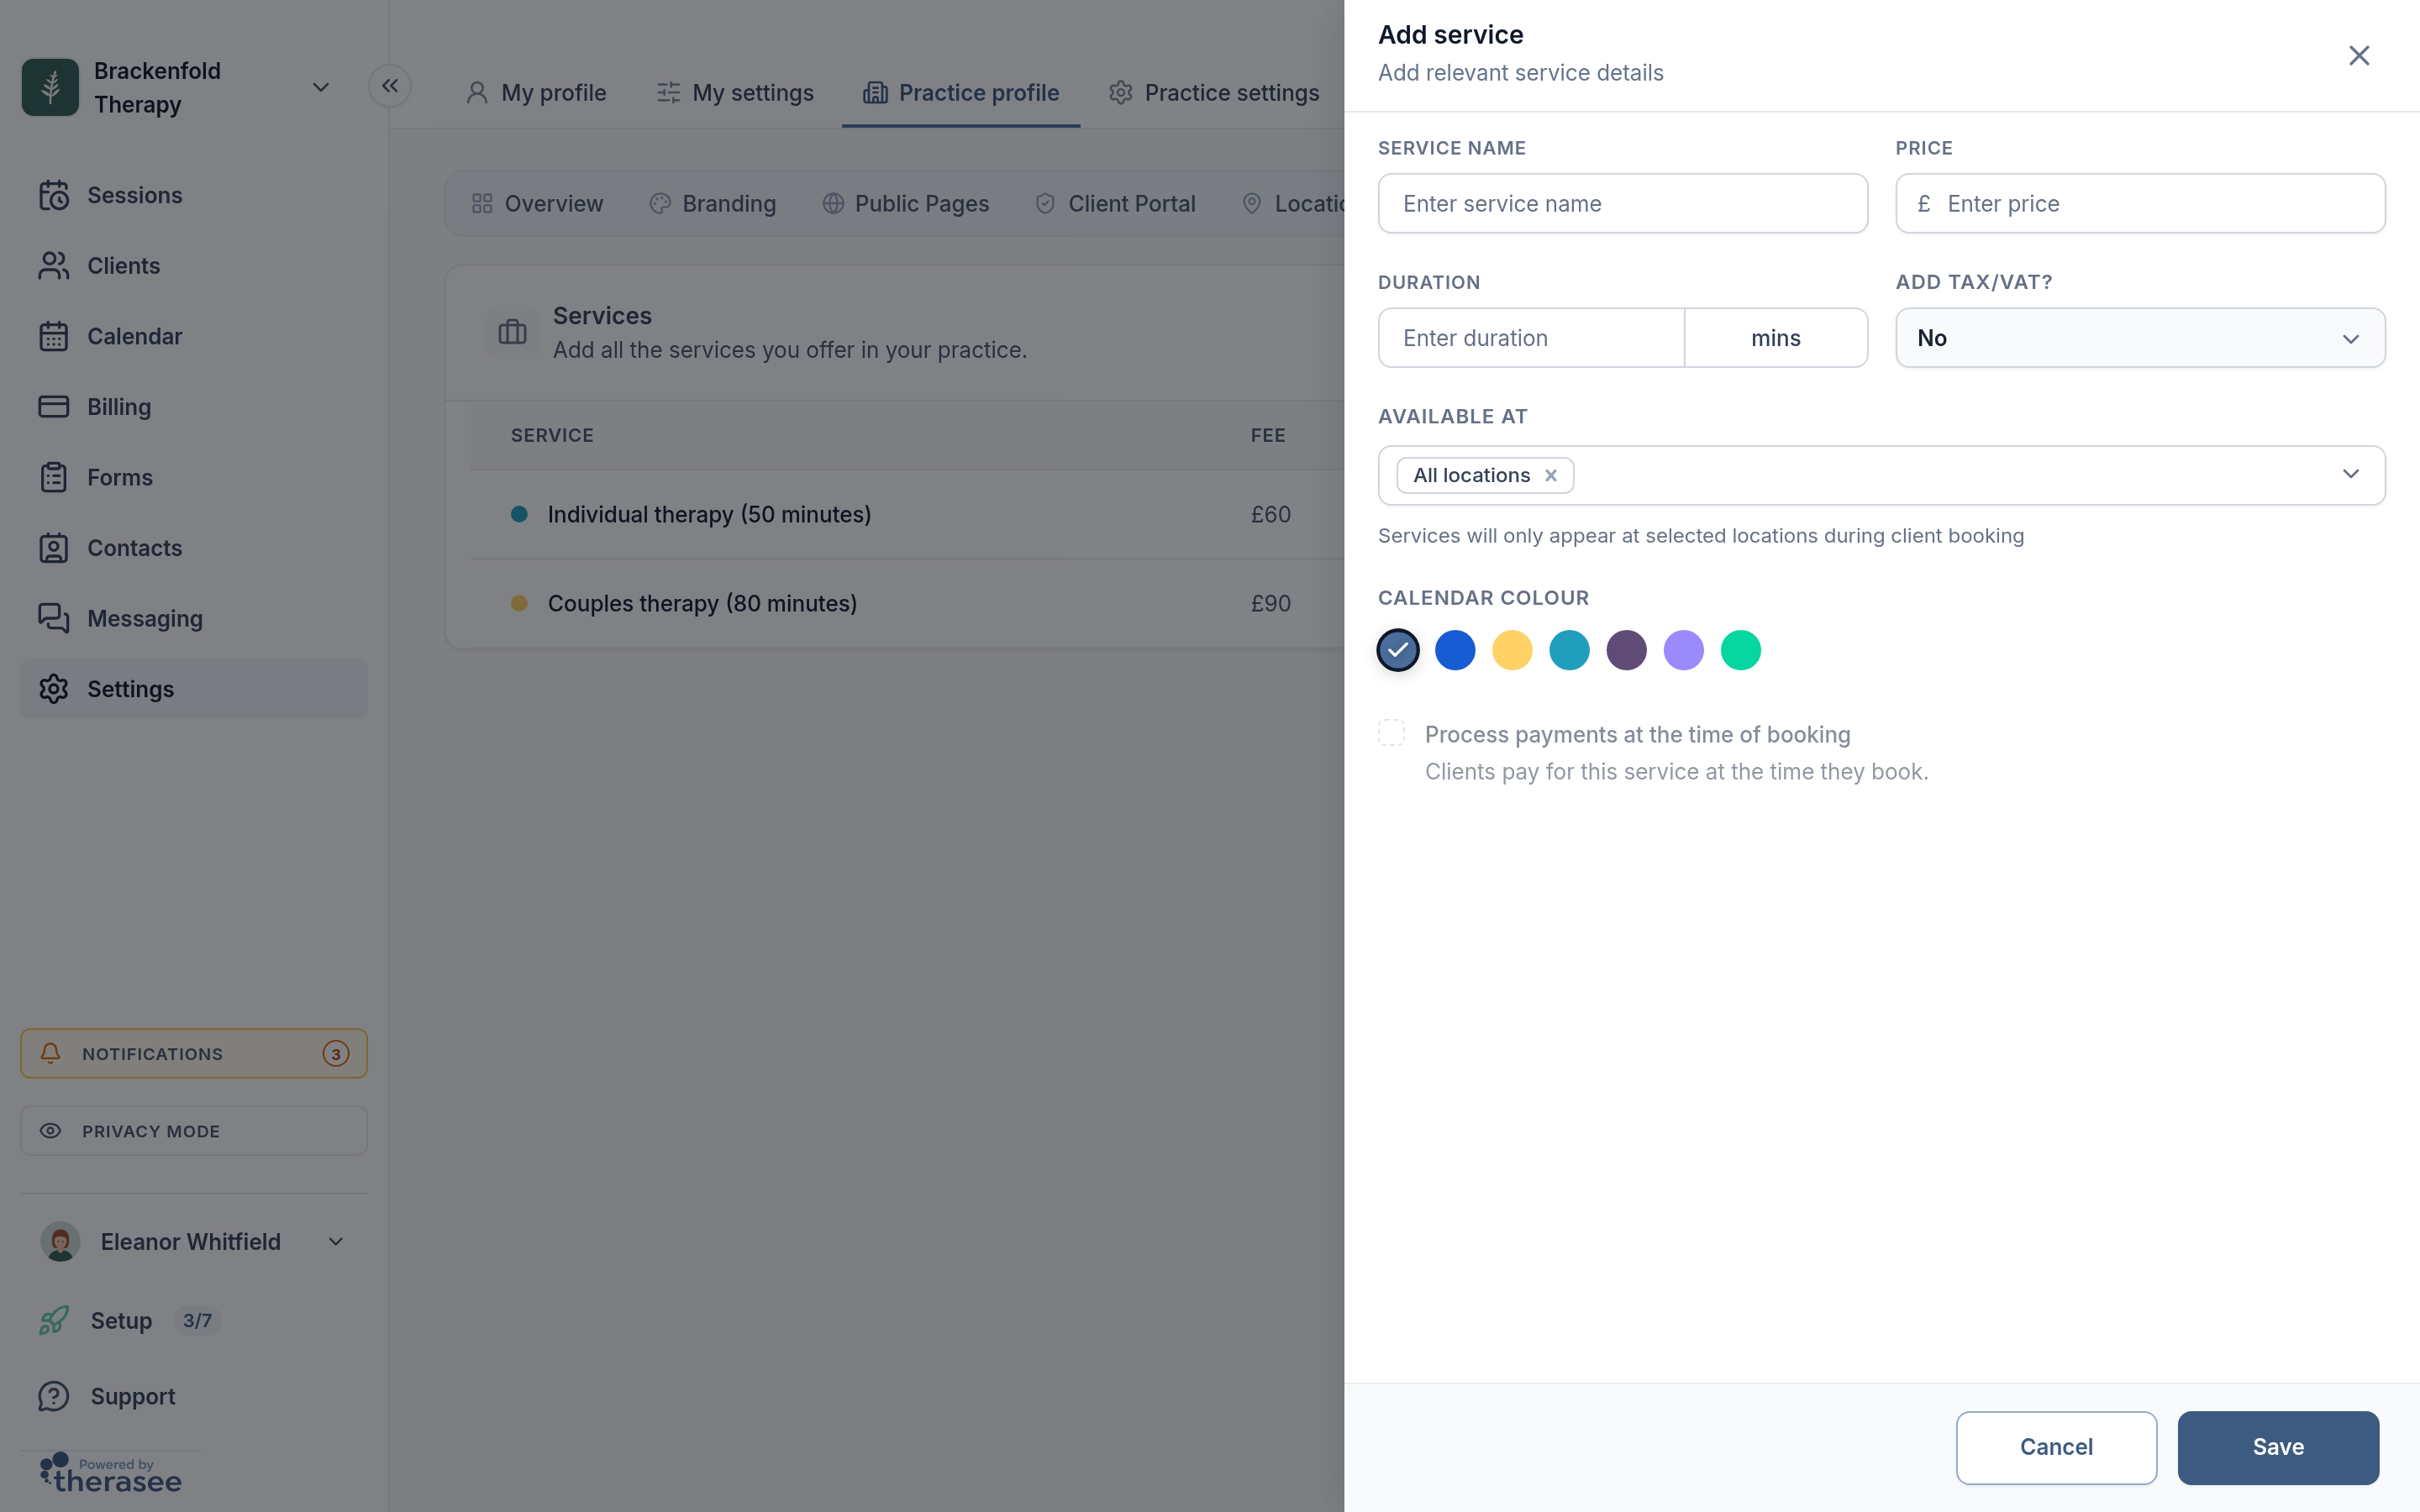
- A panel titled Add service slides in from the right. Fill it in as described below, then click Save. The new service appears in the table straight away.
The fields, one by one
- Service name (required, up to 64 characters). Clients see it when booking and on invoices, so use a name you are happy for them to read.
- Price (required). The standard fee for one session, in your practice's currency. Enter 0 for a free service; clients booking online see it as Free.
- Duration (required), in mins. This sets the length of a session when you book it, and the length of the slots clients are offered online.
- ADD TAX/VAT? Choose Yes if VAT applies to this service. Once your practice's Tax/VAT percentage is set under Settings, Practice settings, Billing (the Currency & Tax card), the Price label shows the price including tax as you type.
- ASSIGN TO. The practitioners who offer this service. It starts with everyone selected (shown as All). Remove anyone who does not offer it. Clients can only book a service with a practitioner it is assigned to. In a practice with one practitioner this field is not shown, and the service is yours.
- AVAILABLE AT. The locations where clients can book this service online. It starts with All locations, which also covers locations you add later. Choose particular locations instead to stop clients booking this service elsewhere, for example to keep an assessment in-person only.
- CALENDAR COLOUR. Sessions for this service show in the colour you click here on your calendar.
- Process payments at the time of booking. Clients pay the full price when they book this service online. It becomes available once your practice is connected to Stripe and the price is more than 0.
A new service can be booked online, from the booking page and by existing clients, with everyone it is assigned to. Each practitioner can change that for their own bookings; see Choosing what clients can book online below.
What each setting changes
When you book a session
The booking form's Service field starts on the client's usual service (set on their record, see below), else the service of their last session, else the first service in your practice's order. Duration and Rate are filled in from it, using the client's own fee if they have one. Choosing another service fills in its duration and rate instead. If a client has only some of your services, theirs are listed first and the rest follow under Other services.
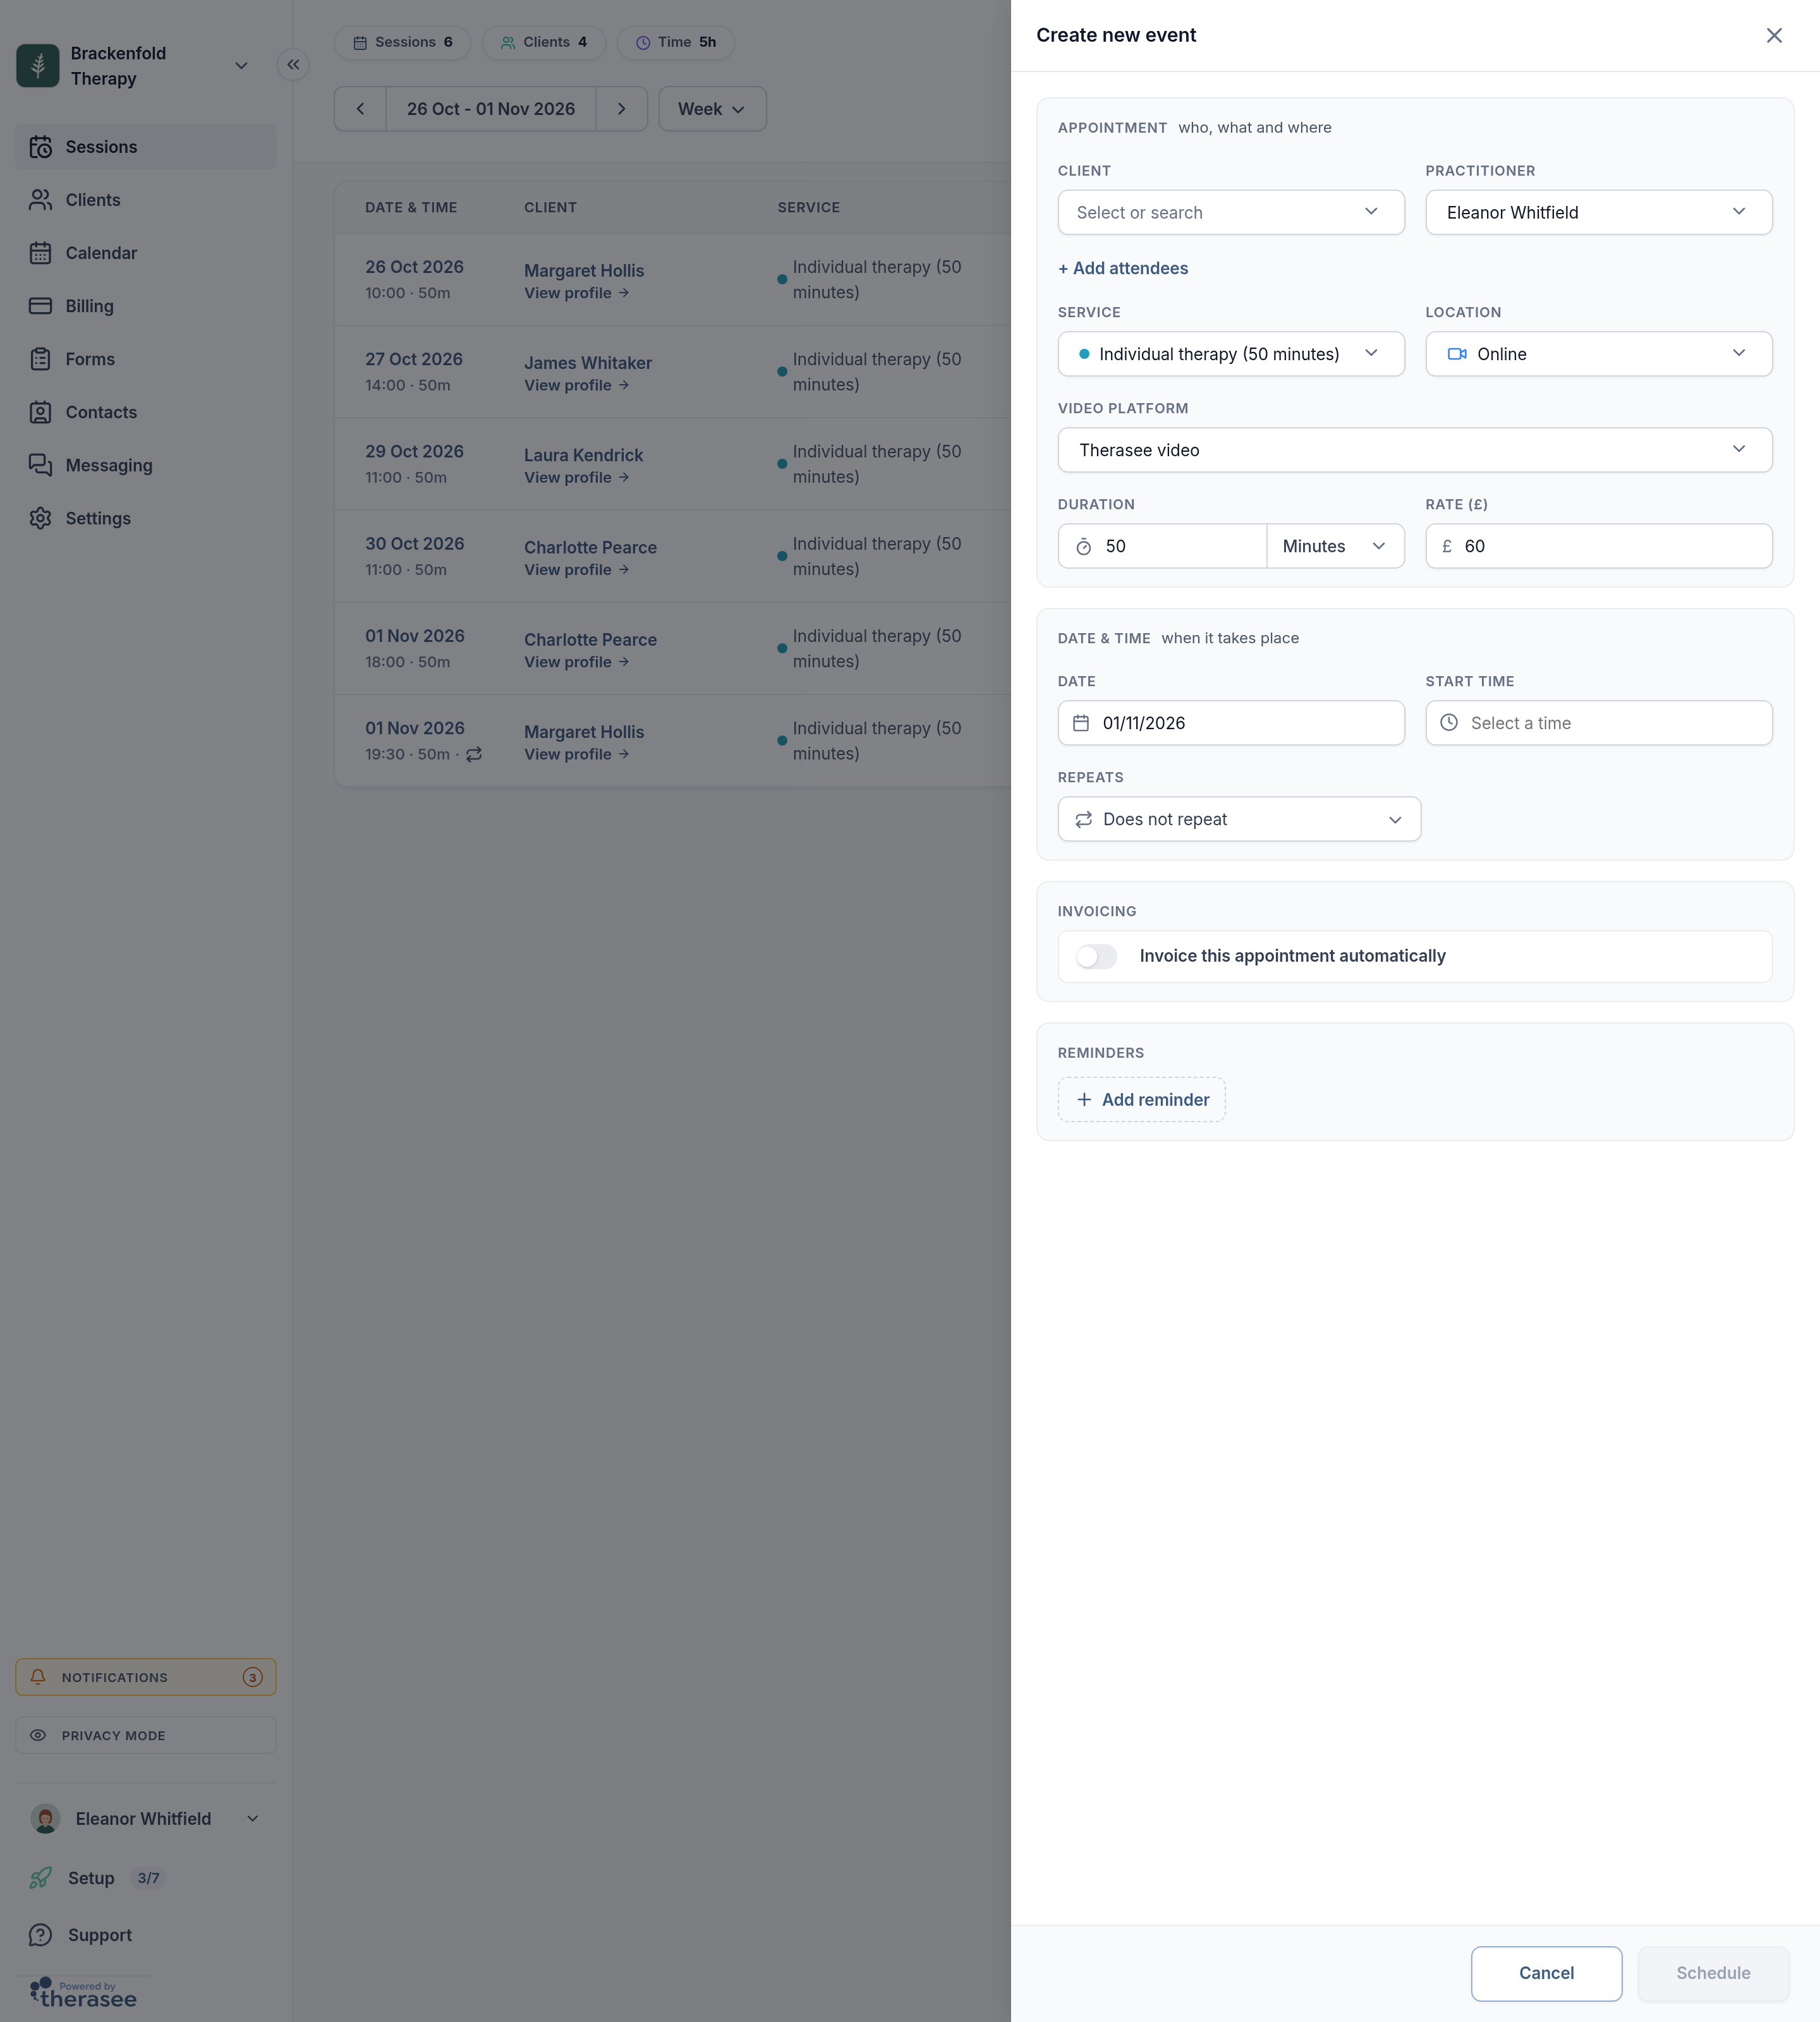
To charge a different amount for one session only, change the Rate on the booking form before you save. The service's standard price stays as it is. See Booking an appointment for the rest of the form.
When clients book online
A client booking online first picks a practitioner (skipped if only one practitioner takes bookings), then a service, then a location, then a time. On the service step they see a card for each service with its name, price and length, and whether it is offered online, by phone or in person. A service appears there when all of these are true:
- It is assigned to that practitioner under ASSIGN TO.
- That practitioner offers it to that kind of client: new clients on the booking page, or existing clients once they have signed in (see below).
- It is available at a location where that practitioner takes online bookings.
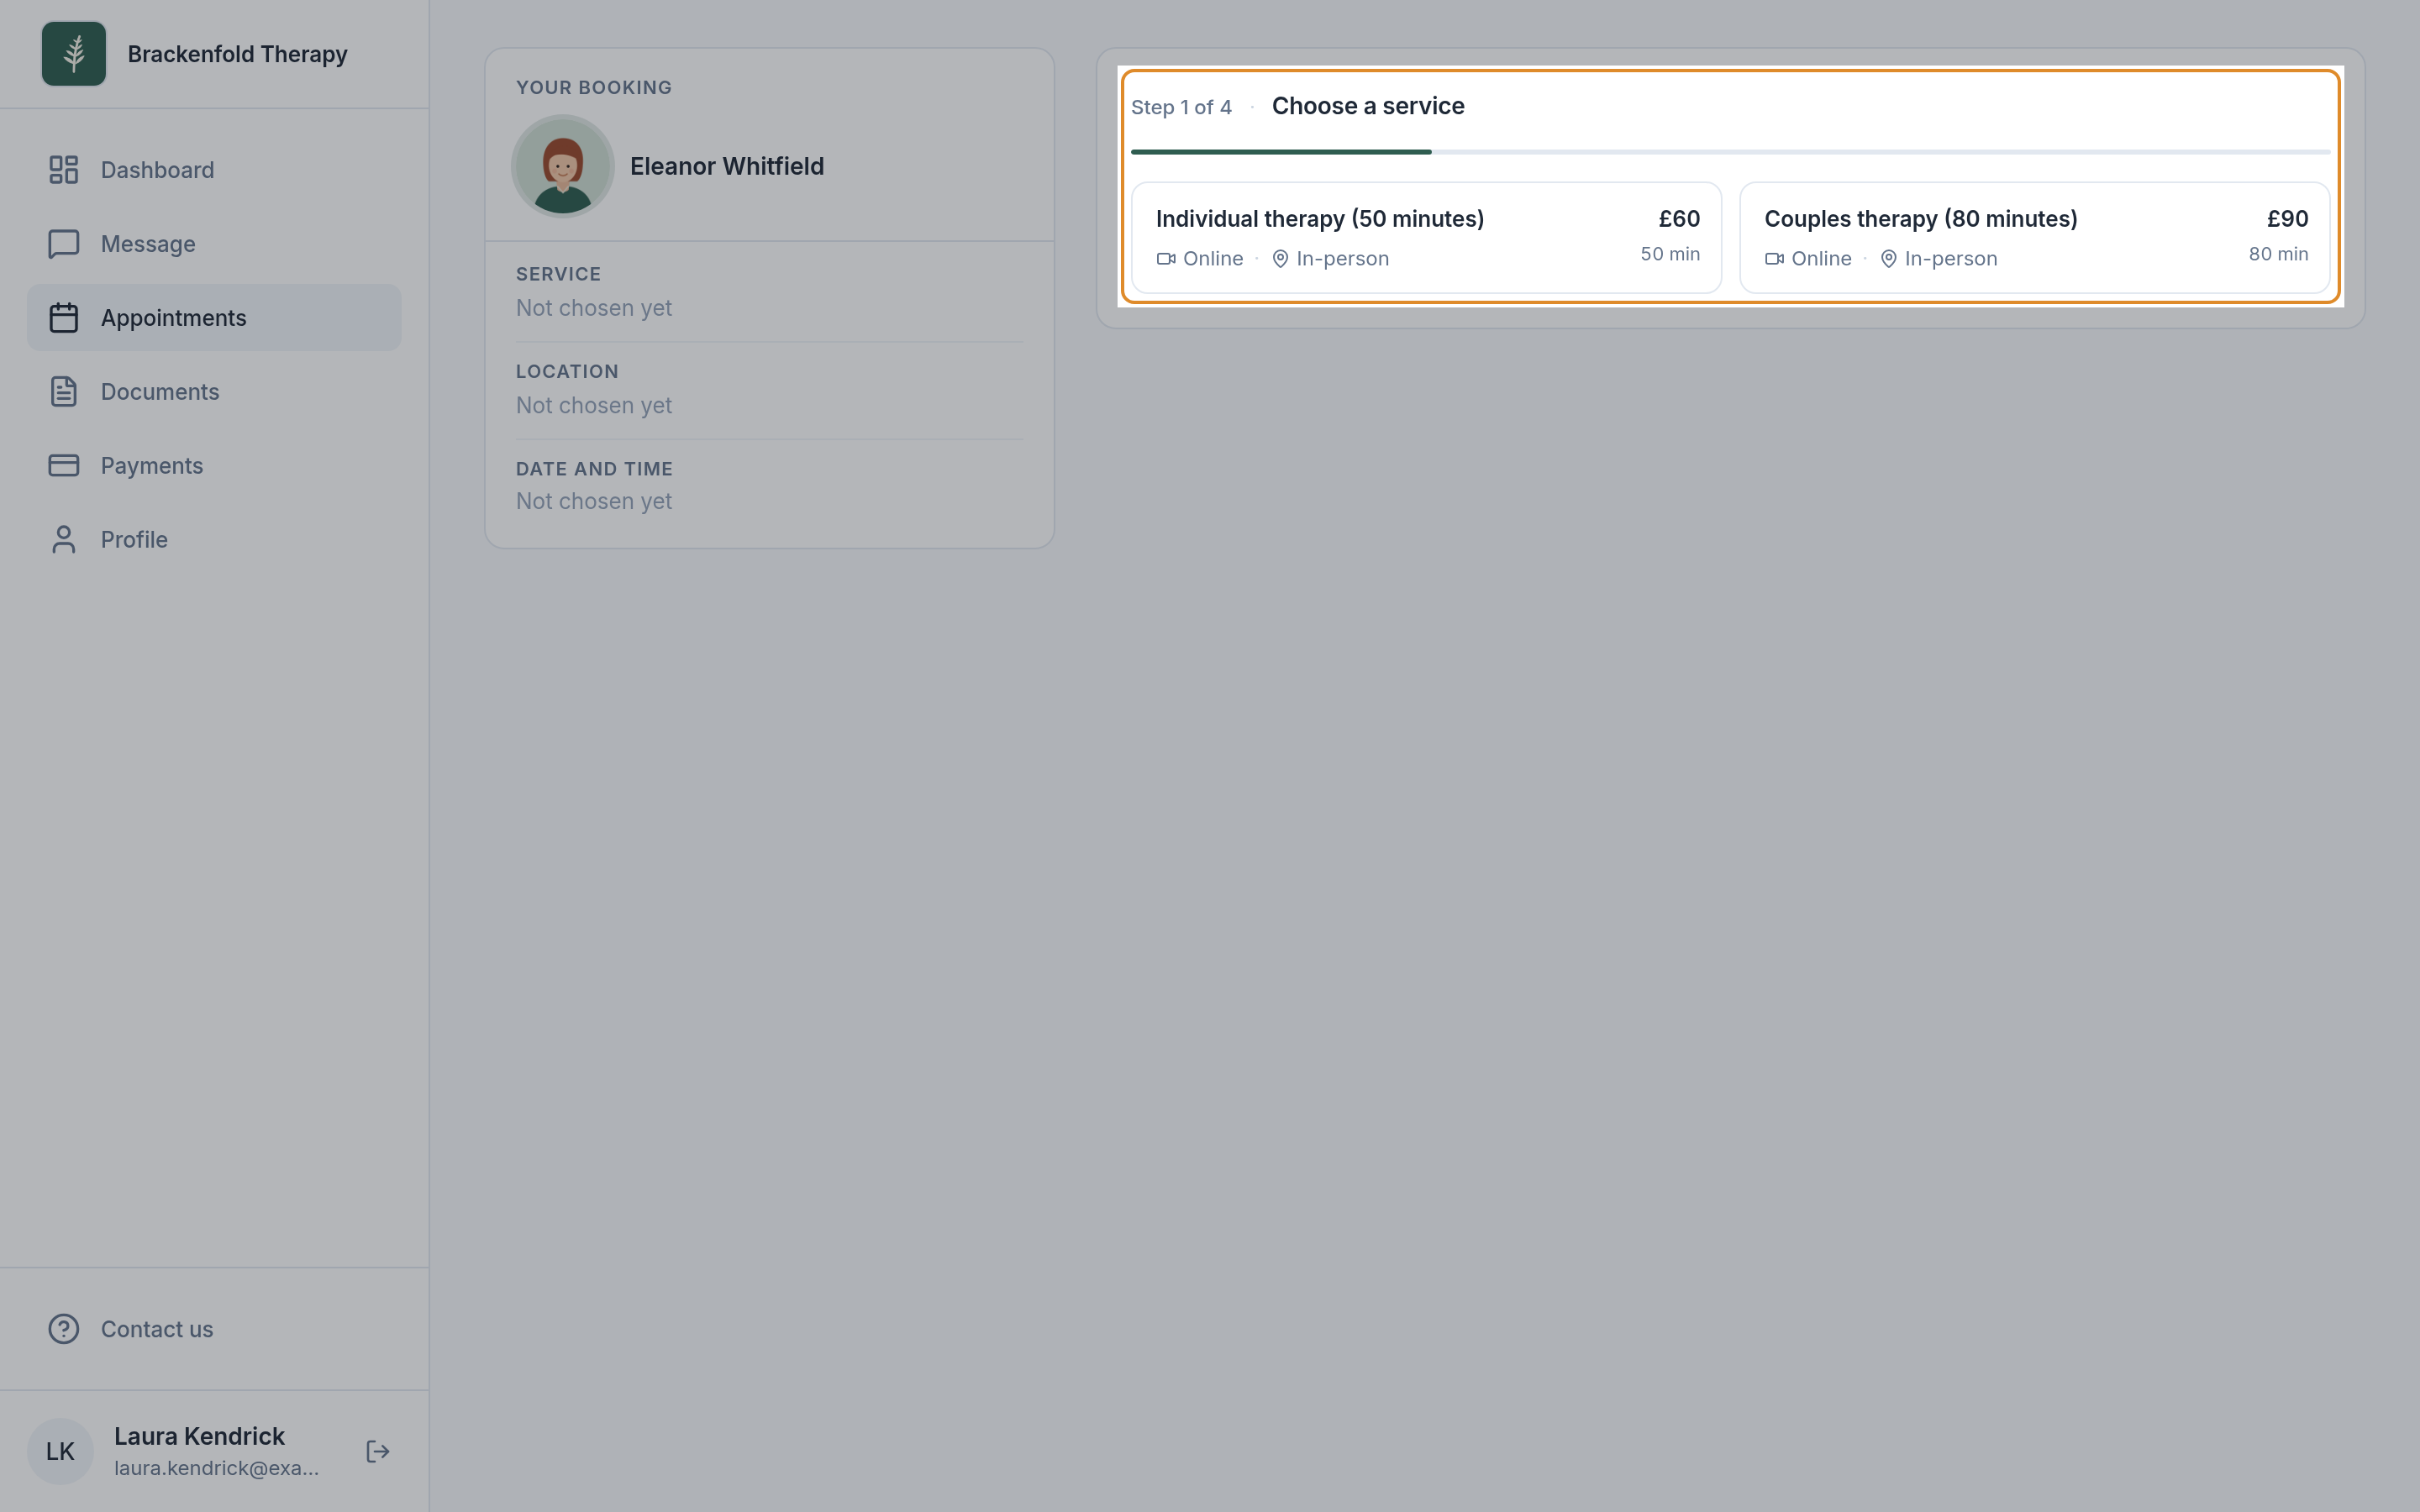
Next, the client is offered the locations that are on the service's AVAILABLE AT list and that the practitioner takes online bookings at, then slots as long as the service's duration. New clients pay the service's standard price; an existing client who has signed in pays their own fee if you have set one. See Letting clients book online.
On invoices
A session's invoice uses the rate the session was booked at. An invoice keeps the amounts it was raised with, so changing a service's price does not change invoices you have already raised. When you create an invoice by hand, the first line starts on the client's usual service, or the service of their last session, at their own fee if they have one. See Creating and sending an invoice.
Reduced or individual fees for particular clients
You can set a client's own fee once, on their record, or change the Rate on a booking.
Set a client's own fee
- Open the client's record from Clients.
- Find the Services box, which shows what the client can see as a booking option, and what they pay.
- Type the client's fee in the box beside the service, then press Enter or click away. Their own fee is shown in bold, with your standard fee beside it.
- To mark the service they book every time, select Make usual. It then shows Usual.
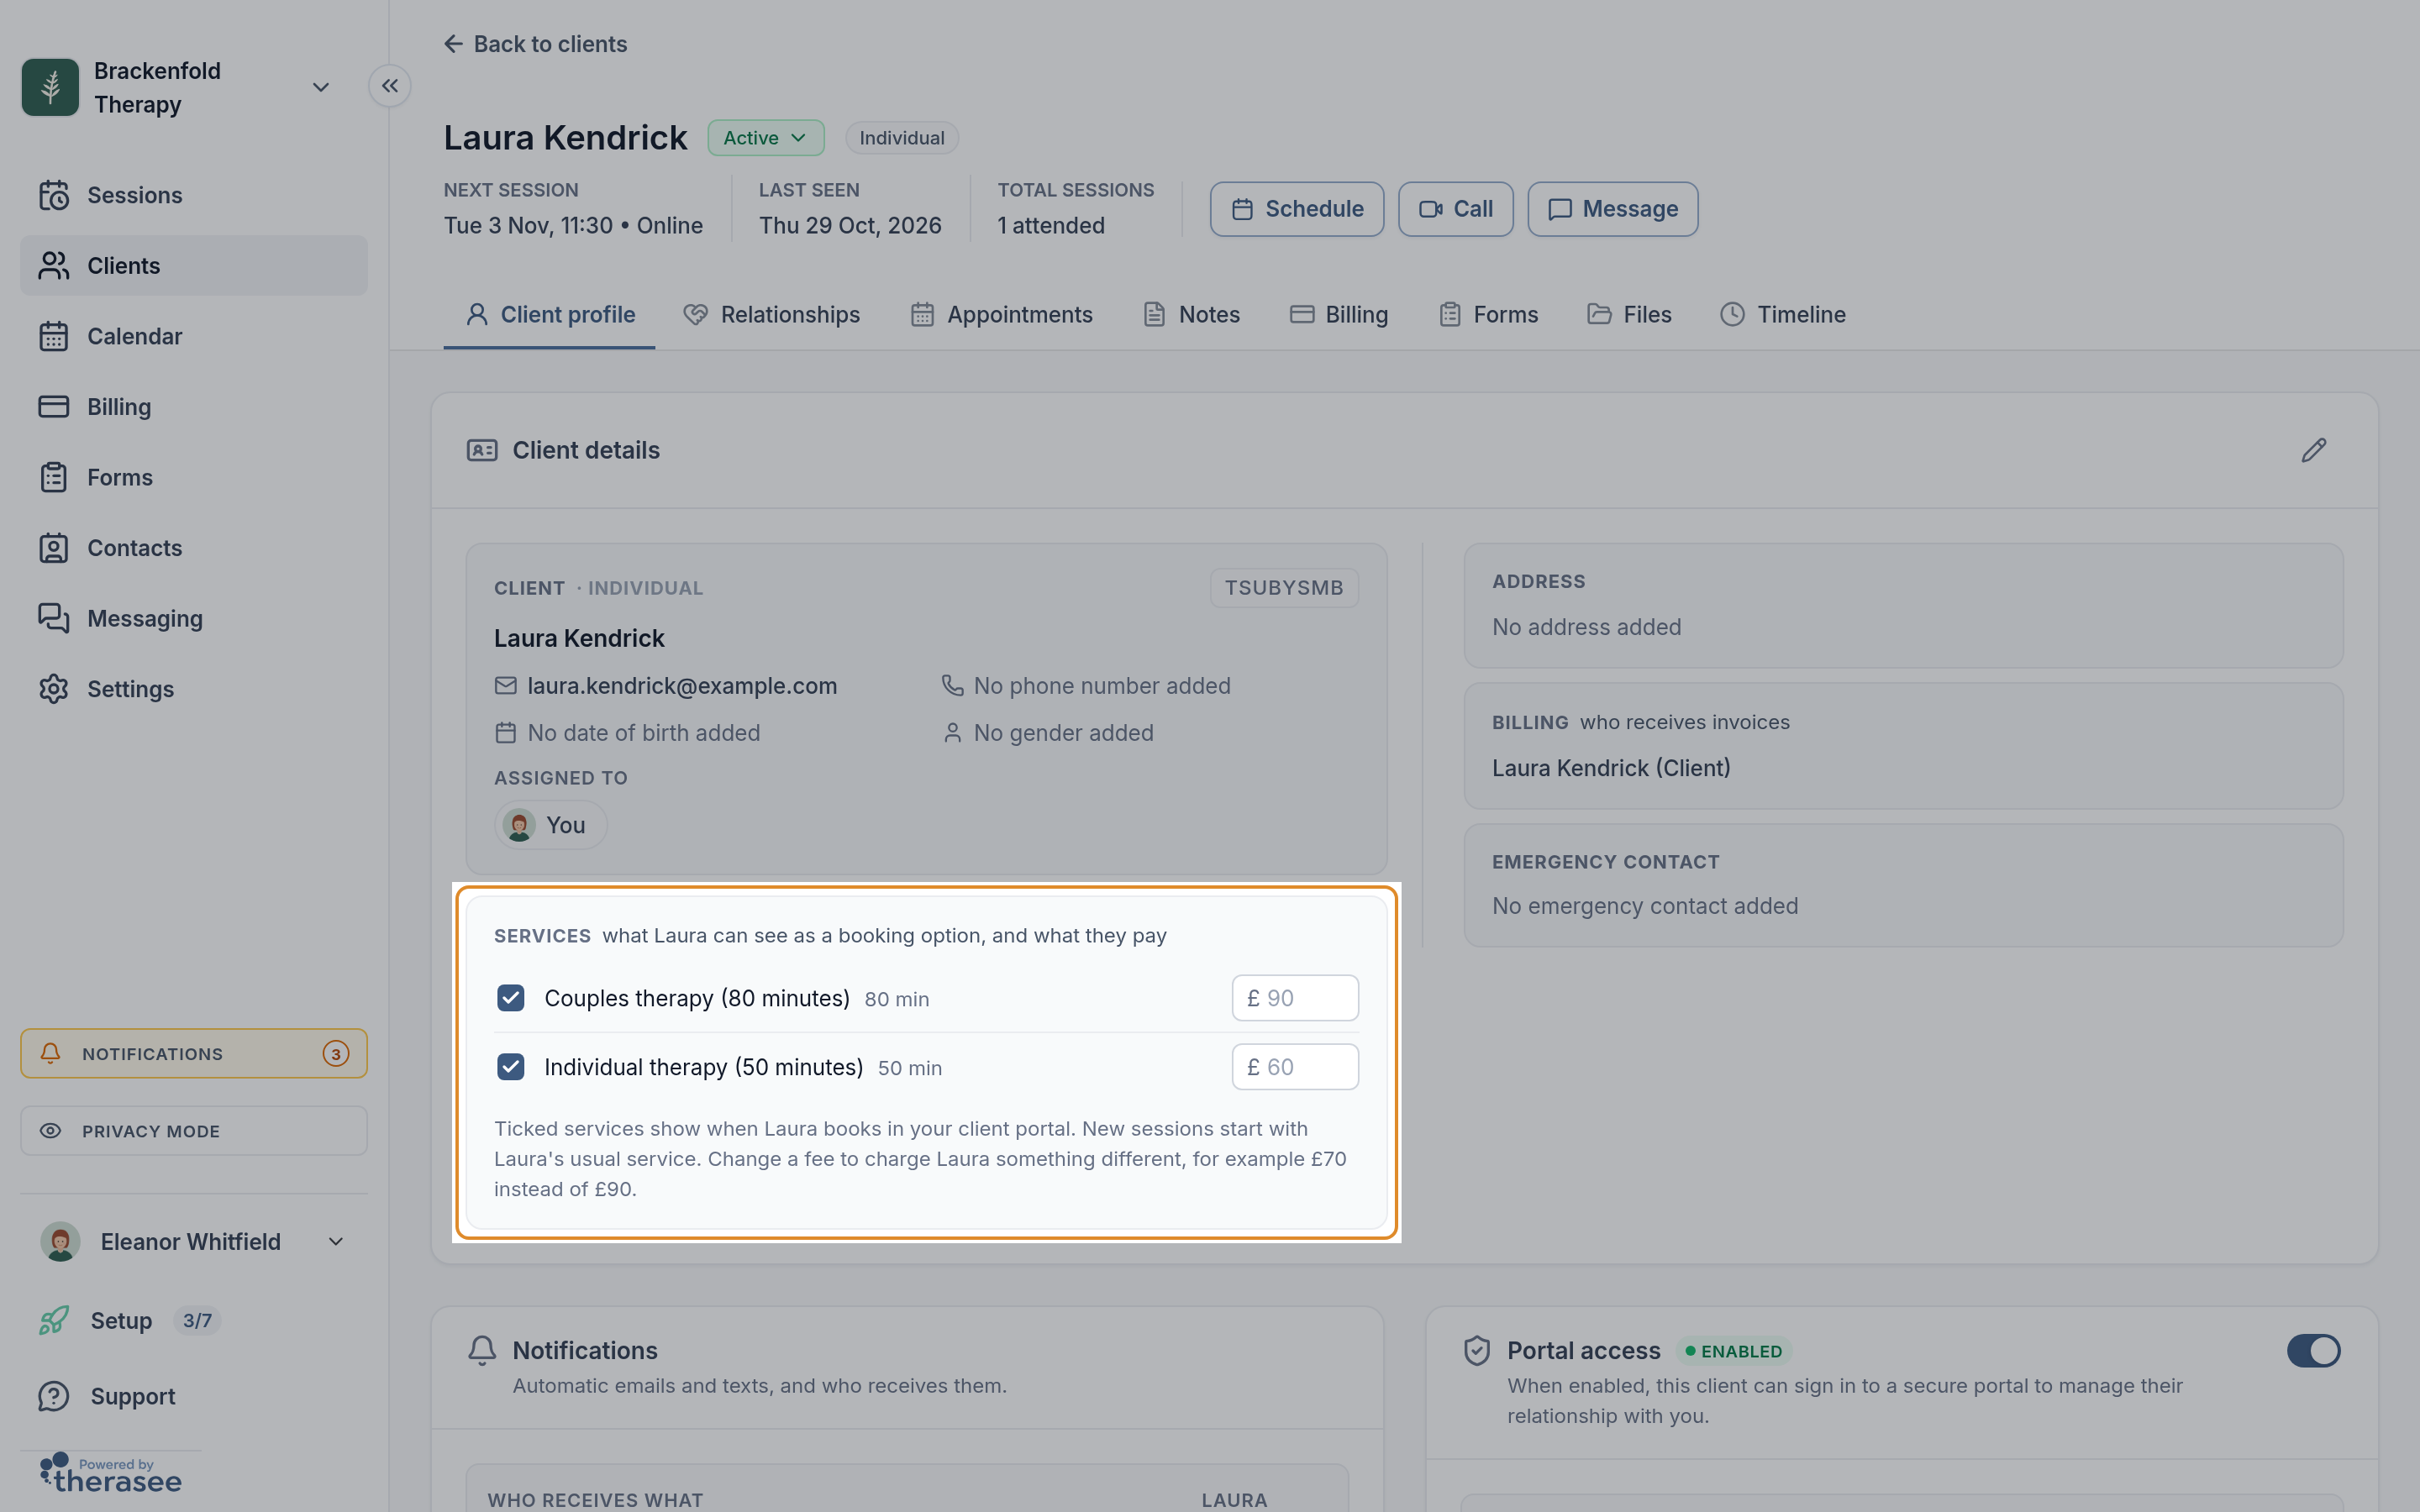
New sessions you book for that client then start with their usual service and their own fee, and so does the first line of an invoice you create for them. When they book online while signed in to your client portal, they see and pay their own fee. Sessions already booked keep the rate they were booked at; to move them onto the new fee, see Changing your prices from a date below.
Change the rate when you book
For an agreed fee on one booking, book the session with your usual service and change the Rate on the booking form before you save. If you set the session to repeat, every session in the series is booked at that rate, so for a client on a reduced fee for weekly sessions you only enter it once.
Choosing what clients can book online
Each practitioner chooses who can book each of their services themselves.
- Go to Settings, My settings, Booking.
- Find the What clients can book card. Each service assigned to you has a row showing where it is Available at.
- Under New clients, choose Booking page (anyone can book it from your booking page), Link only (hidden from the page, but anyone with the service's link can book it) or Not offered.
- Under Existing clients, choose All clients (every existing client, once signed in), Selected clients (only clients you tick in the Services box on their record) or Not offered.
- Each change saves straight away.
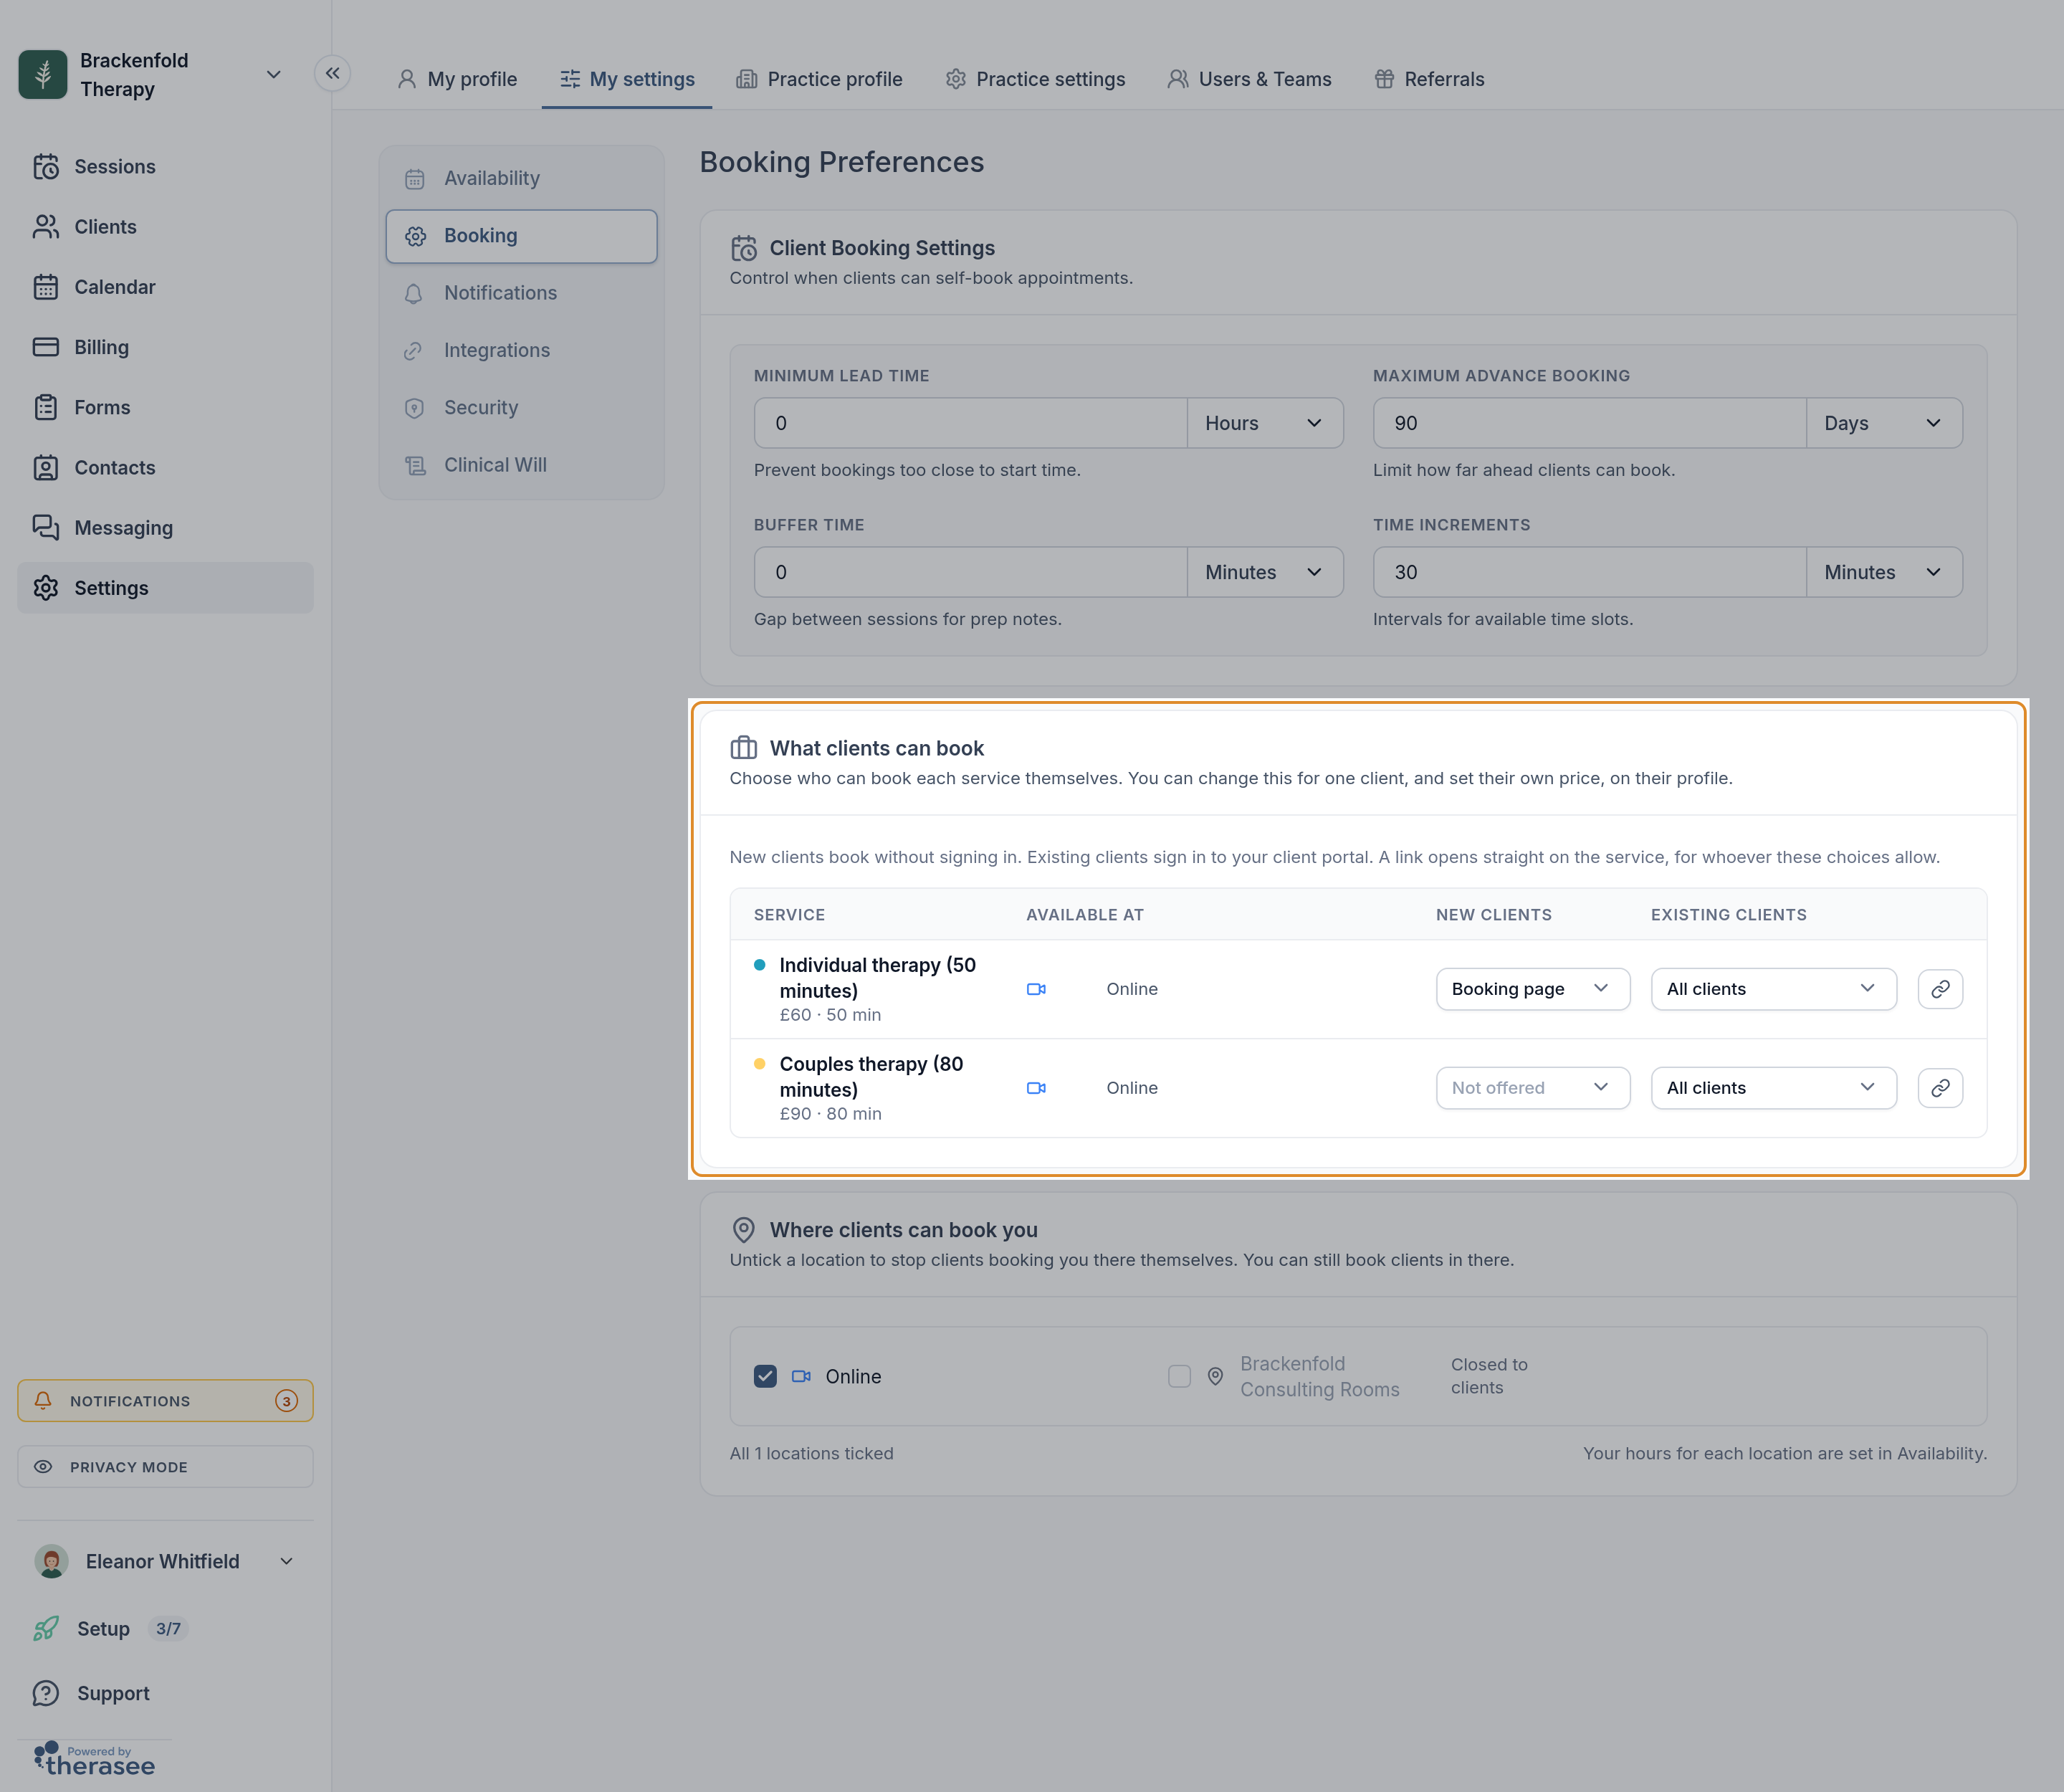
The copy icon at the end of a row copies a link that opens your booking page on that service. Services that neither new nor existing clients can book are listed together at the bottom: clients cannot book these themselves, but you can still book them in. Under Where clients can book you, untick a location to stop clients booking you there themselves; you can still book clients in there.
Locations and services
Your locations are set up under Settings, Practice profile, Locations. Each location has its own list of practitioners. For an in-person location, the ⋯ menu has Stop clients booking here; the location then shows Clients can't book here and is not offered to clients booking online, though you can still book sessions there. Online and telephone locations are offered whenever they are switched on.
A service set to All locations is offered at every location, including ones you add later. If a service is limited to particular locations and you add a new one, open the service, add the location under AVAILABLE AT and click Save.
Your weekly hours, and custom hours for particular dates, can also be limited to certain services; see Setting your working hours and Changing your hours for particular dates.
Arranging your booking page
With more than one service, click Arrange booking page above the table. Drag a service to where you want it: clients see your services in this order on your booking page, and the Services list follows it too. Each move saves as you go; click Done when you have finished. The first service in this order is also where the booking form starts when nothing else applies.
Editing a service
- On the Services tab, click the service's name, or click the ⋯ menu at the end of its row and choose Edit.
- The Edit service panel opens with the current details. Make your changes. Save becomes available once something has changed.
- Click Save.
What happens to sessions already booked
- Price. Sessions already booked, including every session in a repeating series, keep the rate they were booked at. The new price applies to sessions you book from now on and to new online bookings.
- Duration. Booked sessions keep their start and end times. The new length applies to new bookings.
- Tax/VAT. Invoices raised automatically after you save, including for sessions already booked, use the service's new tax setting. Invoices already raised keep their amounts.
- Name and colour. These follow the service, so existing sessions show the new name and calendar colour.
- Practitioners and locations. These affect what clients can book from now on. Appointments clients have already booked stay booked.
Nobody is notified when you edit a service.
Changing your prices from a date
When you change your fees, there are two separate things to update: the service's price, which applies to new bookings, and any sessions already booked, which keep their own rate until you change them.
- Change the service's price. Edit the service, enter the new Price and click Save. Sessions booked from now on, by you or by clients online, use the new price, unless a client has their own fee. Nothing already booked changes, and existing invoices stay as they are.
- Move existing repeating sessions onto the new price, if you want to. On your calendar, click the first session that should cost the new amount, then click the pencil icon (Edit event). The Edit appointment panel opens showing that session's current Rate.
- Enter the new amount in Rate and click Save.
- A box titled Edit recurring event asks how the change applies. Choose This and following events ("This and every later session change. Earlier sessions stay as they are.") and click Continue. Choose This event instead to change just that one session.
- If any of those sessions already have invoices, a box asks Update the invoices too? (or Update the invoice too? for one), listing each invoice number and session date with the old and new amounts. Choose Update the invoices to set the new fee and recalculate any tax, or Keep them as they are.
- Finish saving as usual. On the last step you choose whether the client is sent an update about the change.
What happens to invoices when you change a session's fee:
- Only unpaid invoices can be updated. A paid invoice is listed as keeping the old details, because that money has already been taken. If an adjustment is needed, handle it in Billing.
- With This and following events, sessions that have already happened are left out, so their invoices remain a record of what you charged.
- An updated invoice keeps its invoice number and due date, and is not sent again. You can share it from Billing if you want the client to see it.
- Invoices raised automatically for later sessions in the series use the new rate once you have saved it.
Repeat this for each client whose ongoing sessions should move to the new price. Clients you have agreed to keep on their current fee can simply be left as they are; setting that fee as their own fee on their record keeps new sessions on it too.
Deleting a service
- Click the ⋯ menu at the end of the service's row and choose Delete.
- A box asks Delete service? and warns This can't be undone. Click Delete service to confirm, or Cancel.
Deleting removes the service completely; there is no archive. It disappears from the booking form and from online booking. Sessions already booked with it keep their name and rate. Your practice always needs at least one service, so Delete does not appear when only one is left.
If you want to stop clients booking a service but still book it yourself, set it to Not offered for both new and existing clients under What clients can book instead of deleting it.
Was this helpful?