Creating and sending an invoice
Create invoices from Billing, from a session or automatically when you schedule, bill a company or someone other than the client, put several sessions on one invoice, add payment instructions, send by email or SMS, set reminders and record payment.
Updated 4 November 2026
An invoice can start from the Billing page, from a session, or automatically when you schedule. However it starts, it appears in Billing and on the client's record, and you send, chase, mark as paid and download it in the same way.
Before your first invoice
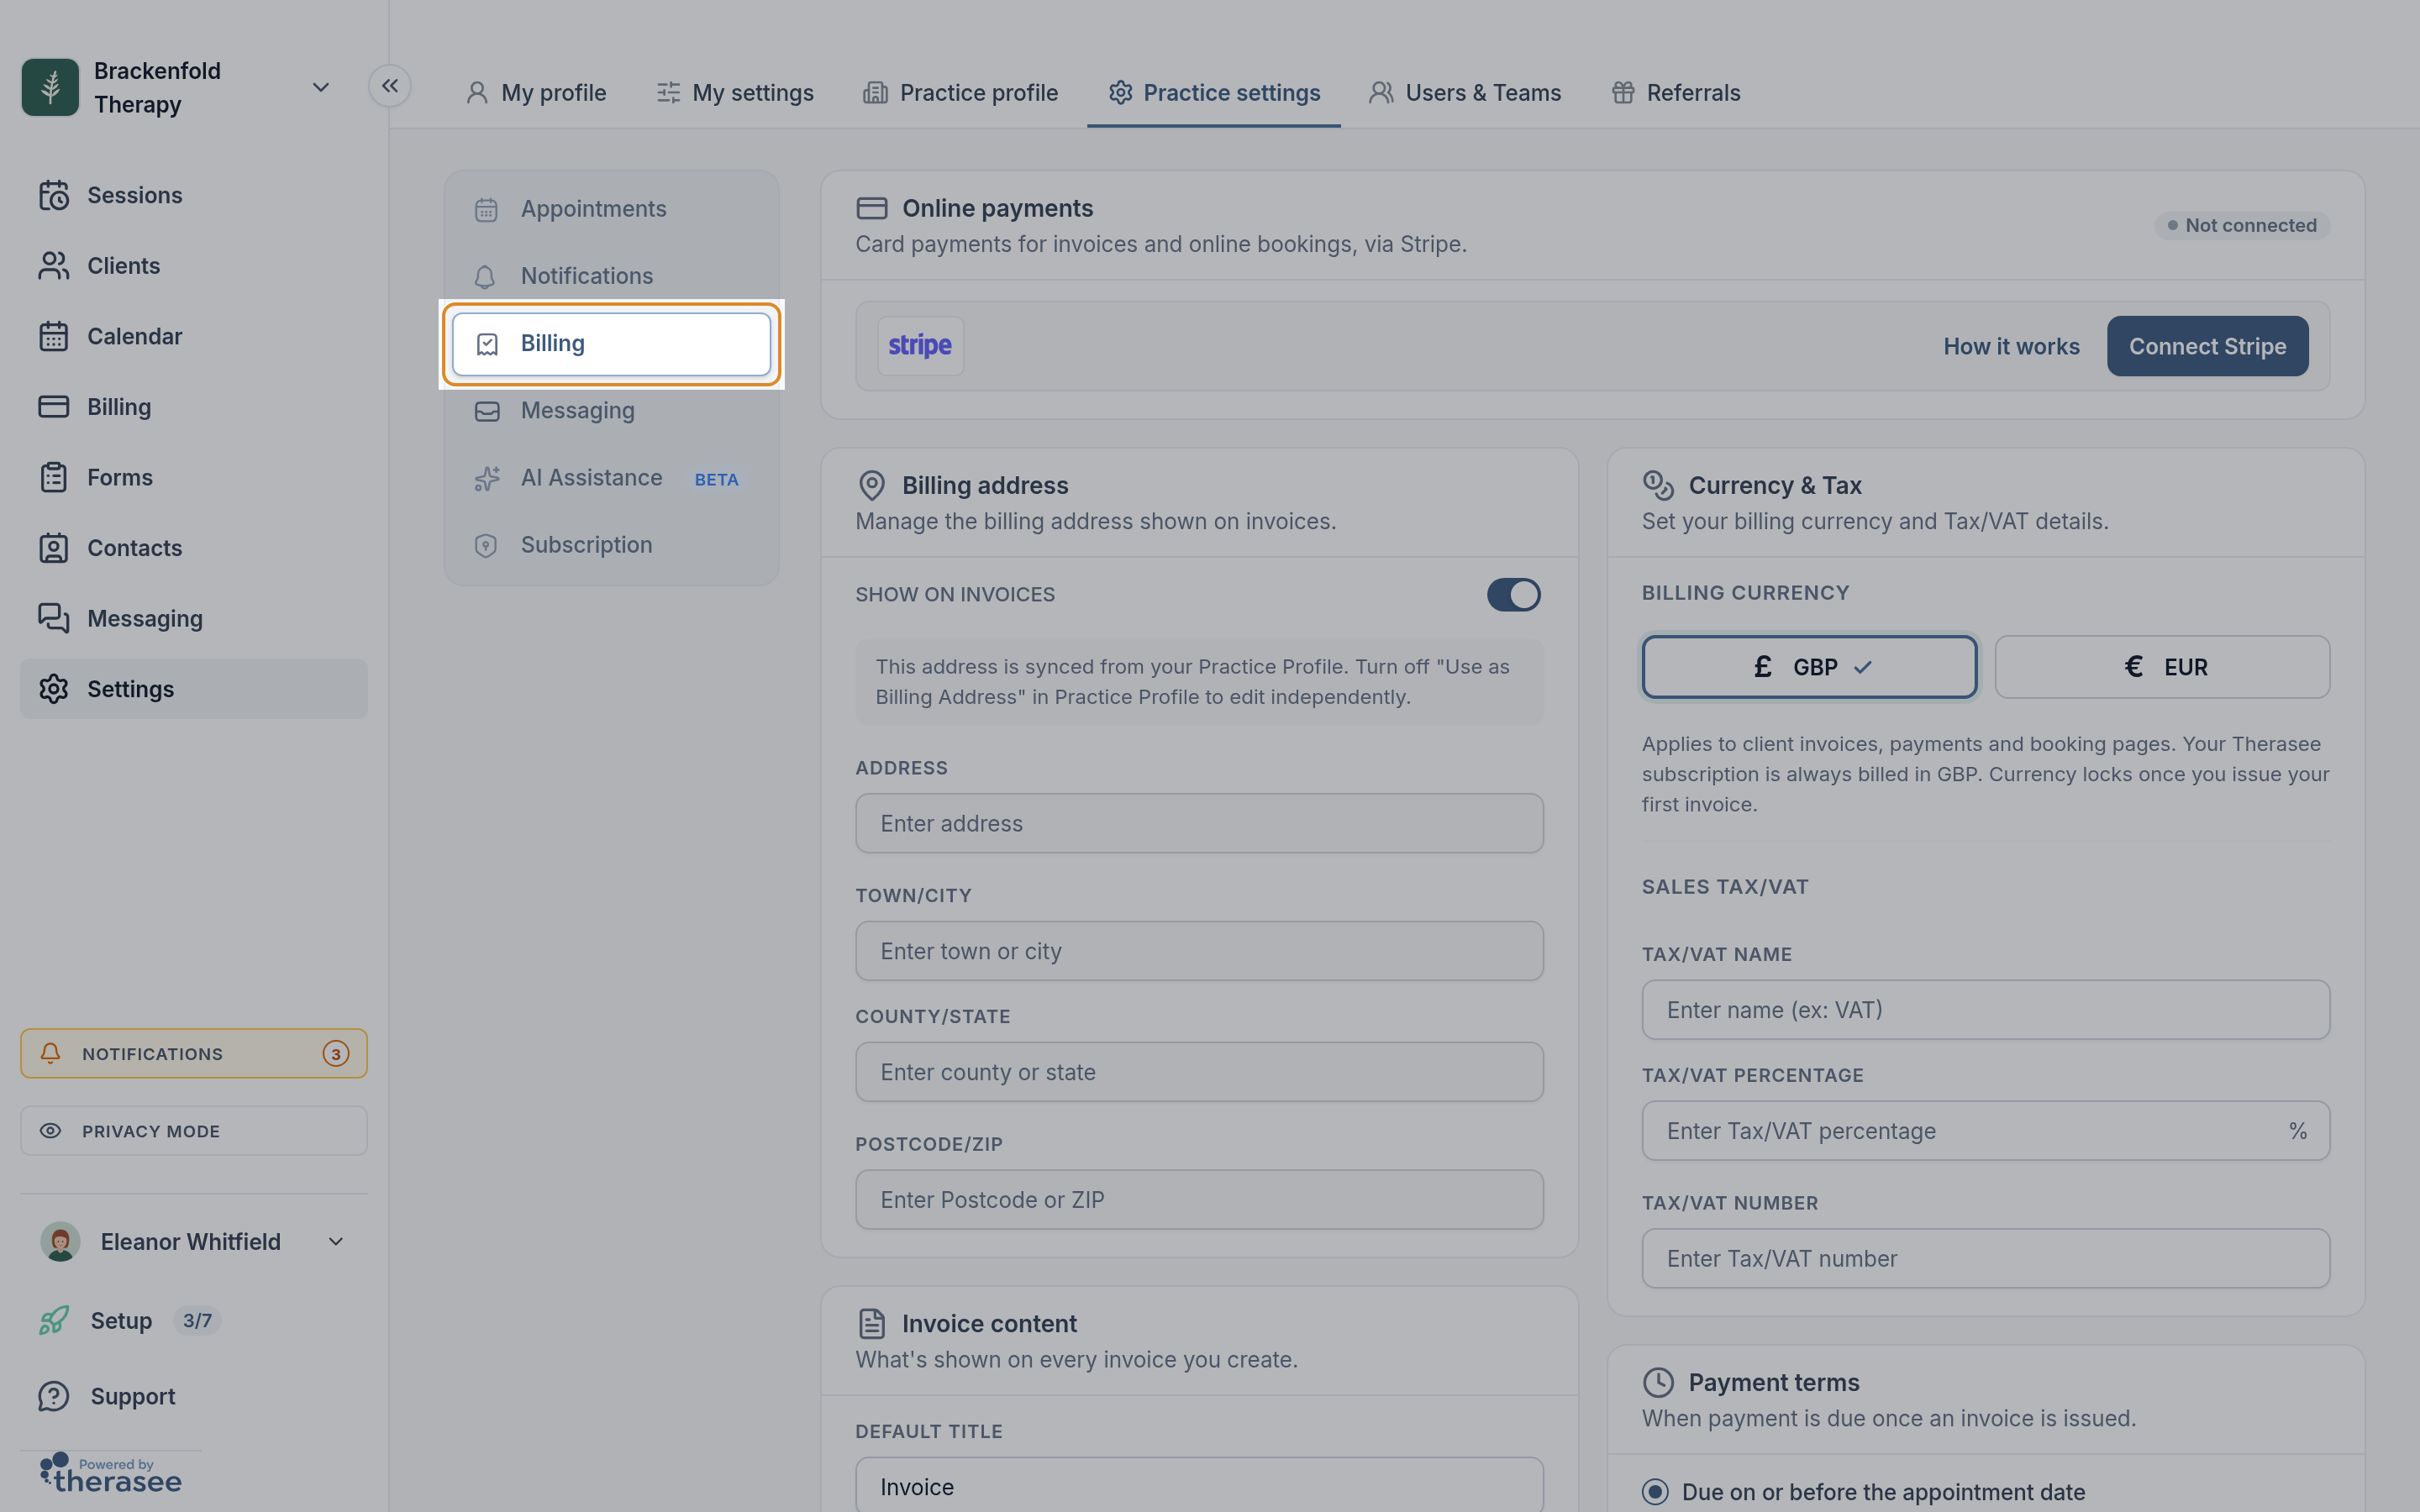
Check these once under Settings, Practice settings, Billing. Each card has its own save.
- Billing address: printed under your practice name. Turn the Show on invoices switch off if you would rather invoices carry no address.
- Invoice content: Default title, Default note (you can change it on each invoice), Website and Invoice footer, which print at the bottom of every invoice PDF. The default note is the place for payment instructions such as your bank details (see "Payment instructions" below).
- Currency & Tax: your Billing currency, and under Sales Tax/VAT the Tax/VAT name, Tax/VAT percentage and Tax/VAT number. Tax is added only to services that have tax turned on (see Setting up your services). Set the currency before your first invoice: after that it is fixed, and support can help if you need to change it.
- Payment terms: when payment is due. Choose Due on or before the appointment date, Due immediately when the invoice is issued, Due a set number of days after the invoice is issued, or Due before or after the appointment. This fills in the due date on new invoices.
- Online payments and Invoice generation: covered below.
How invoices look is set under Settings, Practice profile, Branding, in Invoice appearance: Layout, Invoice logo, Logo size, Background and Density. It applies on screen, in the client portal and on the PDF, and saves as you click.
Creating an invoice from Billing
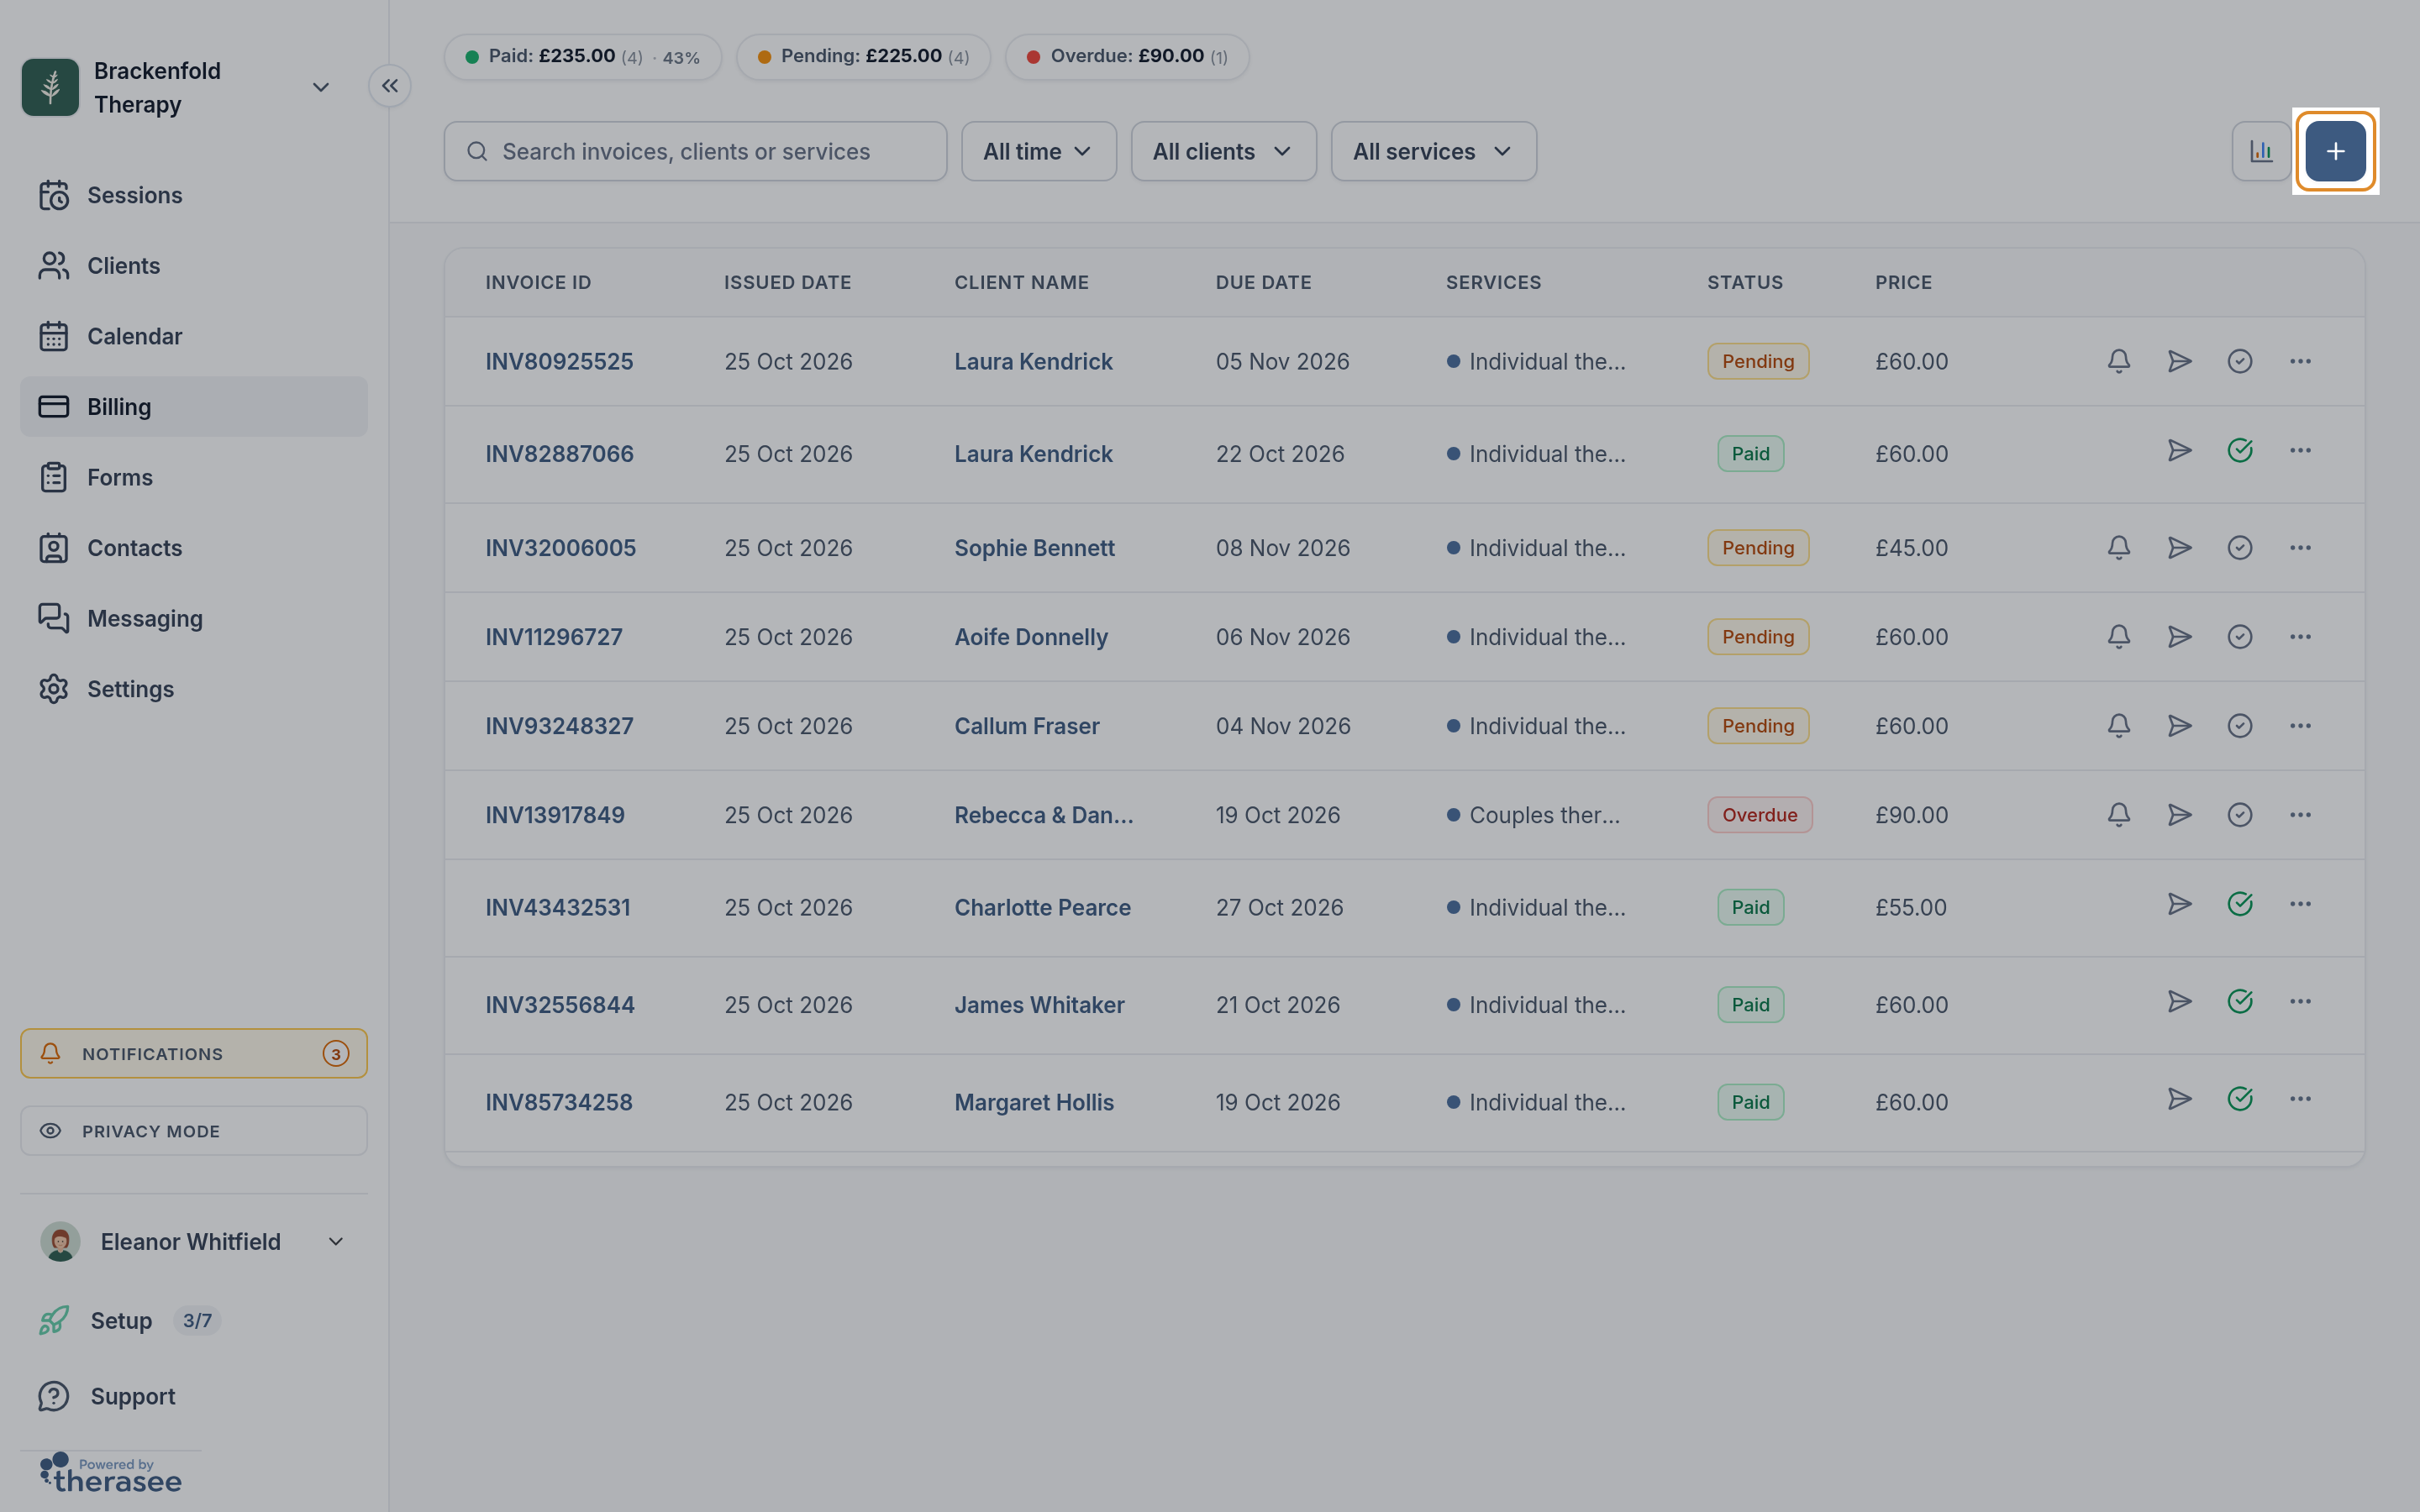
- Open Billing and click the + button at the top right (its tooltip reads Create). A Create invoice panel opens.
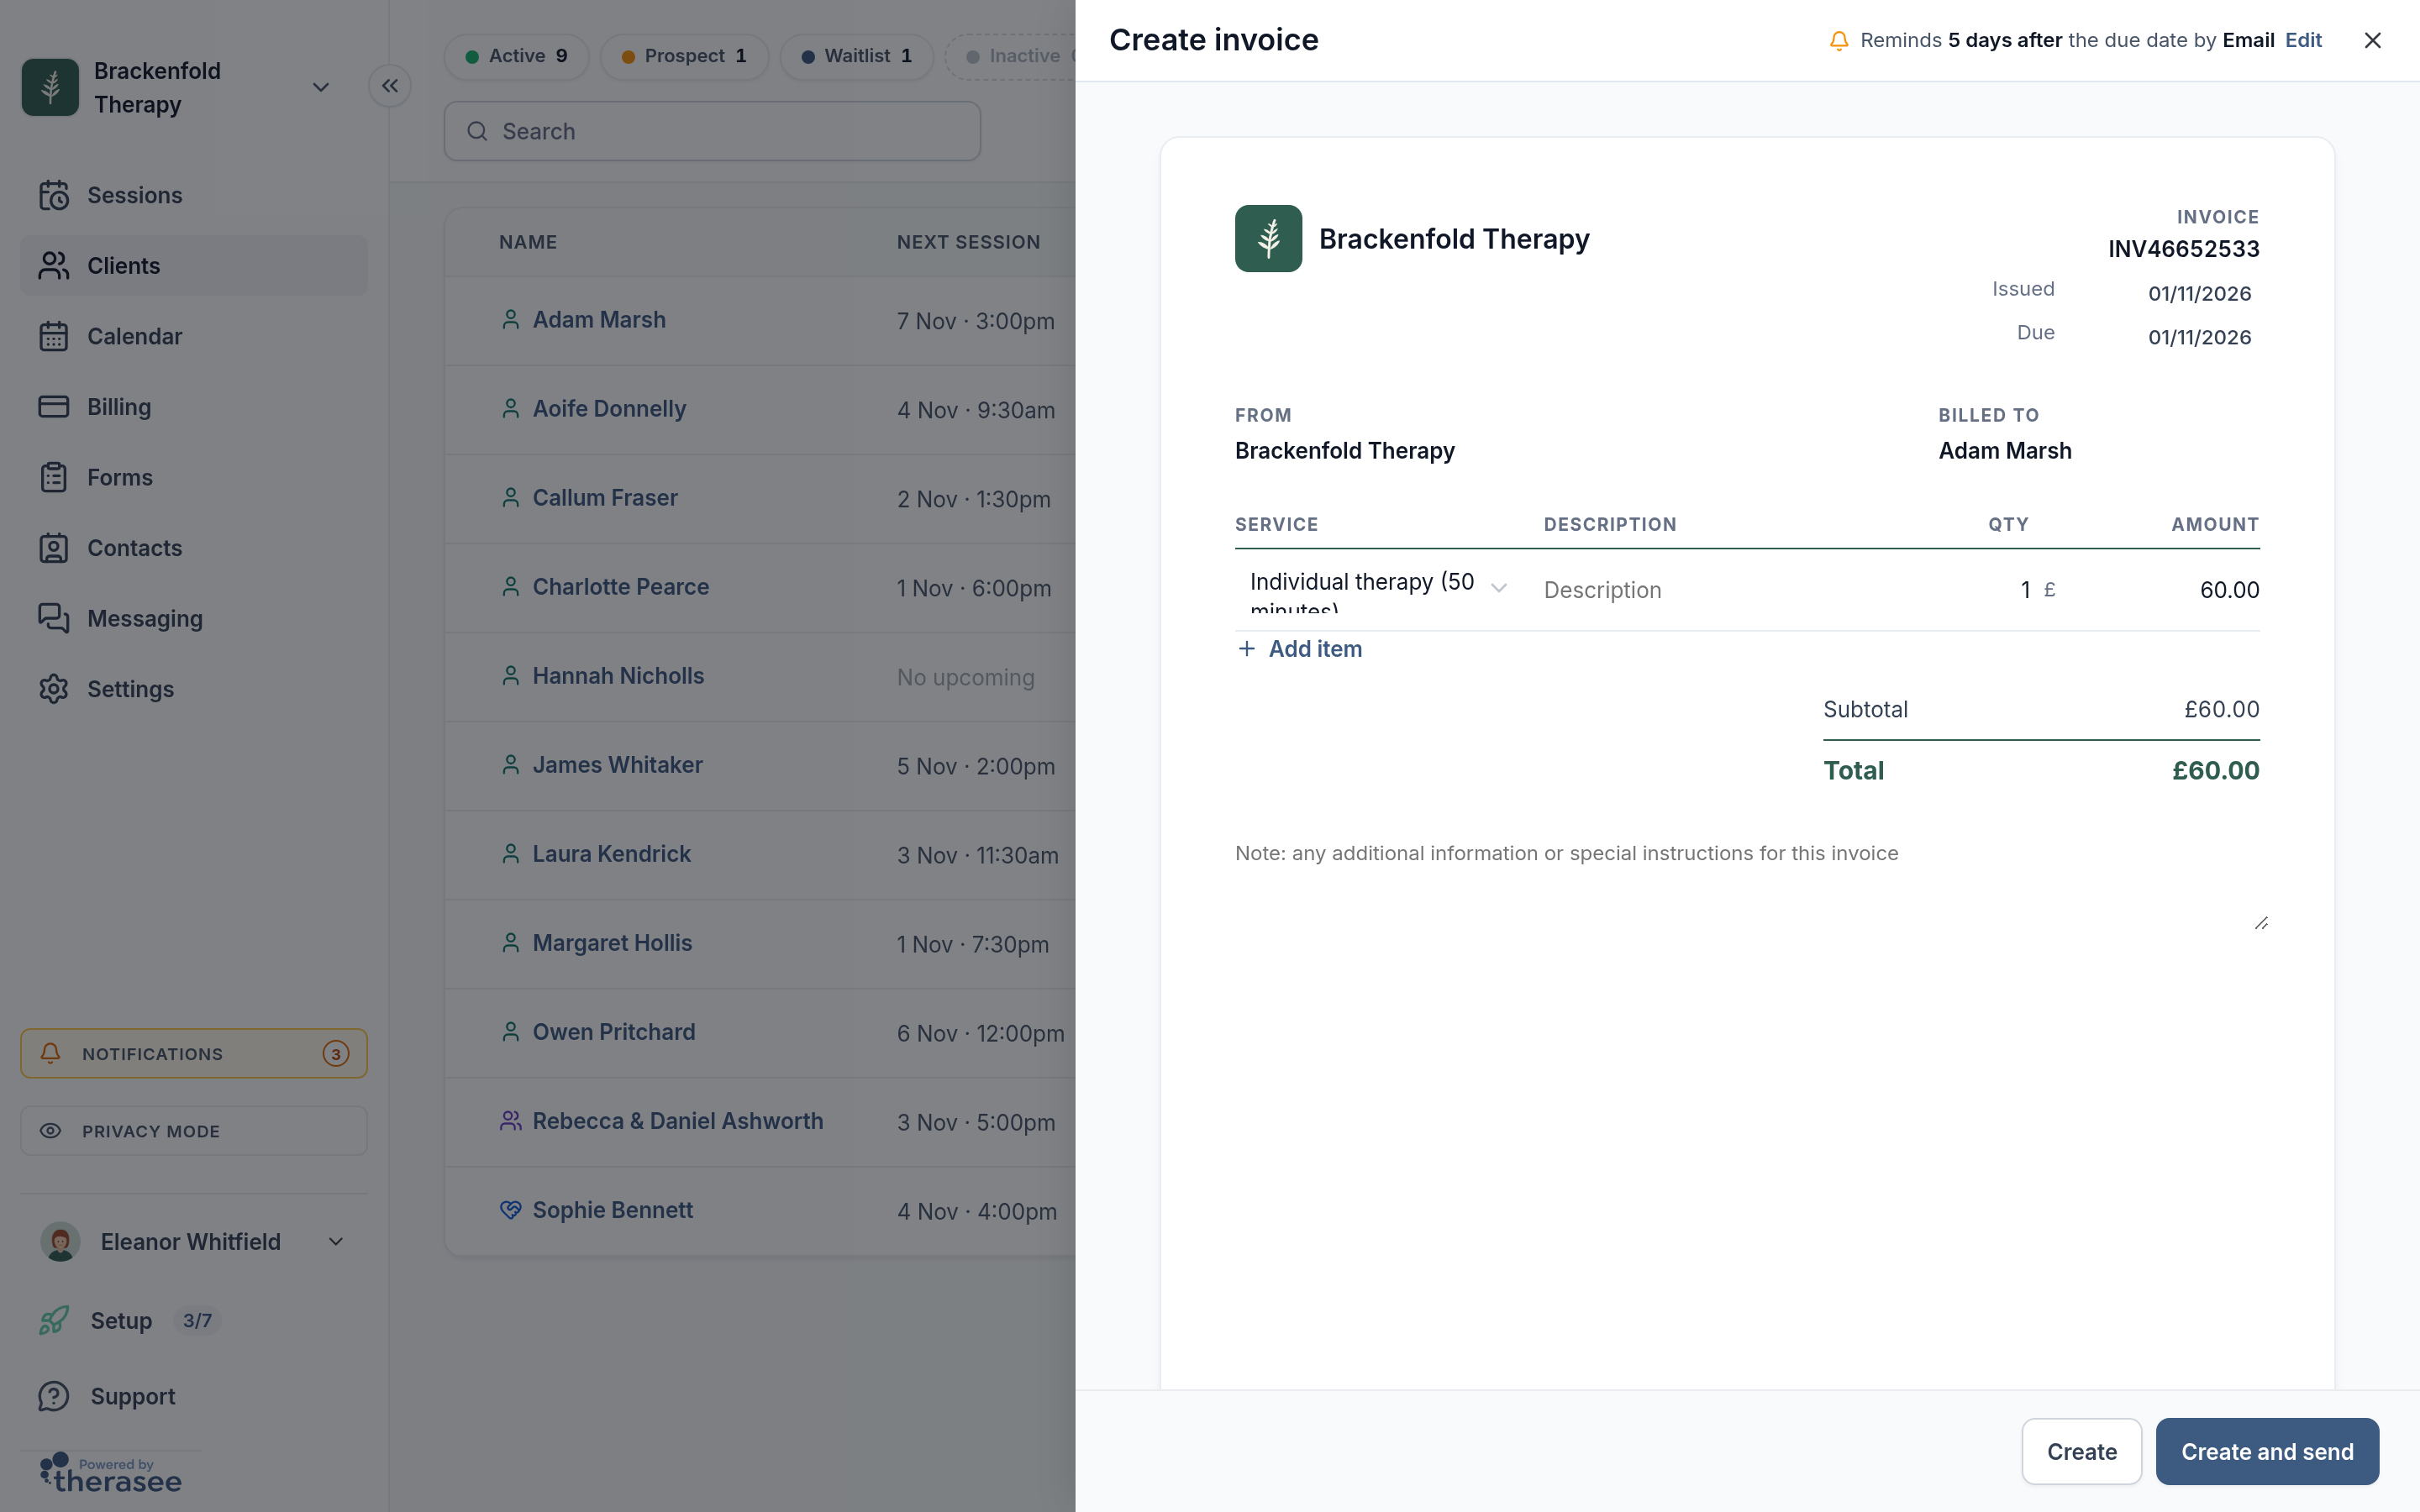
- Under Billed to, type in the Search client box and pick the client. Their address fills in. If you pick the wrong person, click Change client.
- Fill in the rest of the form (field by field below), then click Create or Create and send.
To start with the client filled in, use the receipt icon (Add invoice) on their row in Clients, or + on the Billing tab of their record.
Creating an invoice from a session
- On the Sessions list, click the icon in the Finance column (tooltip Create invoice).
- On the Calendar, open the appointment and click Create invoice next to Invoice.
The form opens with the client, service, price and session date filled in, and a due date worked out from the session. Once a session has an invoice, the same place shows the invoice and its status instead; click it to open the invoice. A session with no fee shows No charge and has nothing to invoice.
The invoice form, field by field
The form is laid out like the finished invoice.
- Invoice number: at the top, pre-filled with a number such as INV12345678. You can type your own.
- Issued: today by default. It cannot be a future date.
- Due: filled from your payment terms. You can change it to any date from today.
- From: your practice details, from your settings.
- Client and Billed to: who the invoice is for and who pays. If a client has a billing contact (for example a parent, an employer or an insurer), the invoice is billed to them; see "Billing a company or someone else" below. For a couple, Change payer bills this one invoice to the other partner.
- Service: the first line starts with the client's usual service, or the service of their last session, at the client's own price if they have one. Otherwise it starts with the first of your services that has a fee. Open the list to choose another. When the client has sessions that have not been invoiced yet, they appear first under Non invoiced, newest first, each with its date; choosing one ties that session to this invoice. Your services follow, with the client's own services listed first under This client's services when they have some.
- Description, Qty and Amount: change the wording, quantity or price for this line if you need to.
- Add item: adds another line, for example to bill several sessions together. The cross on a line removes it. Every line needs a service.
- Subtotal, tax and Total: worked out for you.
- Note: starts with your default note. Anything you type here appears on this invoice only, so it is the place for a reference a payer asks for, such as an authorisation code or policy number.
Billing a company or someone else
When someone other than the client pays, such as an employer, an employee assistance programme, a charity, an insurer or a parent, make them the client's billing contact. Invoices for that client are then addressed and sent to them. There are two parts: add the payer as a contact linked to the client, then choose them as the billing contact.
1. Add the payer as a contact
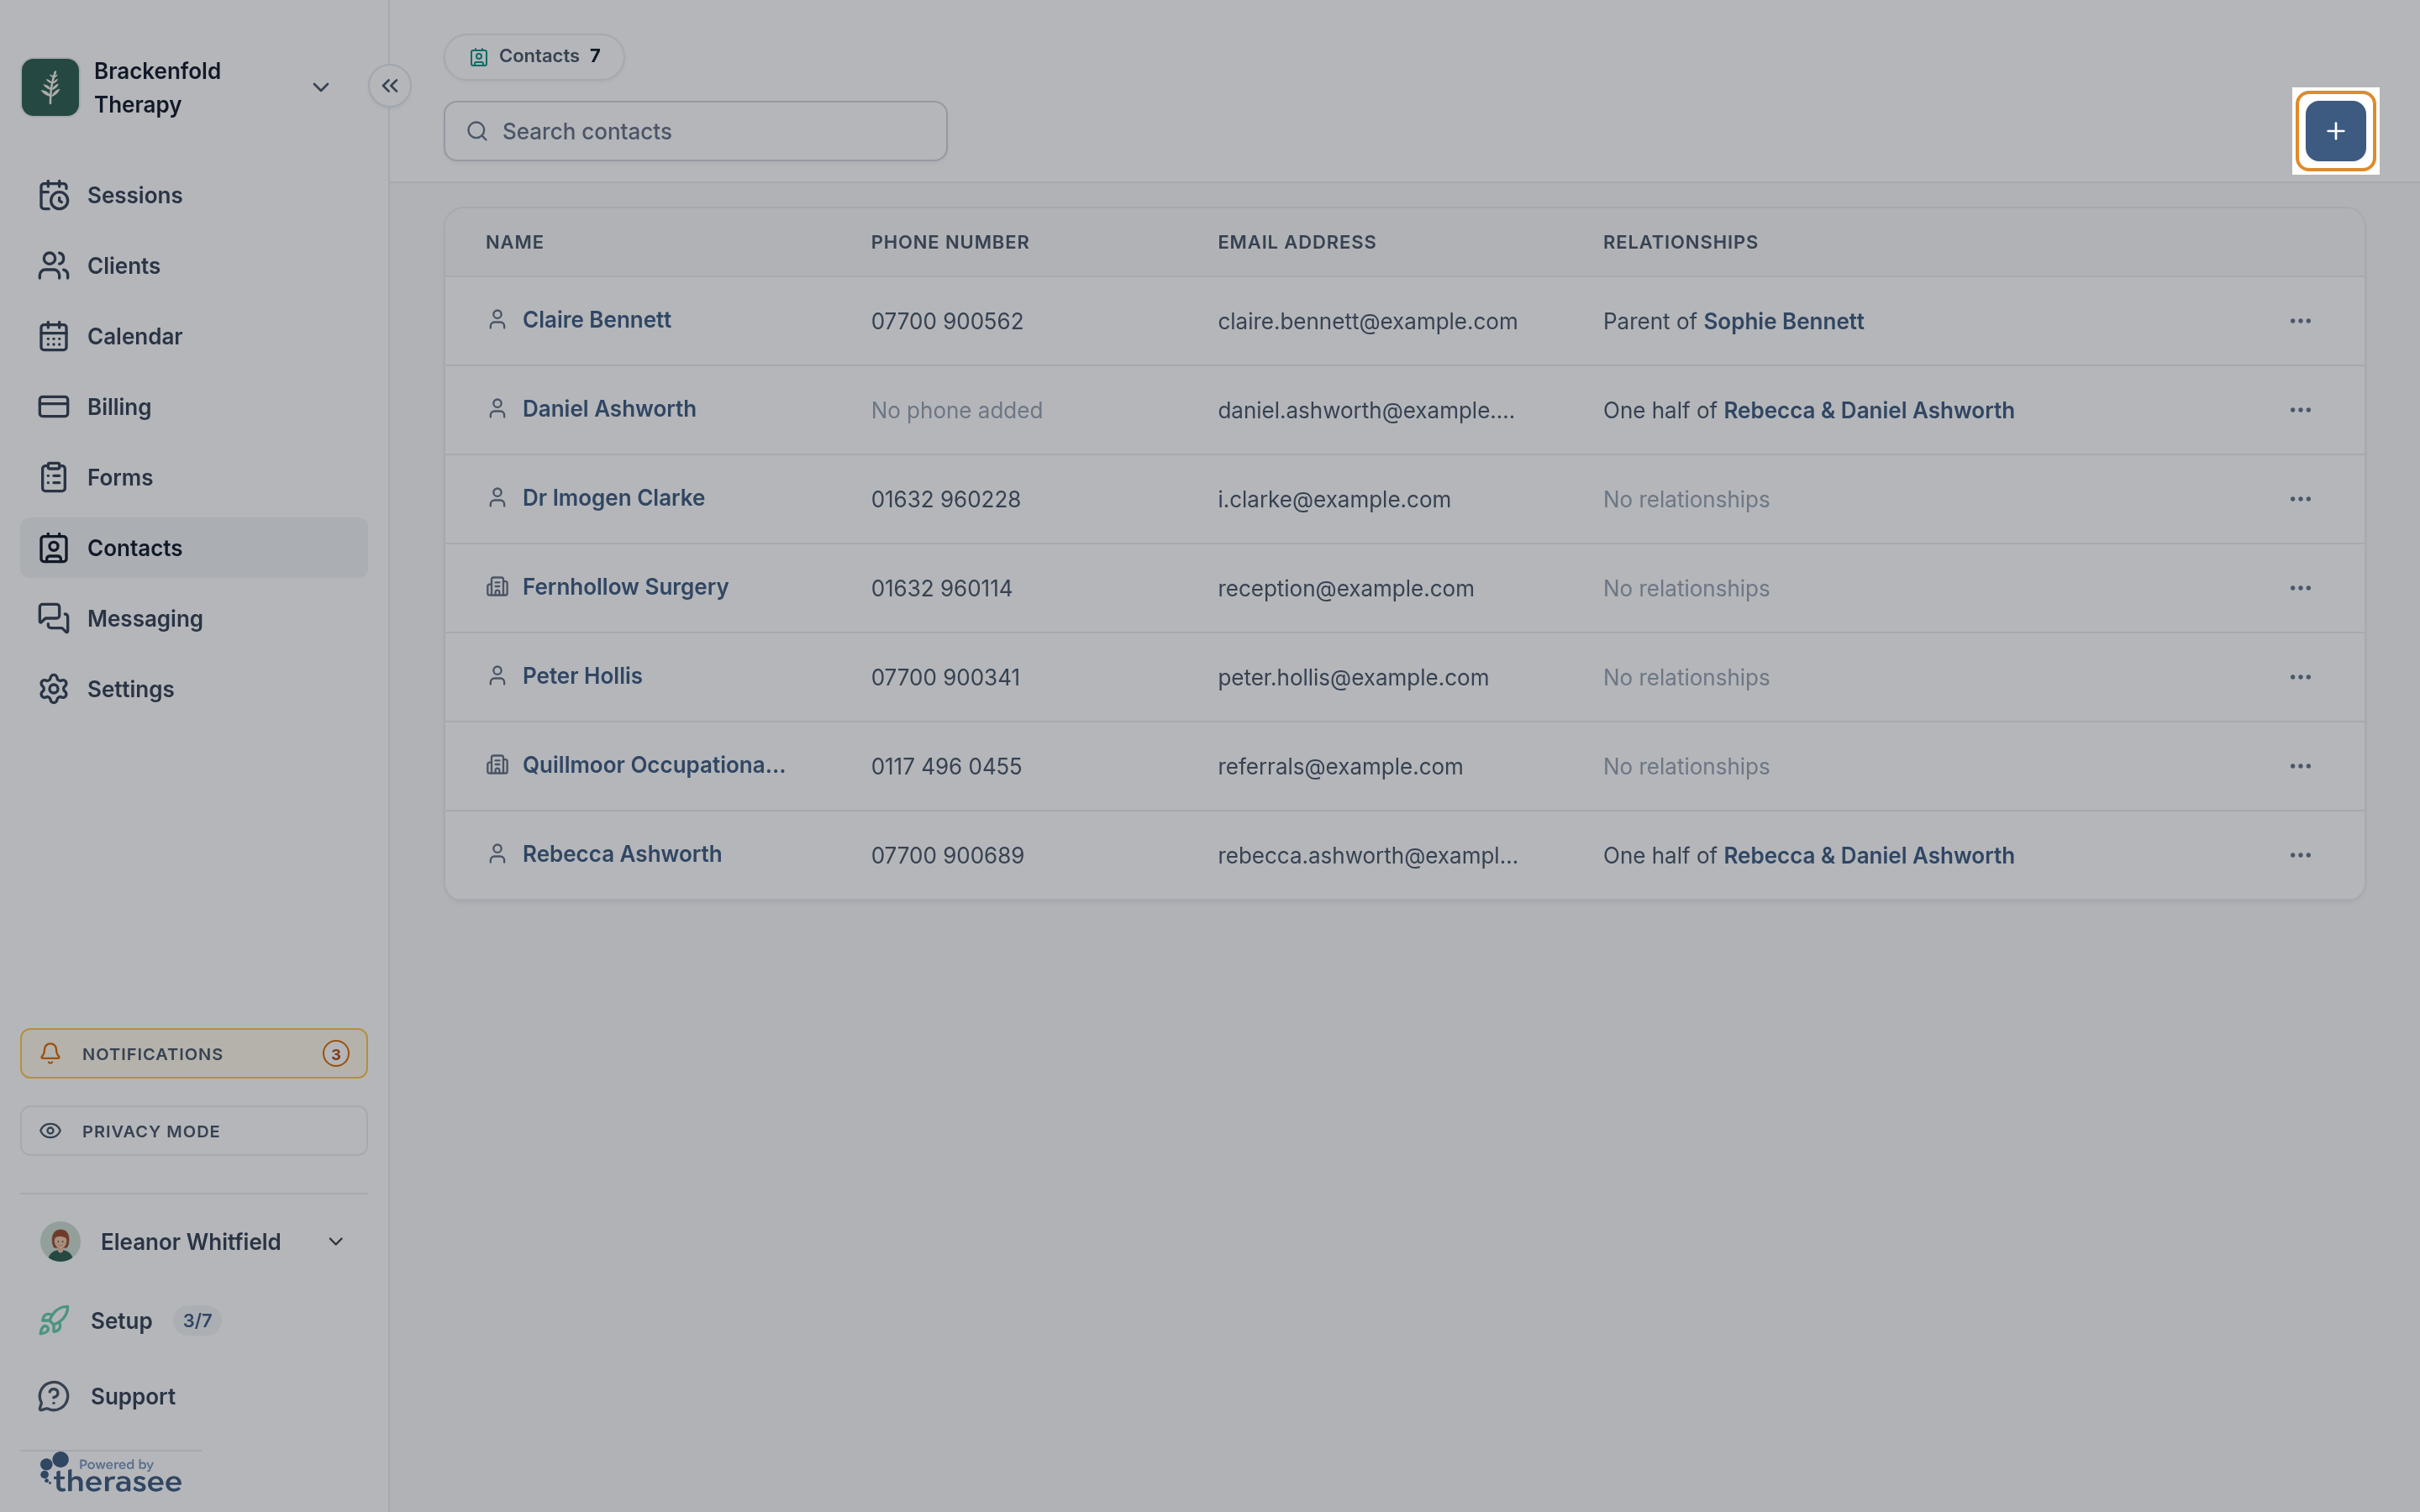
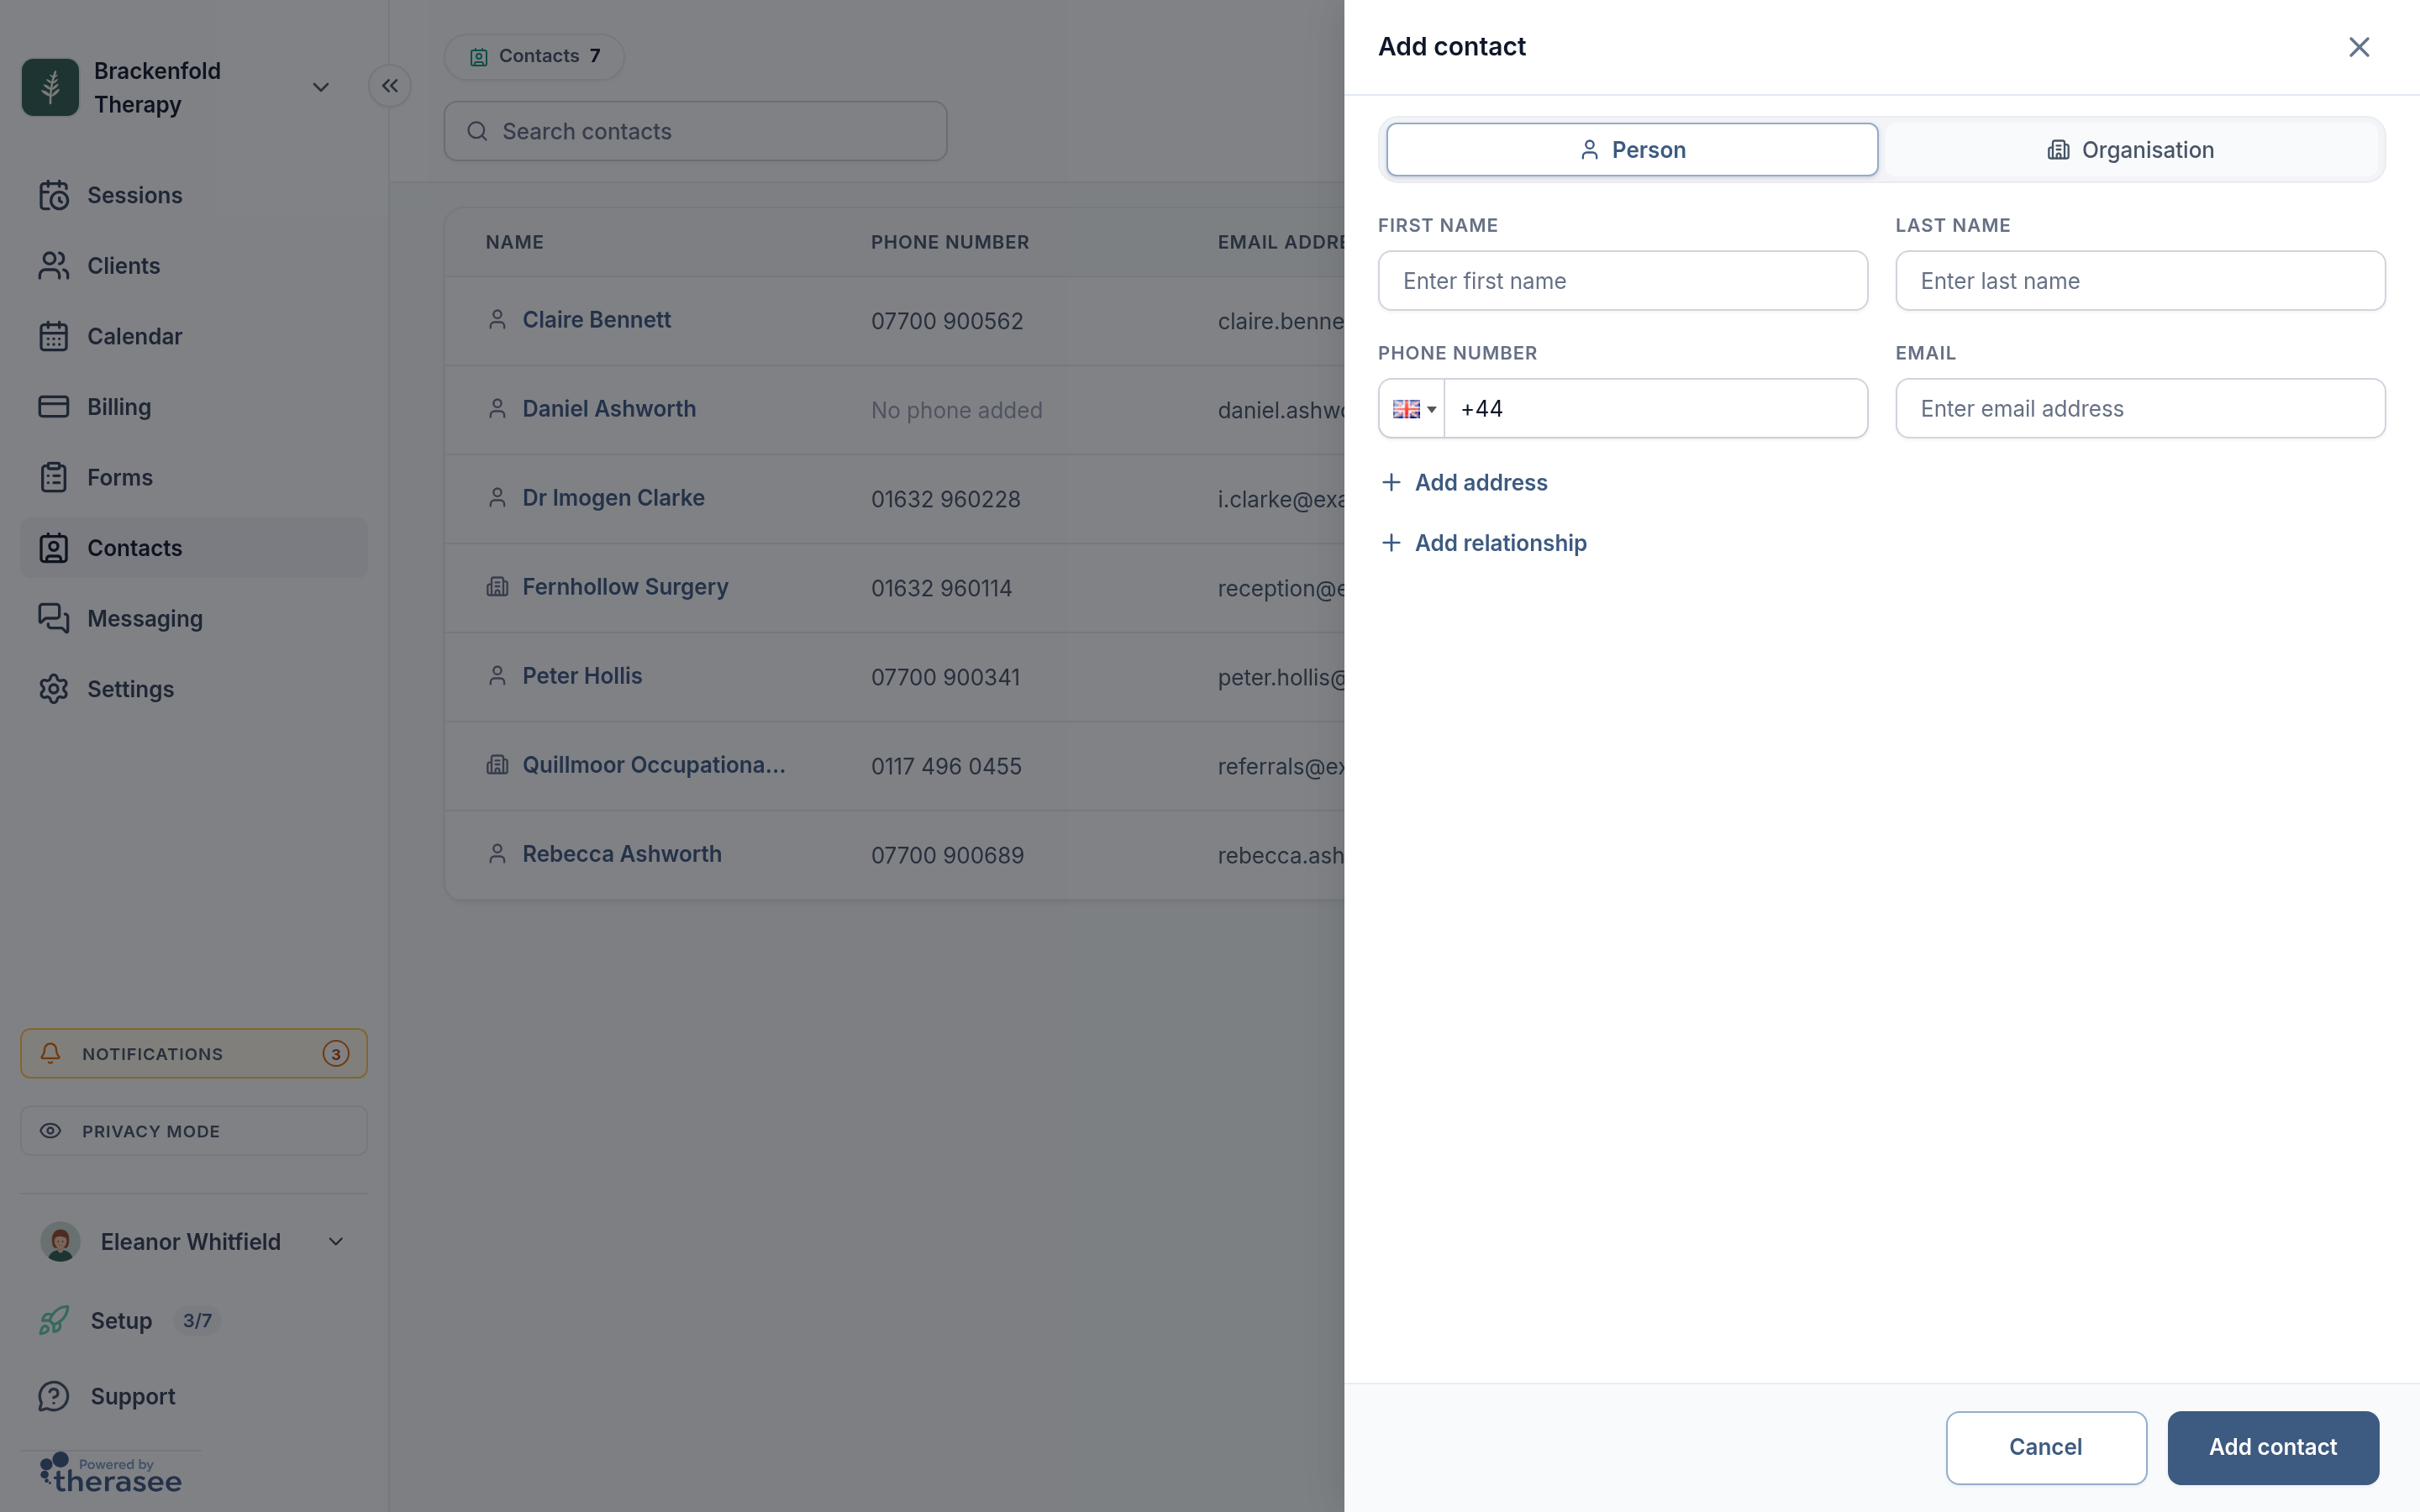
- Open Contacts and click Add contact.
- For a company, charity or insurer, choose the Organisation tab and enter the Organisation name. For a person, stay on Person and enter their name.
- Enter the email address invoices should go to, and a phone number if you want to text invoices to them.
- Click Add address and fill it in if the invoice should show the payer's address.
- Click Add relationship. Under Related client or contact, pick the client, and under Relationship choose a type such as Employer or Insurer, or type your own.
- Click Add contact.
If the payer is already in your contacts, link them from the client's record instead: open the client, go to the Relationships tab, add a relationship and pick them under Existing contact. One organisation can be linked to as many clients as it pays for.
2. Make them the billing contact
- Open the client from Clients. On Client profile, click the pencil on the Client details card.
- In the Billing card (who receives invoices), choose the payer from the list. Only people and organisations linked to the client appear there.
- Click Save.
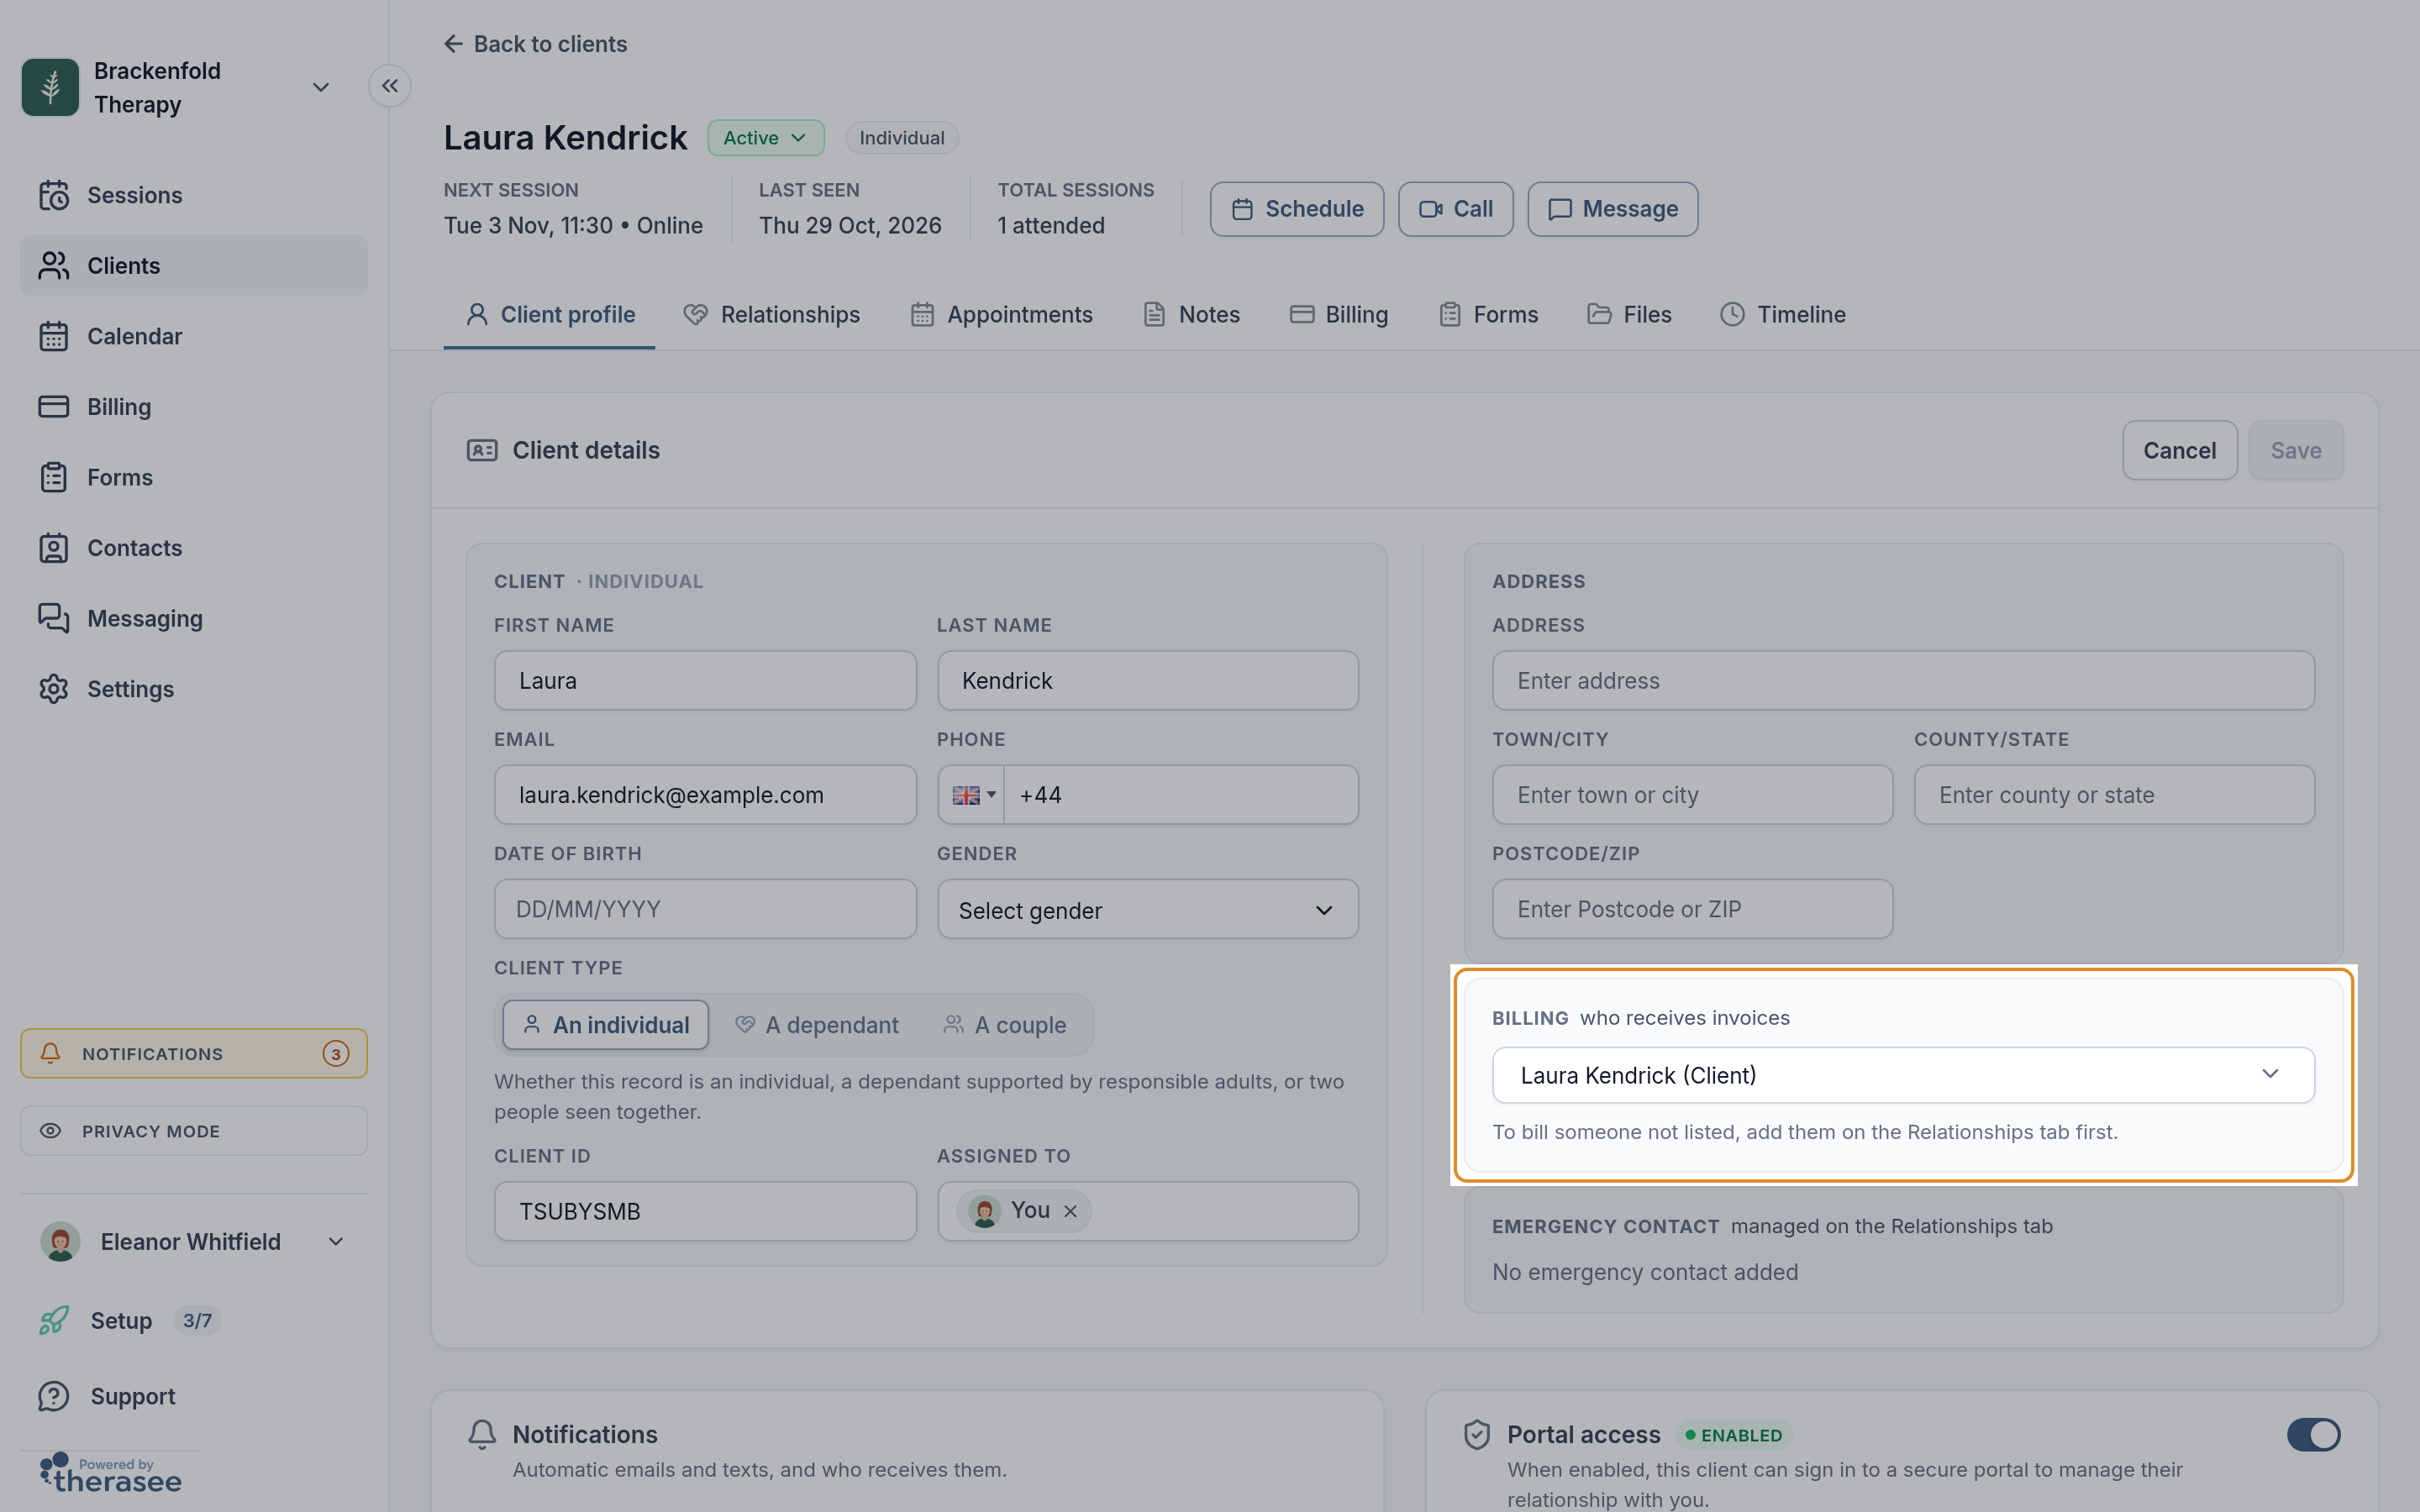
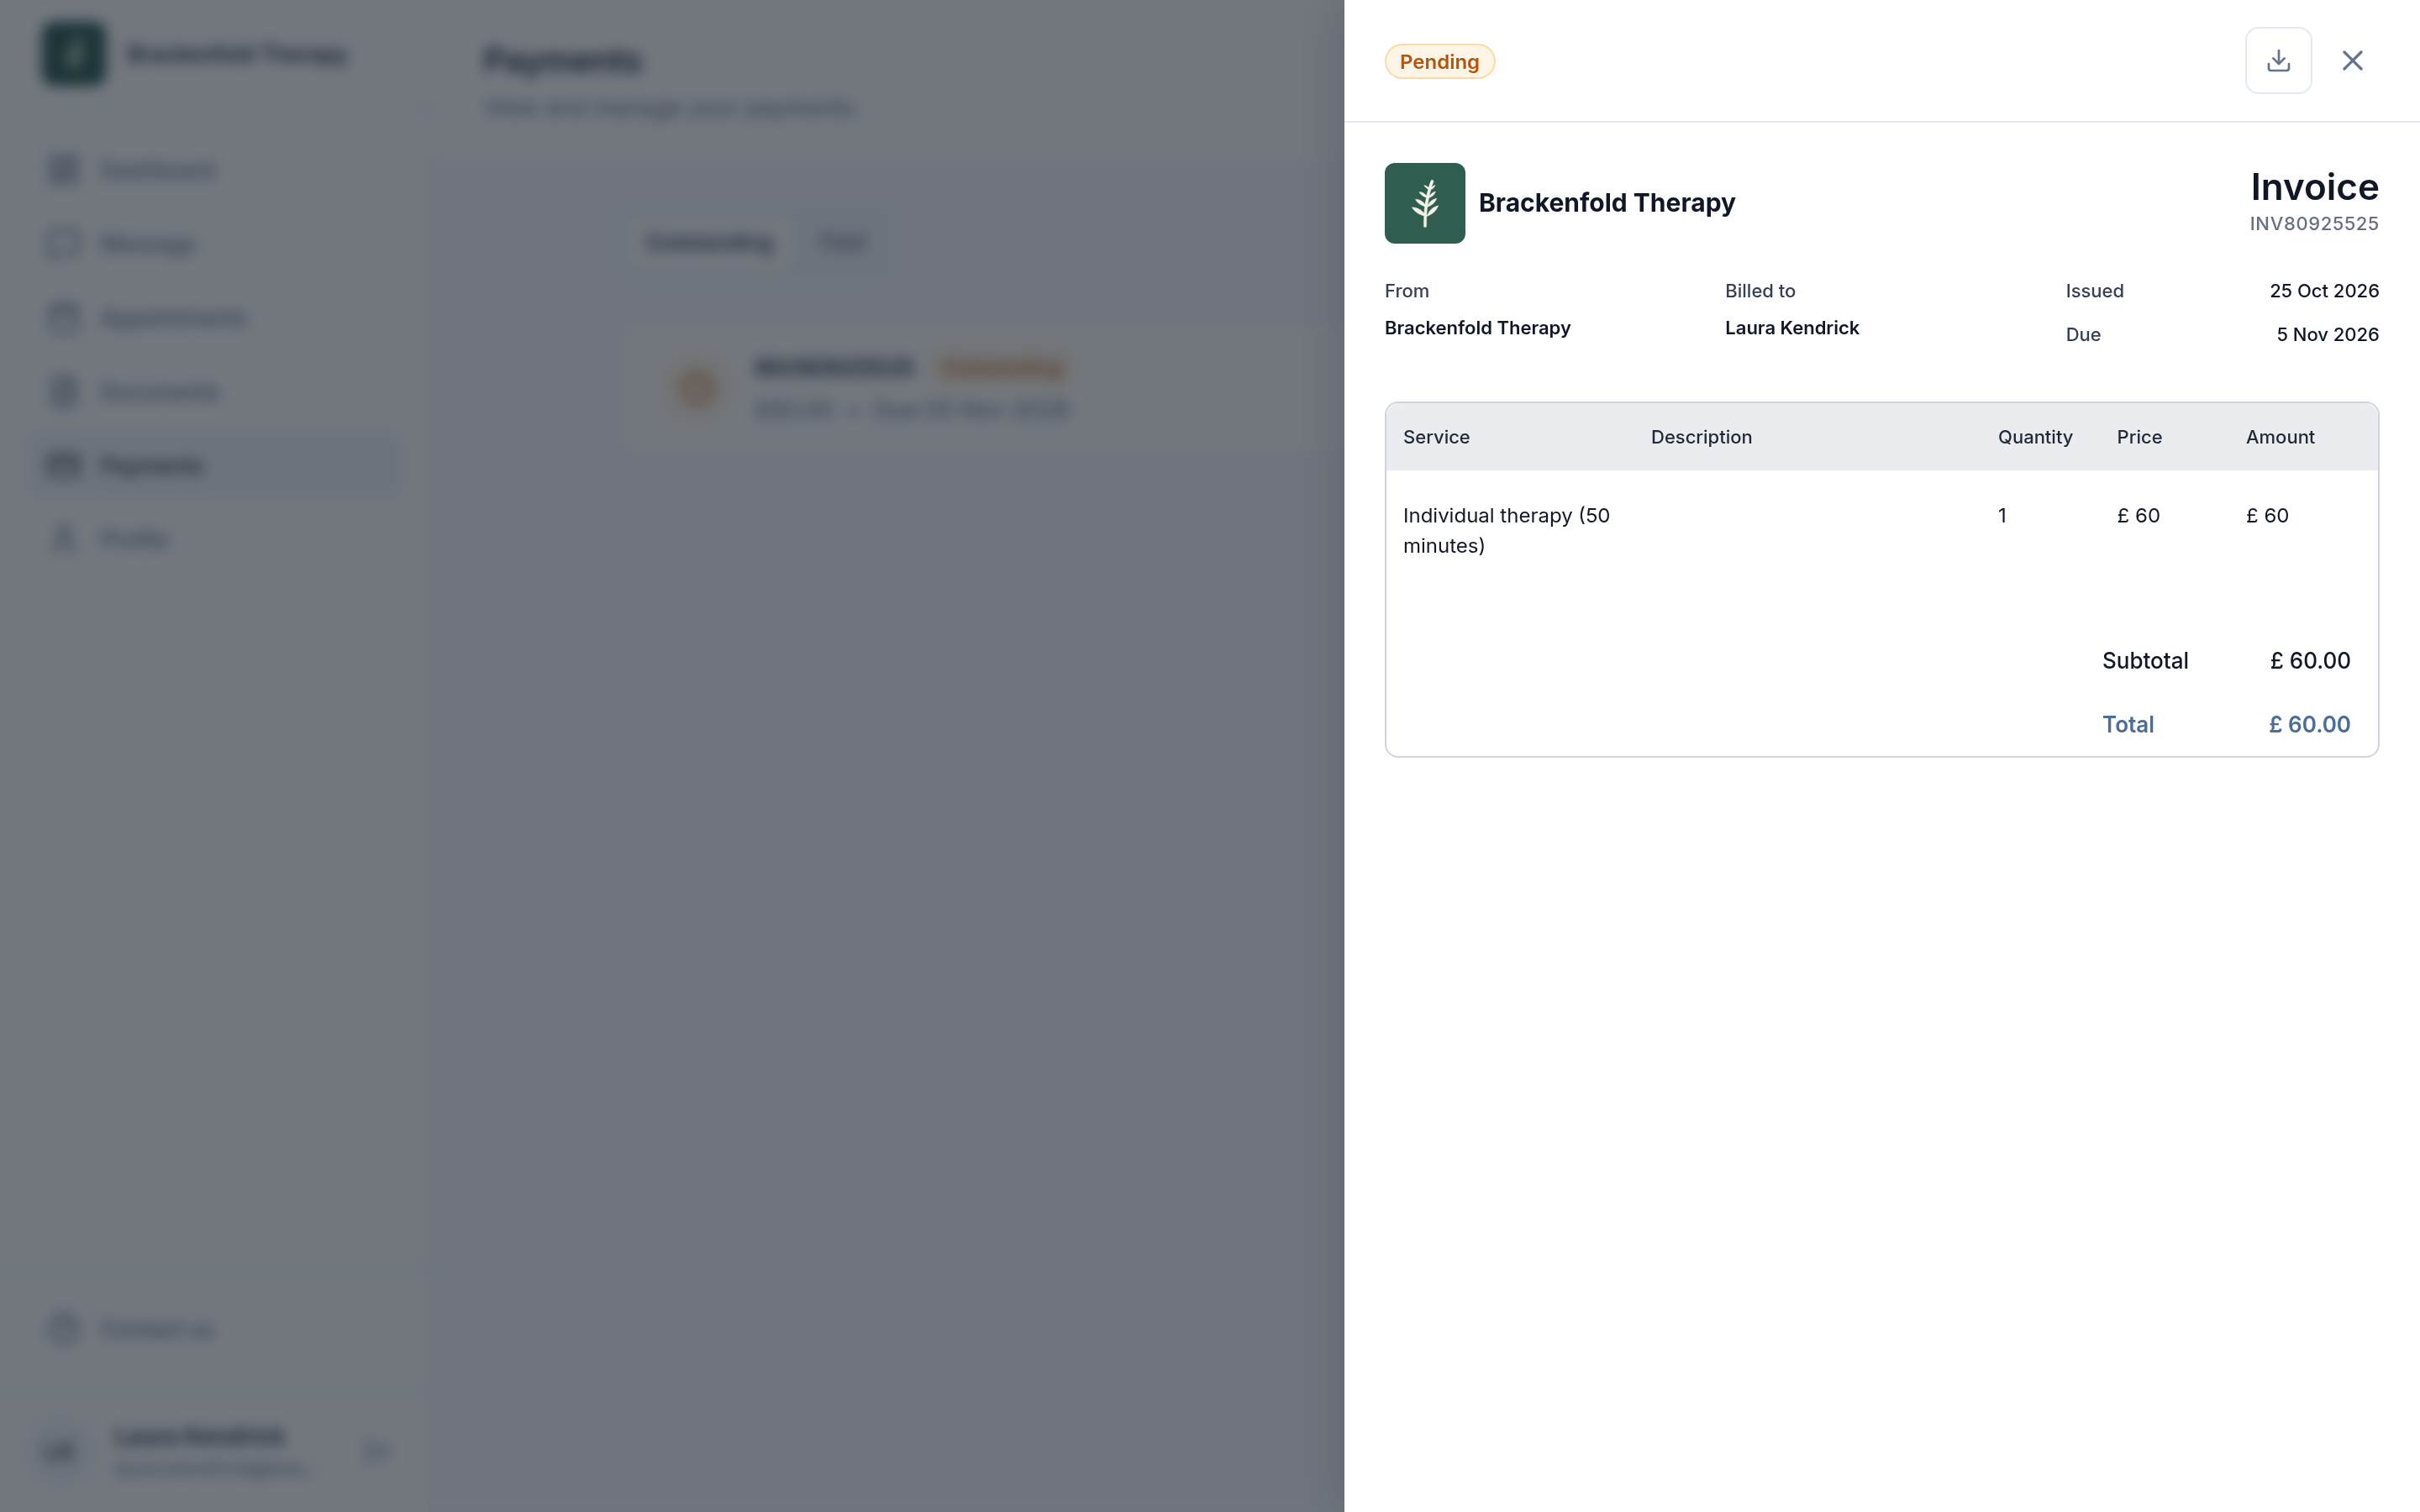
From then on, new invoices for this client show the client under Client and the payer, with their address, under Billed to. Create and send, automatic invoices and reminders all go to the payer. If the payer has no email address, invoice emails go to the client instead, so add the payer's email before you send. Texts go only to the payer. The invoice still belongs to the client's record and, if they use your client portal, appears on their Payments page too.
Each invoice keeps the payer it was created with. Changing the billing contact later affects new invoices only; to switch back, choose the client themself in the Billing card. For one-off sends to someone else, use Share (below) and type their email address.
One invoice for several sessions
You can bill several sessions together, for example a month of sessions or a block paid for by an employer.
- Start a new invoice from Billing (or with Add invoice on the client's row) and pick the client.
- Open the Service list on the first line and choose a session under Non invoiced. Its price fills in, and the Description reads, for example, "Appointment on Mon 7 Sep 2026".
- Click Add item and choose the next session. Repeat for each one. A session you have already added no longer appears in the list for the other lines.
- Check the Due date and the Total, then click Create or Create and send.
Non invoiced lists the client's sessions from the past 12 months and the next 3 months that are not on an invoice yet, newest first. Sessions marked as cancelled or no-show are listed too. Every session you add is tied to this invoice: the Finance column on Sessions shows it against each one, and none of them can be invoiced twice.
If you plan to bill sessions together at the end of the month, choose Manually generate invoices (or turn invoicing off on those bookings) so an invoice is not raised for each session as you book it. Sessions that already have an automatic invoice do not appear under Non invoiced; delete those invoices first if you want to rebill the sessions together.
Sending it: Create or Create and send
- Create saves the invoice without emailing or texting it. You can share it whenever you are ready.
- Create and send opens Send invoice?, showing the person the invoice is billed to with an Email and an SMS tick. Each is ticked when that person has the contact detail, and greyed out with a note such as "No phone number added" when they do not. Click Create and send to finish, or Create without sending. The cross takes you back to the form without creating anything.
To send one later, click the paper-plane icon (Share) on its row in Billing. In Share invoice, pick recipients from the client and their contacts (or type an email address), add a message if you like, and click Send.
What the client receives
The email comes from your practice name, with a subject such as "Invoice INV12345678". It shows the amount, due date and who it is for, with a button to open the invoice: View and pay when you take card payments, otherwise View. The invoice is attached as a PDF. The text message contains a link to the same invoice. They do not need to sign in to open the link from the email or text. If the client uses your client portal, the invoice also appears on their Payments page, where they can view, download and, if you take card payments, pay it. Paying an invoice walks through their side.
Automatic invoices
In the Invoice generation card, choose Automatically generate invoices and tick what it covers:
- Single appointments: invoiced when the appointment is scheduled.
- Repeating appointments: one invoice per session. The first is raised when you schedule, and each later one an hour after the previous session finishes.
- Send to client: tick Email, SMS or both to send each invoice as soon as it is created. Untick both to create invoices without sending them.
This is only the starting position: the Invoicing card on the booking form turns it on or off for each appointment. Bookings clients make in the portal follow Single appointments. Choose Manually generate invoices to create every invoice yourself. If you delete an automatic invoice, it is not raised again. See Booking an appointment.
Invoice reminders
Reminders chase an unpaid invoice automatically. Set your practice default under Settings, Practice settings, Notifications, in the Invoice reminders card:
- Click Add a reminder. You can have up to two.
- Set the number of days, then choose before or after the due date.
- Tick Email, SMS or both, then save the card.
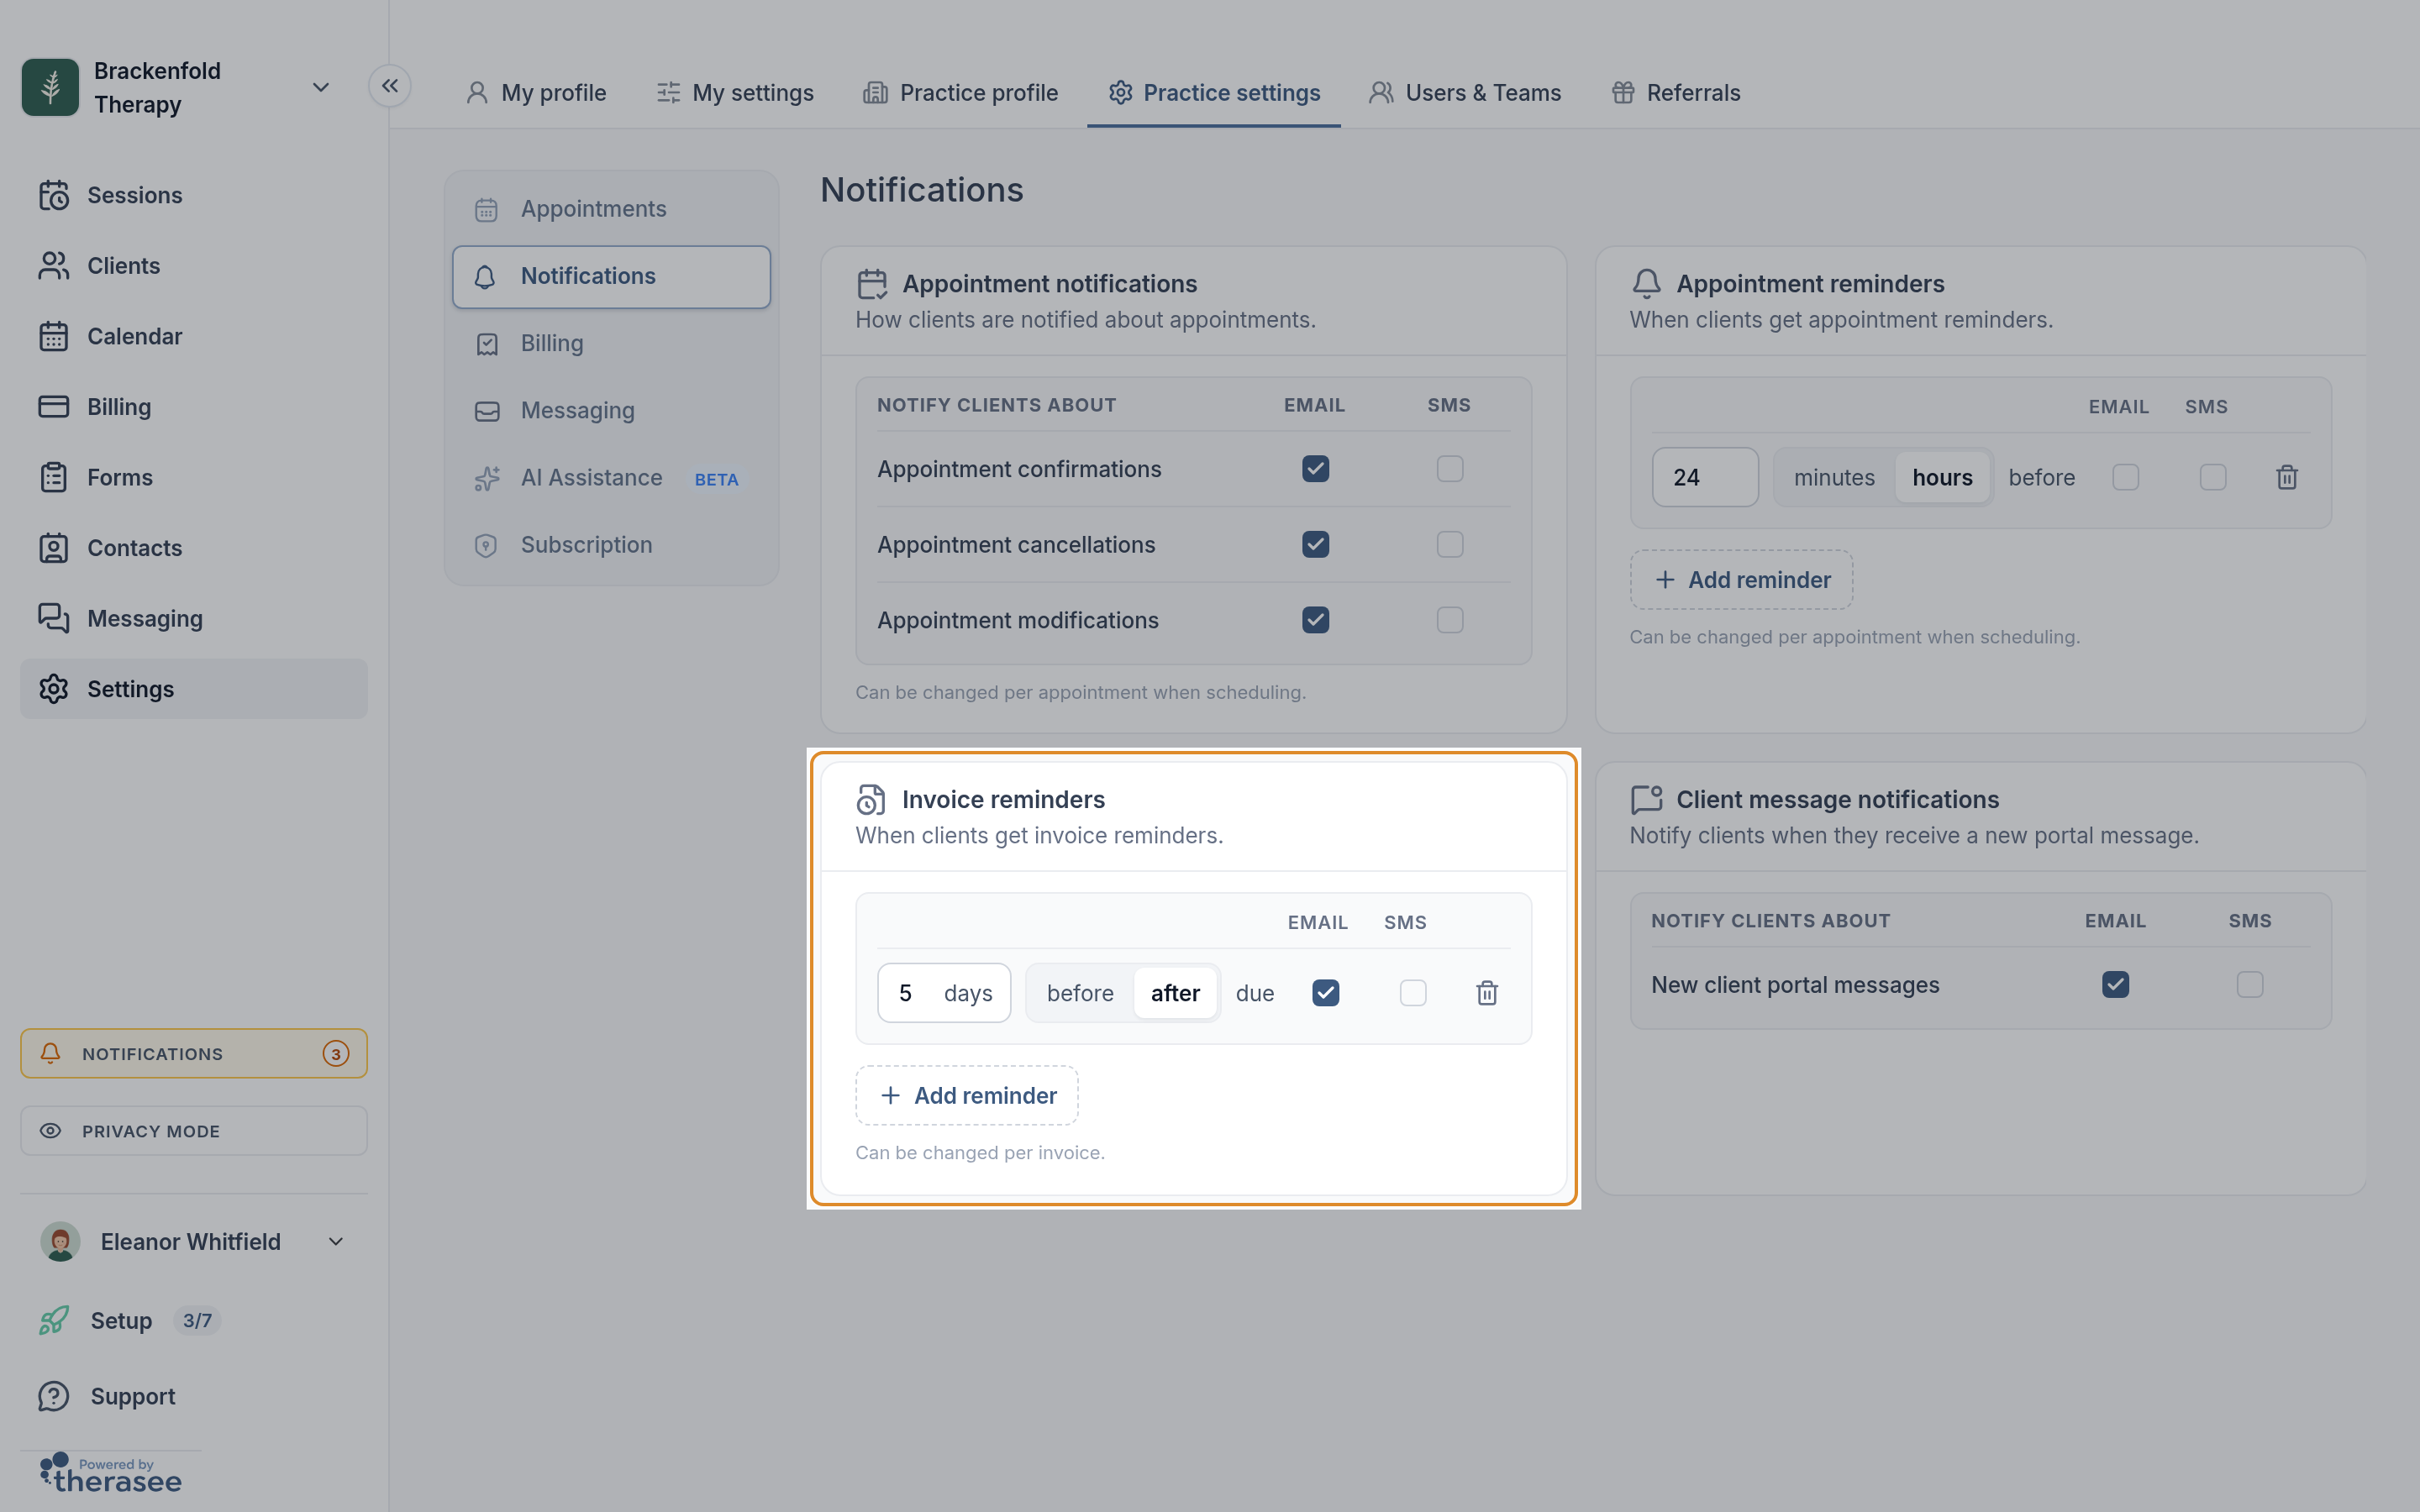
New invoices, including automatic ones, start with this default. To change one invoice, click the bell line in the Create invoice header (for example "Reminds 3 days after the due date by Email"), adjust and click Save. An open invoice shows the same line. Reminders stop as soon as an invoice is paid. To chase one straight away, click the bell icon (Send reminder) on its row in Billing.
Online payments with Stripe
In the Online payments card, click Connect Stripe and follow Stripe's steps. Once it shows Connected, emails say View and pay and the portal offers Pay online. When a client pays, the invoice turns Paid by itself, the client gets a receipt by email, and you get a notification. Fees, payouts and refunds are covered in Connecting Stripe and taking card payments.
Payment instructions for clients who do not pay by card
If clients pay by bank transfer, or you do not take card payments, put the instructions on the invoice itself. There is no separate bank details field; the note is the place for them.
- Go to Settings, Practice settings, Billing.
- In Invoice content, type your instructions into Default note, for example your account name, sort code and account number, and the invoice number as the payment reference.
- Save the card.
The note is copied onto every new invoice, including automatic ones, and prints below the total on screen, in the client portal and on the PDF. On any single invoice you can change or add to it in the Note box before creating it. Invoices that already exist keep the note they were created with. The Invoice footer is printed at the bottom of every invoice PDF, if you prefer to keep short, fixed wording such as a company number there.
When the money arrives, record it as below so the invoice turns Paid and reminders stop.
Recording a payment yourself
- In Billing, click the tick-in-a-circle icon (Mark as paid) on the invoice's row.
- Choose the Payment method: Bank transfer, External card or Cash.
- Set the Payment date (today or earlier) and click Confirm.
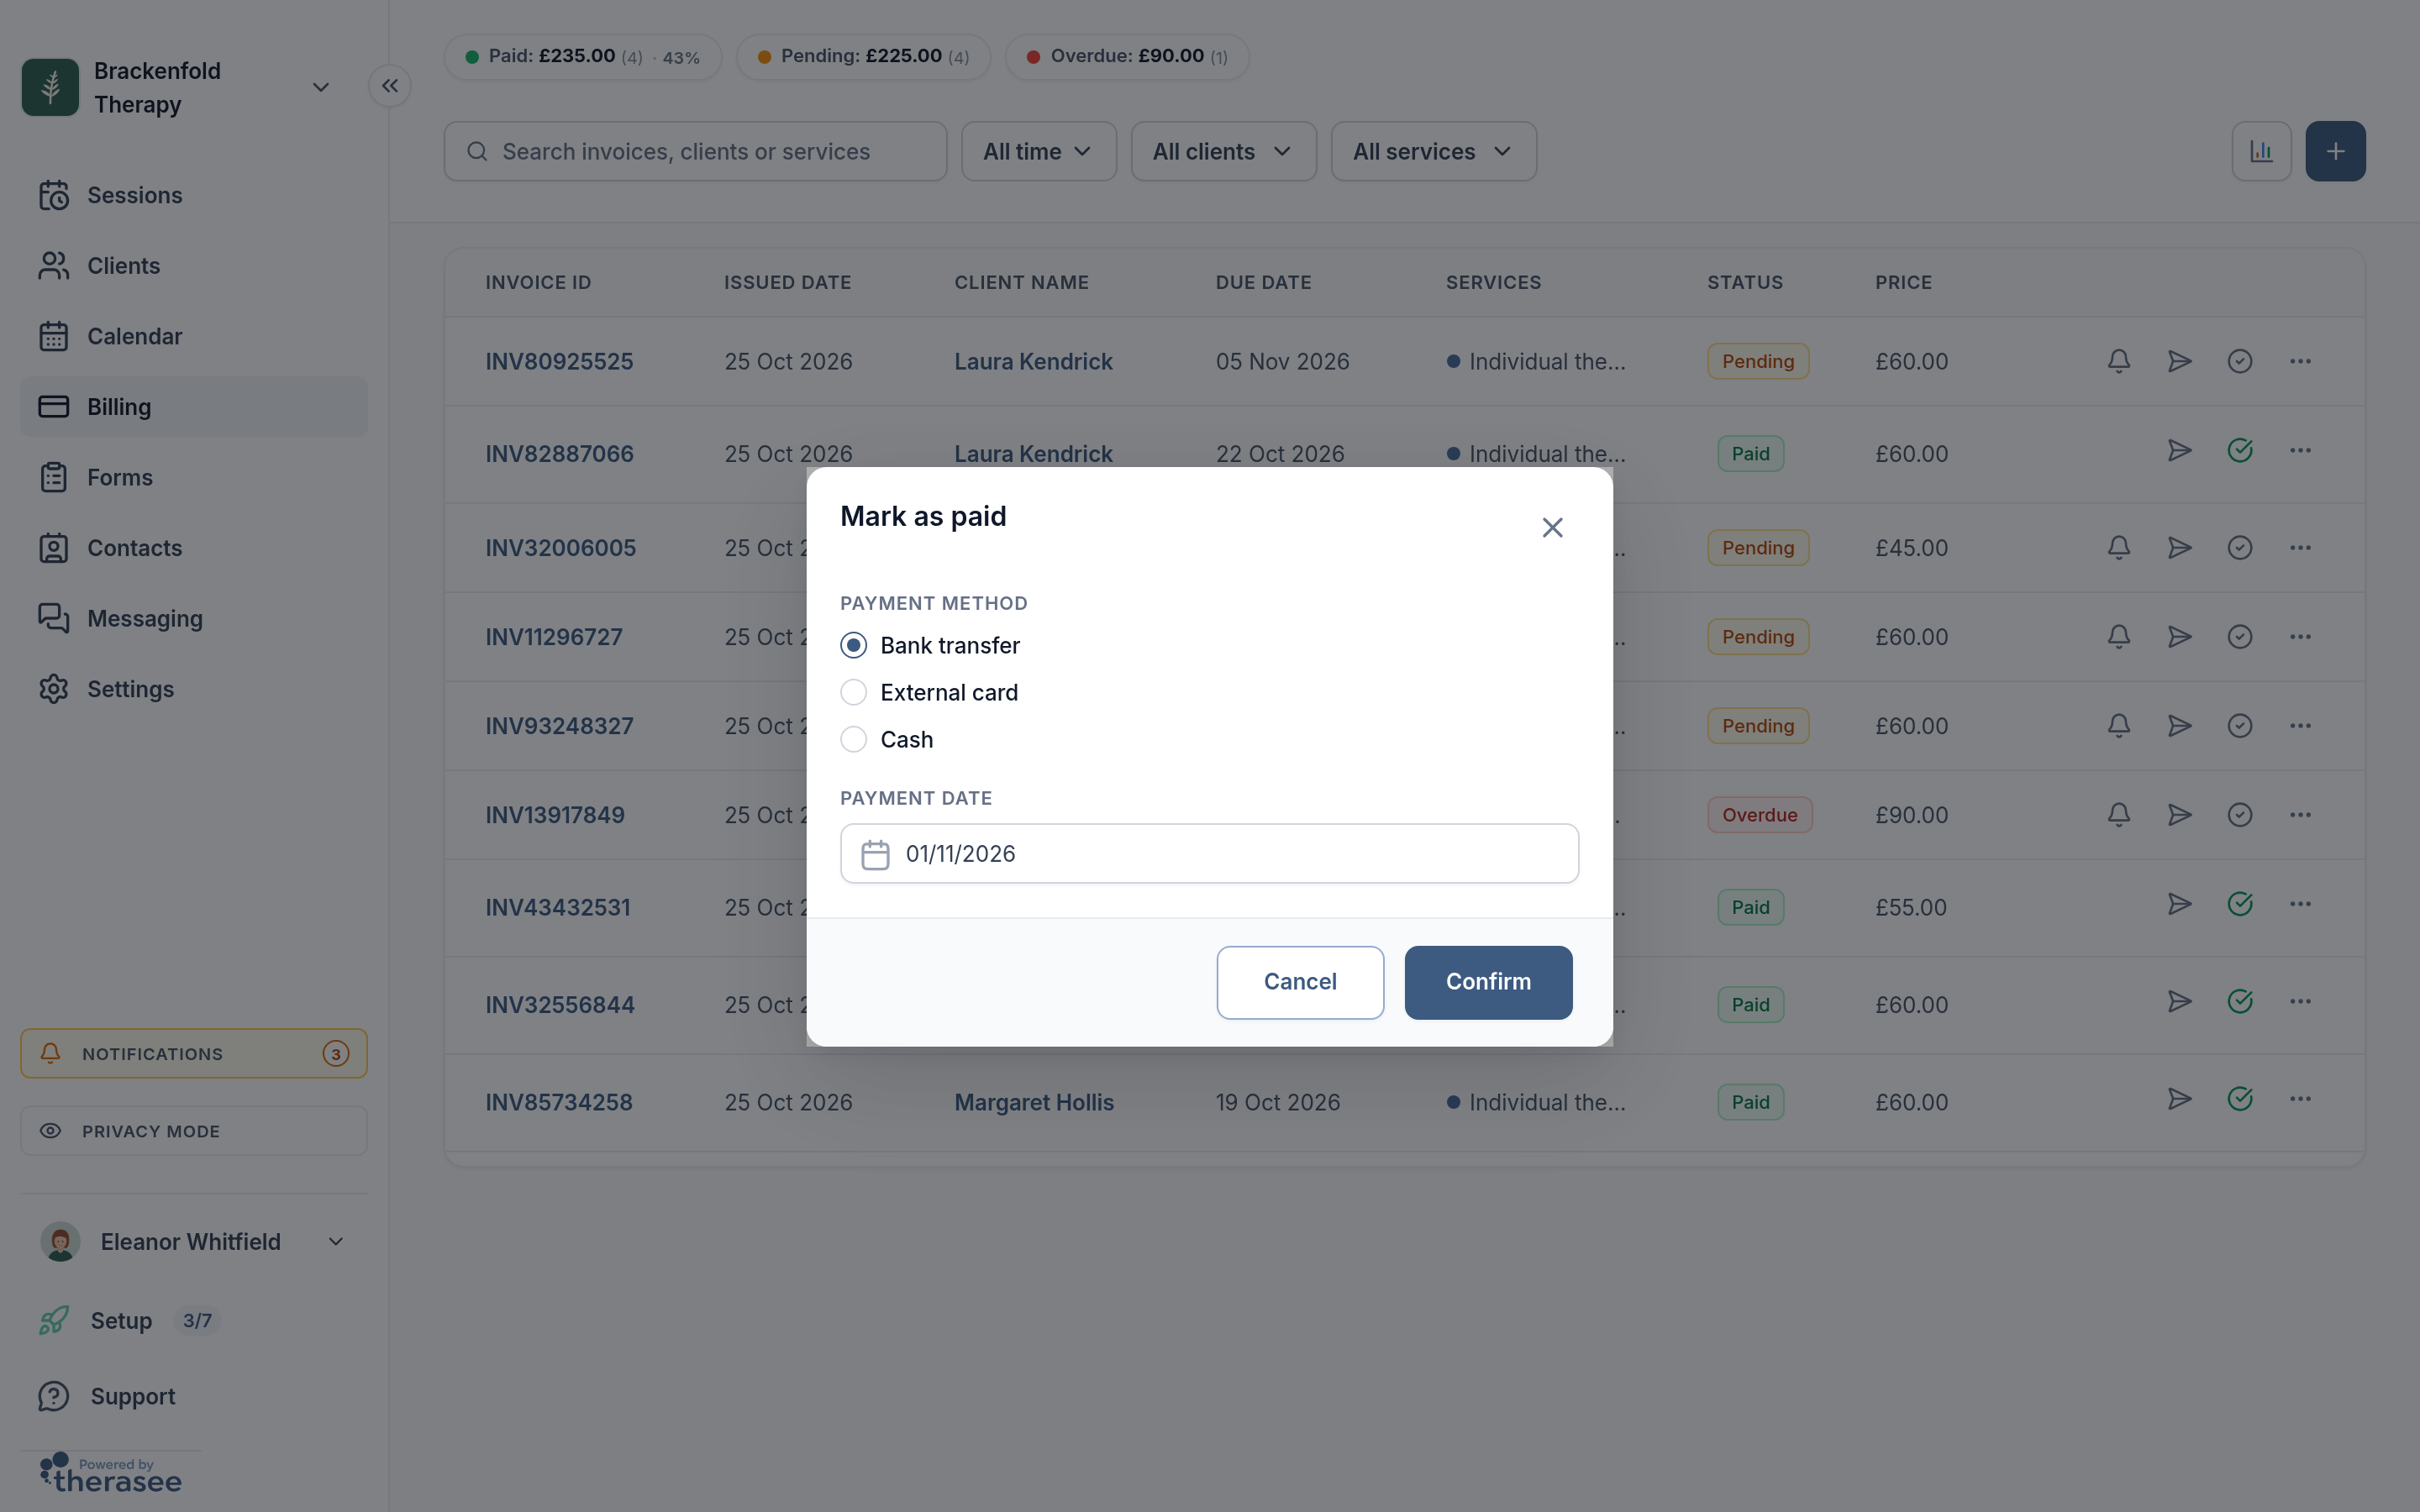
The invoice moves to Paid and any reminders still to come are cancelled.
Statuses, editing and downloading
- Pending: not paid yet, and the due date has not passed.
- Overdue: not paid, and the due date has passed.
- Paid: paid online or marked as paid.
The Paid, Pending and Overdue totals at the top of Billing also filter the list: click one to hide or show those invoices. Click an invoice number to open it.
The ... menu on each row has Edit (while the invoice is unpaid), Download (a PDF of the invoice) and Delete. Deleting cannot be undone, and any session on the invoice goes back to Non invoiced so you can invoice it again. Cancelling a session leaves its invoice as it is; see Cancellations and no-shows.
If an action is greyed out with the tooltip "You don't have permission", your role does not include invoicing for that client. Whoever manages your team can change this in the Invoices & payments permissions (View access and Edit access, each All, Assigned only or None) under Settings, Users & Teams.
Was this helpful?