What your clients are sent, and when
Every email and text Therasee sends your clients, what triggers each one, who receives it, and where to turn each one on or off. Also how to resend an appointment's joining link, how reminders reach a parent or both partners, and what wording you can change.
Updated 4 November 2026
Therasee emails and texts your clients at set moments: around appointments, invoices, forms and messages. This article lists each one, who receives it, and where you control it.
Three places decide what is sent
- Practice defaults set which channels (email, SMS) each kind of message uses.
- Each client's profile has a Notifications card that decides who receives each kind of message: the client, a responsible adult, or both.
- Each appointment gets a final say when you book, change or cancel it. The dialog starts from your defaults and the client's settings, and any change you make applies to that appointment only.
Everything your clients can be sent
- Appointment confirmation (email, SMS): when you book an appointment, or a client books through your portal. Controlled by your practice default, then Send confirmation? when you book.
- Appointment reminder (email, SMS): up to two per appointment, a set number of minutes or hours before it. Controlled by the Appointment reminders card, then Reminders when you book.
- Change to an appointment (email, SMS): when an appointment is moved or its details change. Controlled by your practice default, then Who should hear about this change?
- Cancellation (email, SMS): when an appointment is cancelled, by you or by the client. Controlled by your practice default, then Who should hear about this cancellation?
- Appointment details sent again (email, SMS): only when you choose Send invite on an appointment. You write the subject and any note yourself.
- Invoice (email with the PDF attached, SMS with a link): when an invoice is created automatically, or you send one. Controlled under Billing > Invoice generation, then on the appointment or invoice.
- Invoice reminder (email, SMS): up to two, a set number of days before or after the due date, while the invoice is unpaid. Controlled by the Invoice reminders card, then on each invoice.
- Receipt (email with the PDF attached): when a client pays an invoice online. Sent automatically. Stripe can also send its own receipt if you turn on Successful payments under Customer emails in your Stripe Dashboard settings.
- Form request (email, SMS): when you send a form. Controlled by your choices when sending.
- Portal invitation (email, SMS): when you turn on a client's portal access and choose to tell them. Controlled in the invitation dialog.
- New message (email, SMS): when you send a message in the portal. Controlled by the Client message notifications card.
A text message is only ever sent to someone with a mobile number on file, and an email only to someone with an email address. Texts count towards your practice's monthly text allowance, which depends on your plan, and a long text counts as two or more. If the allowance runs out, texts pause until the next month and emails still go out.
Set your practice defaults
- Go to Settings > Practice settings > Notifications. The page has four cards.
- In Appointment notifications, tick Email and/or SMS for Appointment confirmations, Appointment cancellations and Appointment modifications.
- When you change anything, Cancel and Save appear at the top right of that card. Click Save. Each card saves on its own, and you see a message such as Appointment notifications saved.
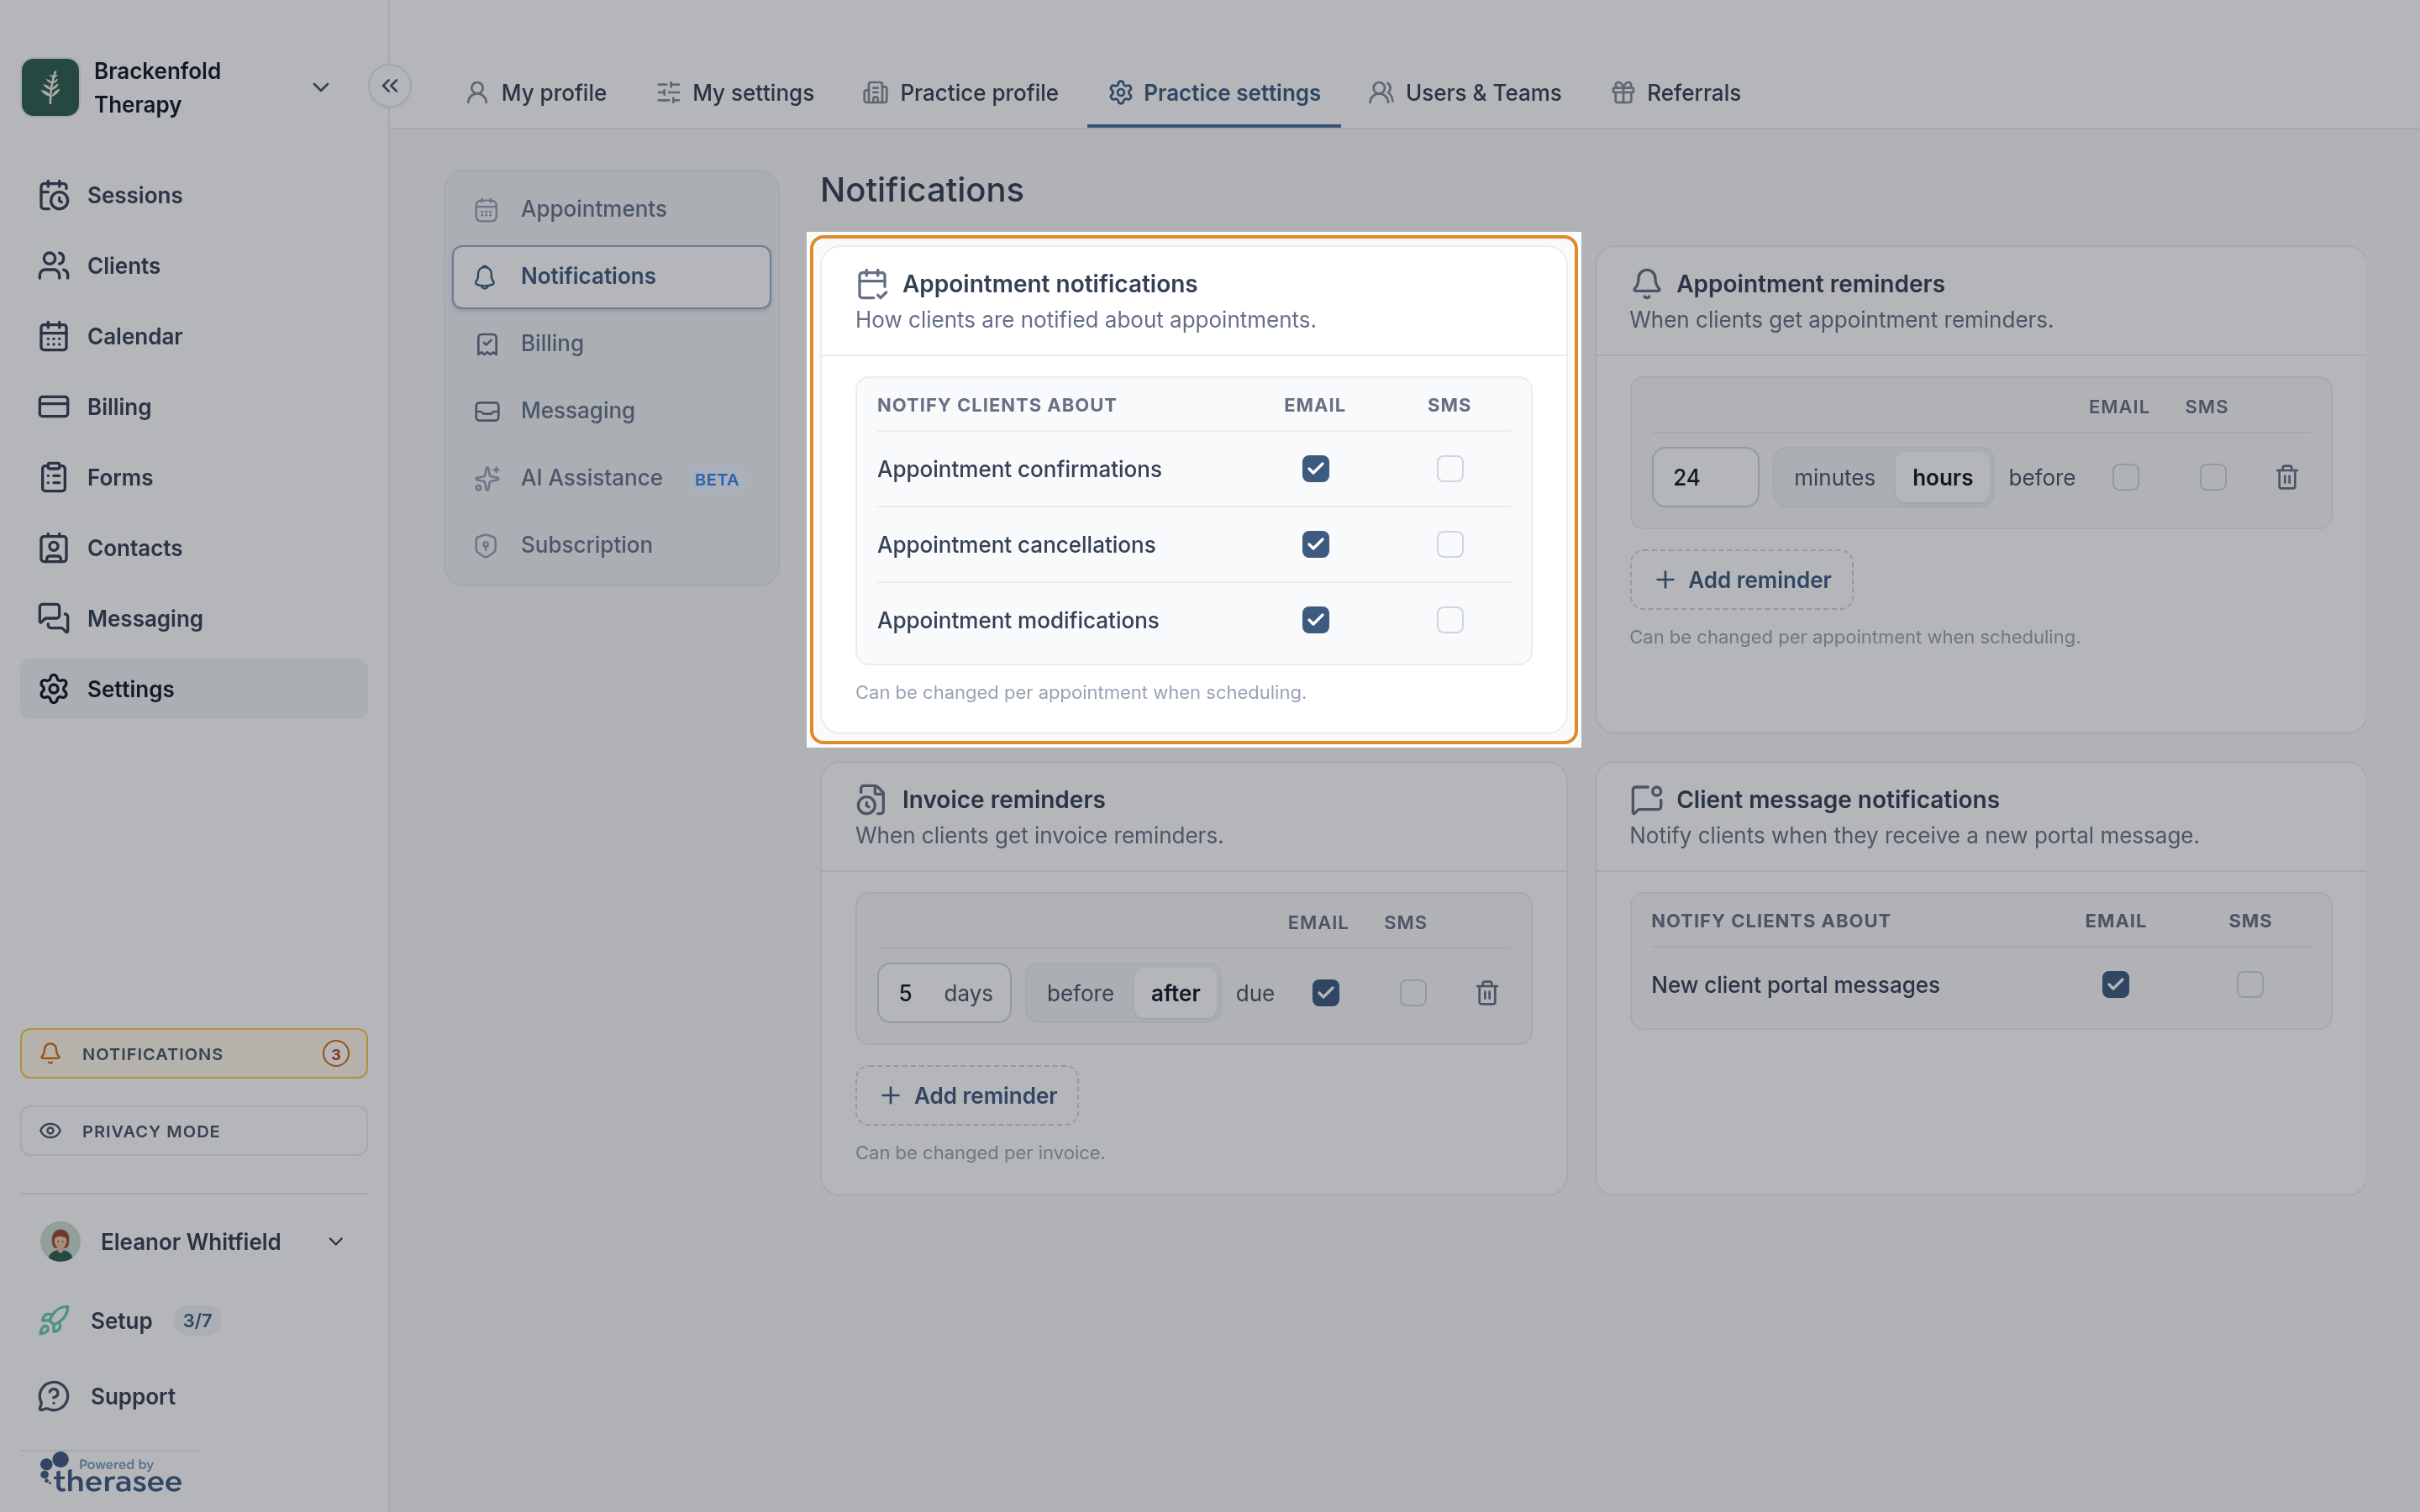
A new practice starts with email ticked and SMS unticked for confirmations, changes, cancellations and new messages.
Appointment reminders
- In the Appointment reminders card, click Add a reminder (or Add reminder for a second one). You can have up to two.
- Type a number, choose minutes or hours, then tick Email, SMS or both. A reminder with neither ticked is not sent. The bin icon removes a reminder.
- Click Save.
A new practice starts with one reminder, 24 hours before, with neither Email nor SMS ticked, so no reminders are sent until you tick one.
Reminders are stored on each appointment when it is booked, so new defaults apply to appointments booked from then on. The Reminders section of the booking form lets you change them for one appointment. Reminders for online sessions include the joining link.
Invoice reminders
In Invoice reminders, add up to two reminders, each a number of days before or after the due date, with Email and/or SMS. Just before a reminder goes out, Therasee checks the invoice again and only sends it if the invoice is still unpaid. You can change reminders for each invoice when you create it; see Creating and sending an invoice.
New message notifications
In Client message notifications, tick Email and/or SMS for New client portal messages. These notifications never include what you wrote: the email says who sent a message and has a Read message button, and the text links to the portal inbox.
The ten-minute rule: if you send several messages in a row, the client is not notified about each one. After a new-message email or text, any further messages you send to that client in the next ten minutes do not trigger another. Internal notes never notify anyone.
This setting also covers forms you send from inside a conversation: the email that goes with them follows the Email tick here.
Invoices created automatically
Whether automatically created invoices go to the client is set under Settings > Practice settings > Billing, in Invoice generation. With Automatically generate invoices chosen, tick Email and/or SMS under Send to client. Untick both to create invoices quietly. When booking, the Email the invoice and Text the invoice ticks let you change this for one appointment.
Choose what is sent for one appointment
When you book
- Fill in the booking form and click Schedule. See Booking an appointment for the form itself.
- The Send confirmation? dialog opens. It lists everyone who could be told, with Email and SMS ticks already set from your practice defaults and the client's Notifications card. Underneath it says the ticks were prefilled from the client's notification settings and that changes apply to this appointment only.
- Adjust the ticks if you need to, then click Schedule and send, or Schedule without sending to book it without a confirmation.
These ticks decide who is sent the confirmation. Reminders follow the Reminders section of the booking form, so unticking SMS here does not stop text reminders.
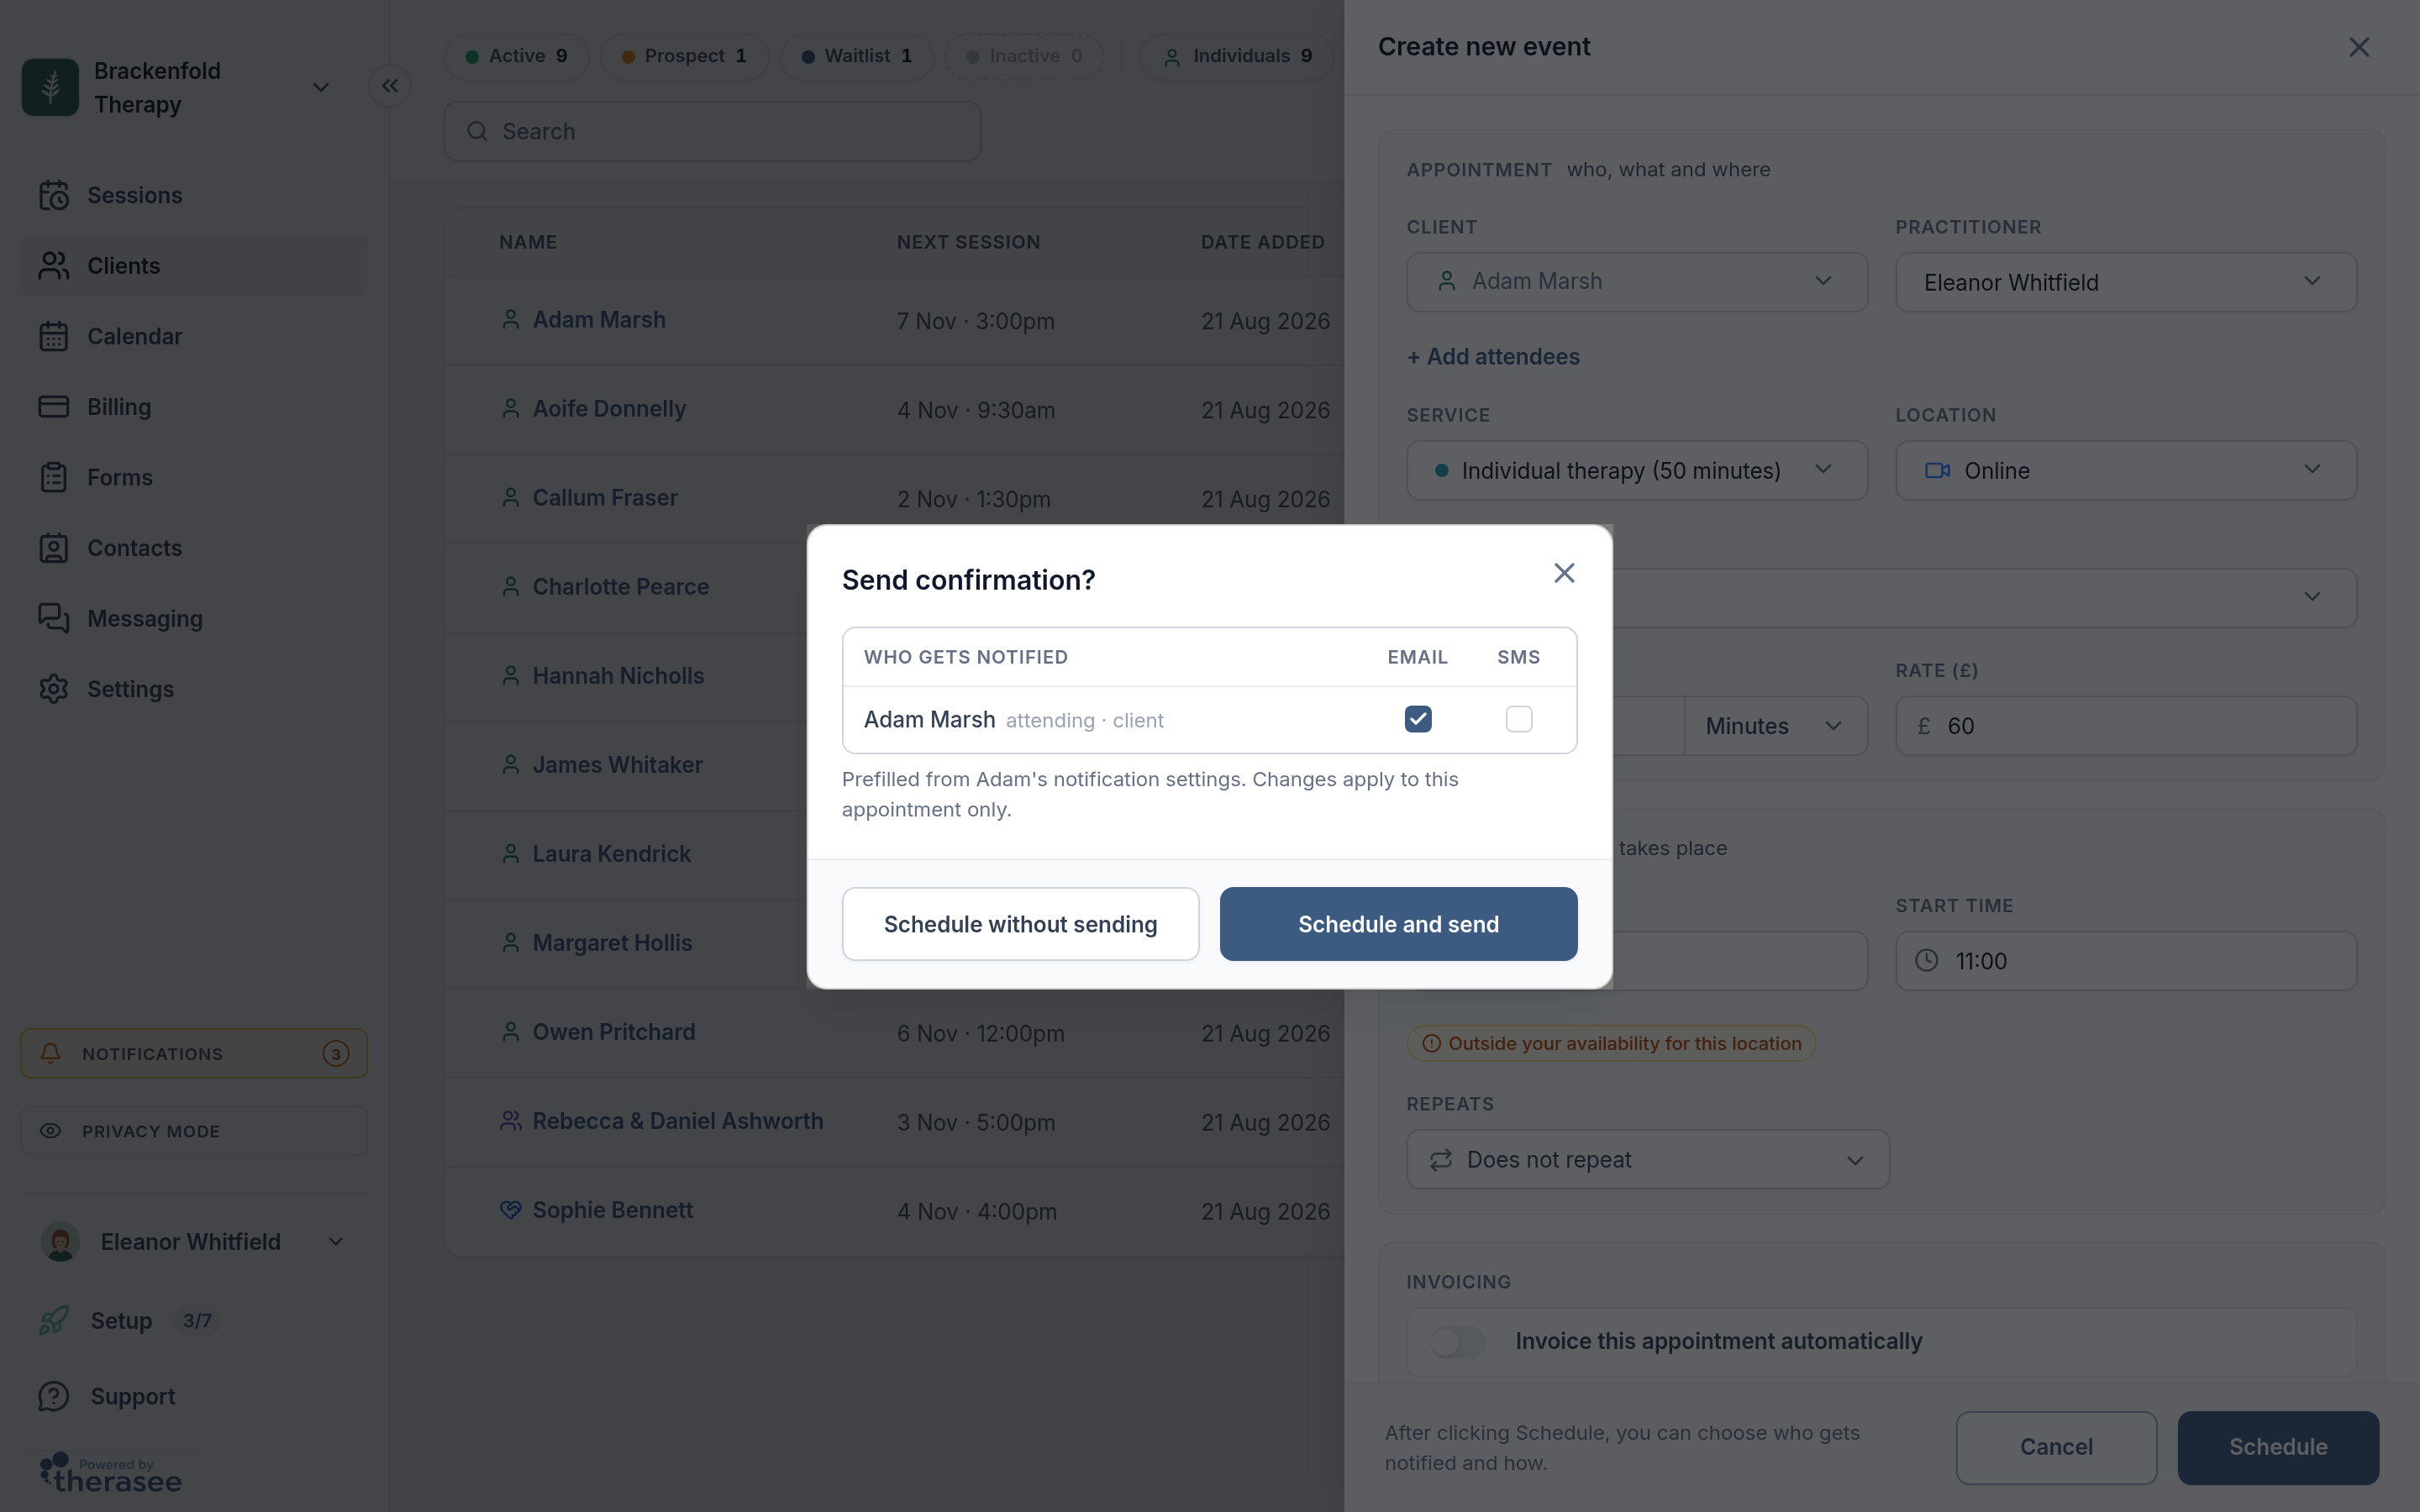
The confirmation email includes the date and time and a calendar file the client can add to their own calendar. For an online session it also has a Join session button.
When you change or cancel
Changing an appointment asks Who should hear about this change?. Cancelling from the Sessions list or the calendar asks Who should hear about this cancellation?. Both work the same way: tick who is told and how, add an Optional message if you want (it appears in the email), then click Send, or Don't send to go ahead without telling anyone. For the full cancelling steps, see Cancellations and no-shows.
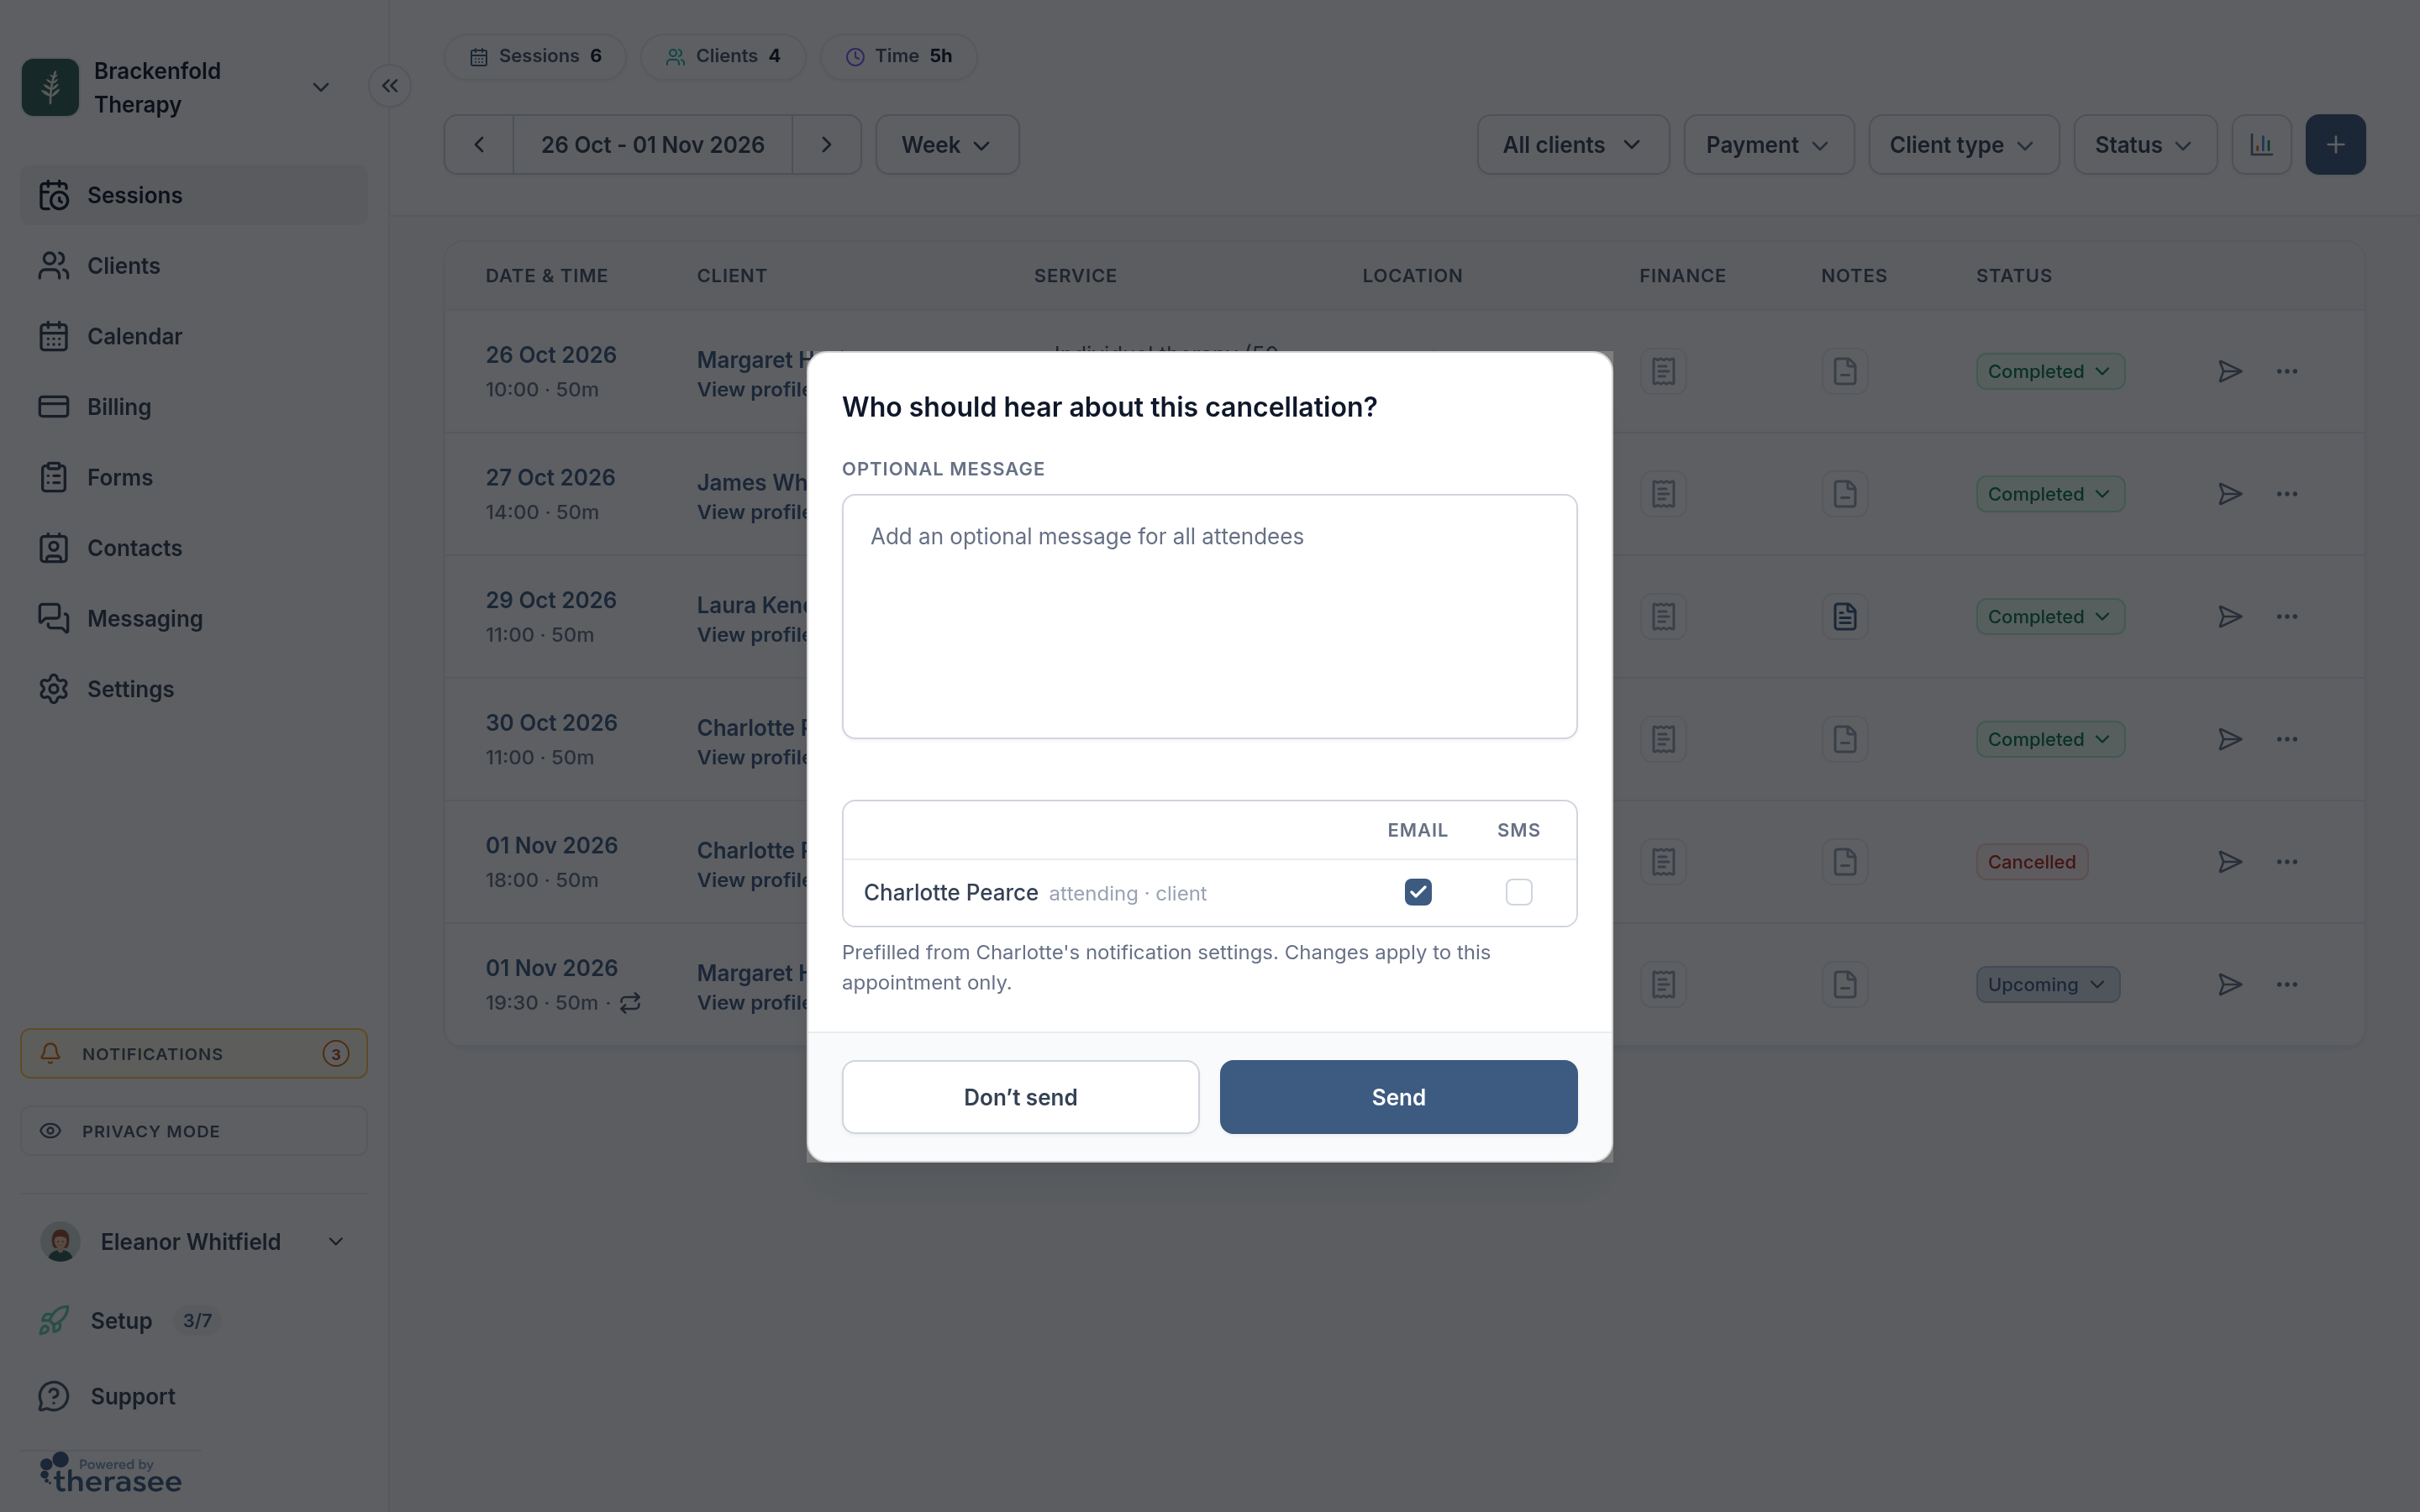
When a client books, reschedules or cancels through your portal there is no dialog, so your practice defaults decide what is sent.
Send the details or joining link again
If a client has lost their confirmation or joining link, send the details again without changing the appointment.
- Open the appointment from the Calendar. For an online session, click the paper-plane button (Send invite) at the bottom left of the appointment panel. The same button is on the appointment's row in Sessions (Share) and on the client's Appointments tab.
- The Send invite panel opens with Send via Email ticked and the client's email address filled in under Email address. For a couple or a dependant, the partners or responsible adults are filled in instead. You can add or remove addresses.
- Check the Subject, which starts as "Appointment with [your name] is confirmed". Add a note under Message (optional) if you want to. The Added automatically box shows what the email includes by itself: the date and time, the service and where it takes place, who is attending and, for an online session, a Join session button.
- To send a text as well, tick Send via SMS, check the Phone number and edit the Message. For an online session, the joining link is added to the end of the text.
- Click Send.
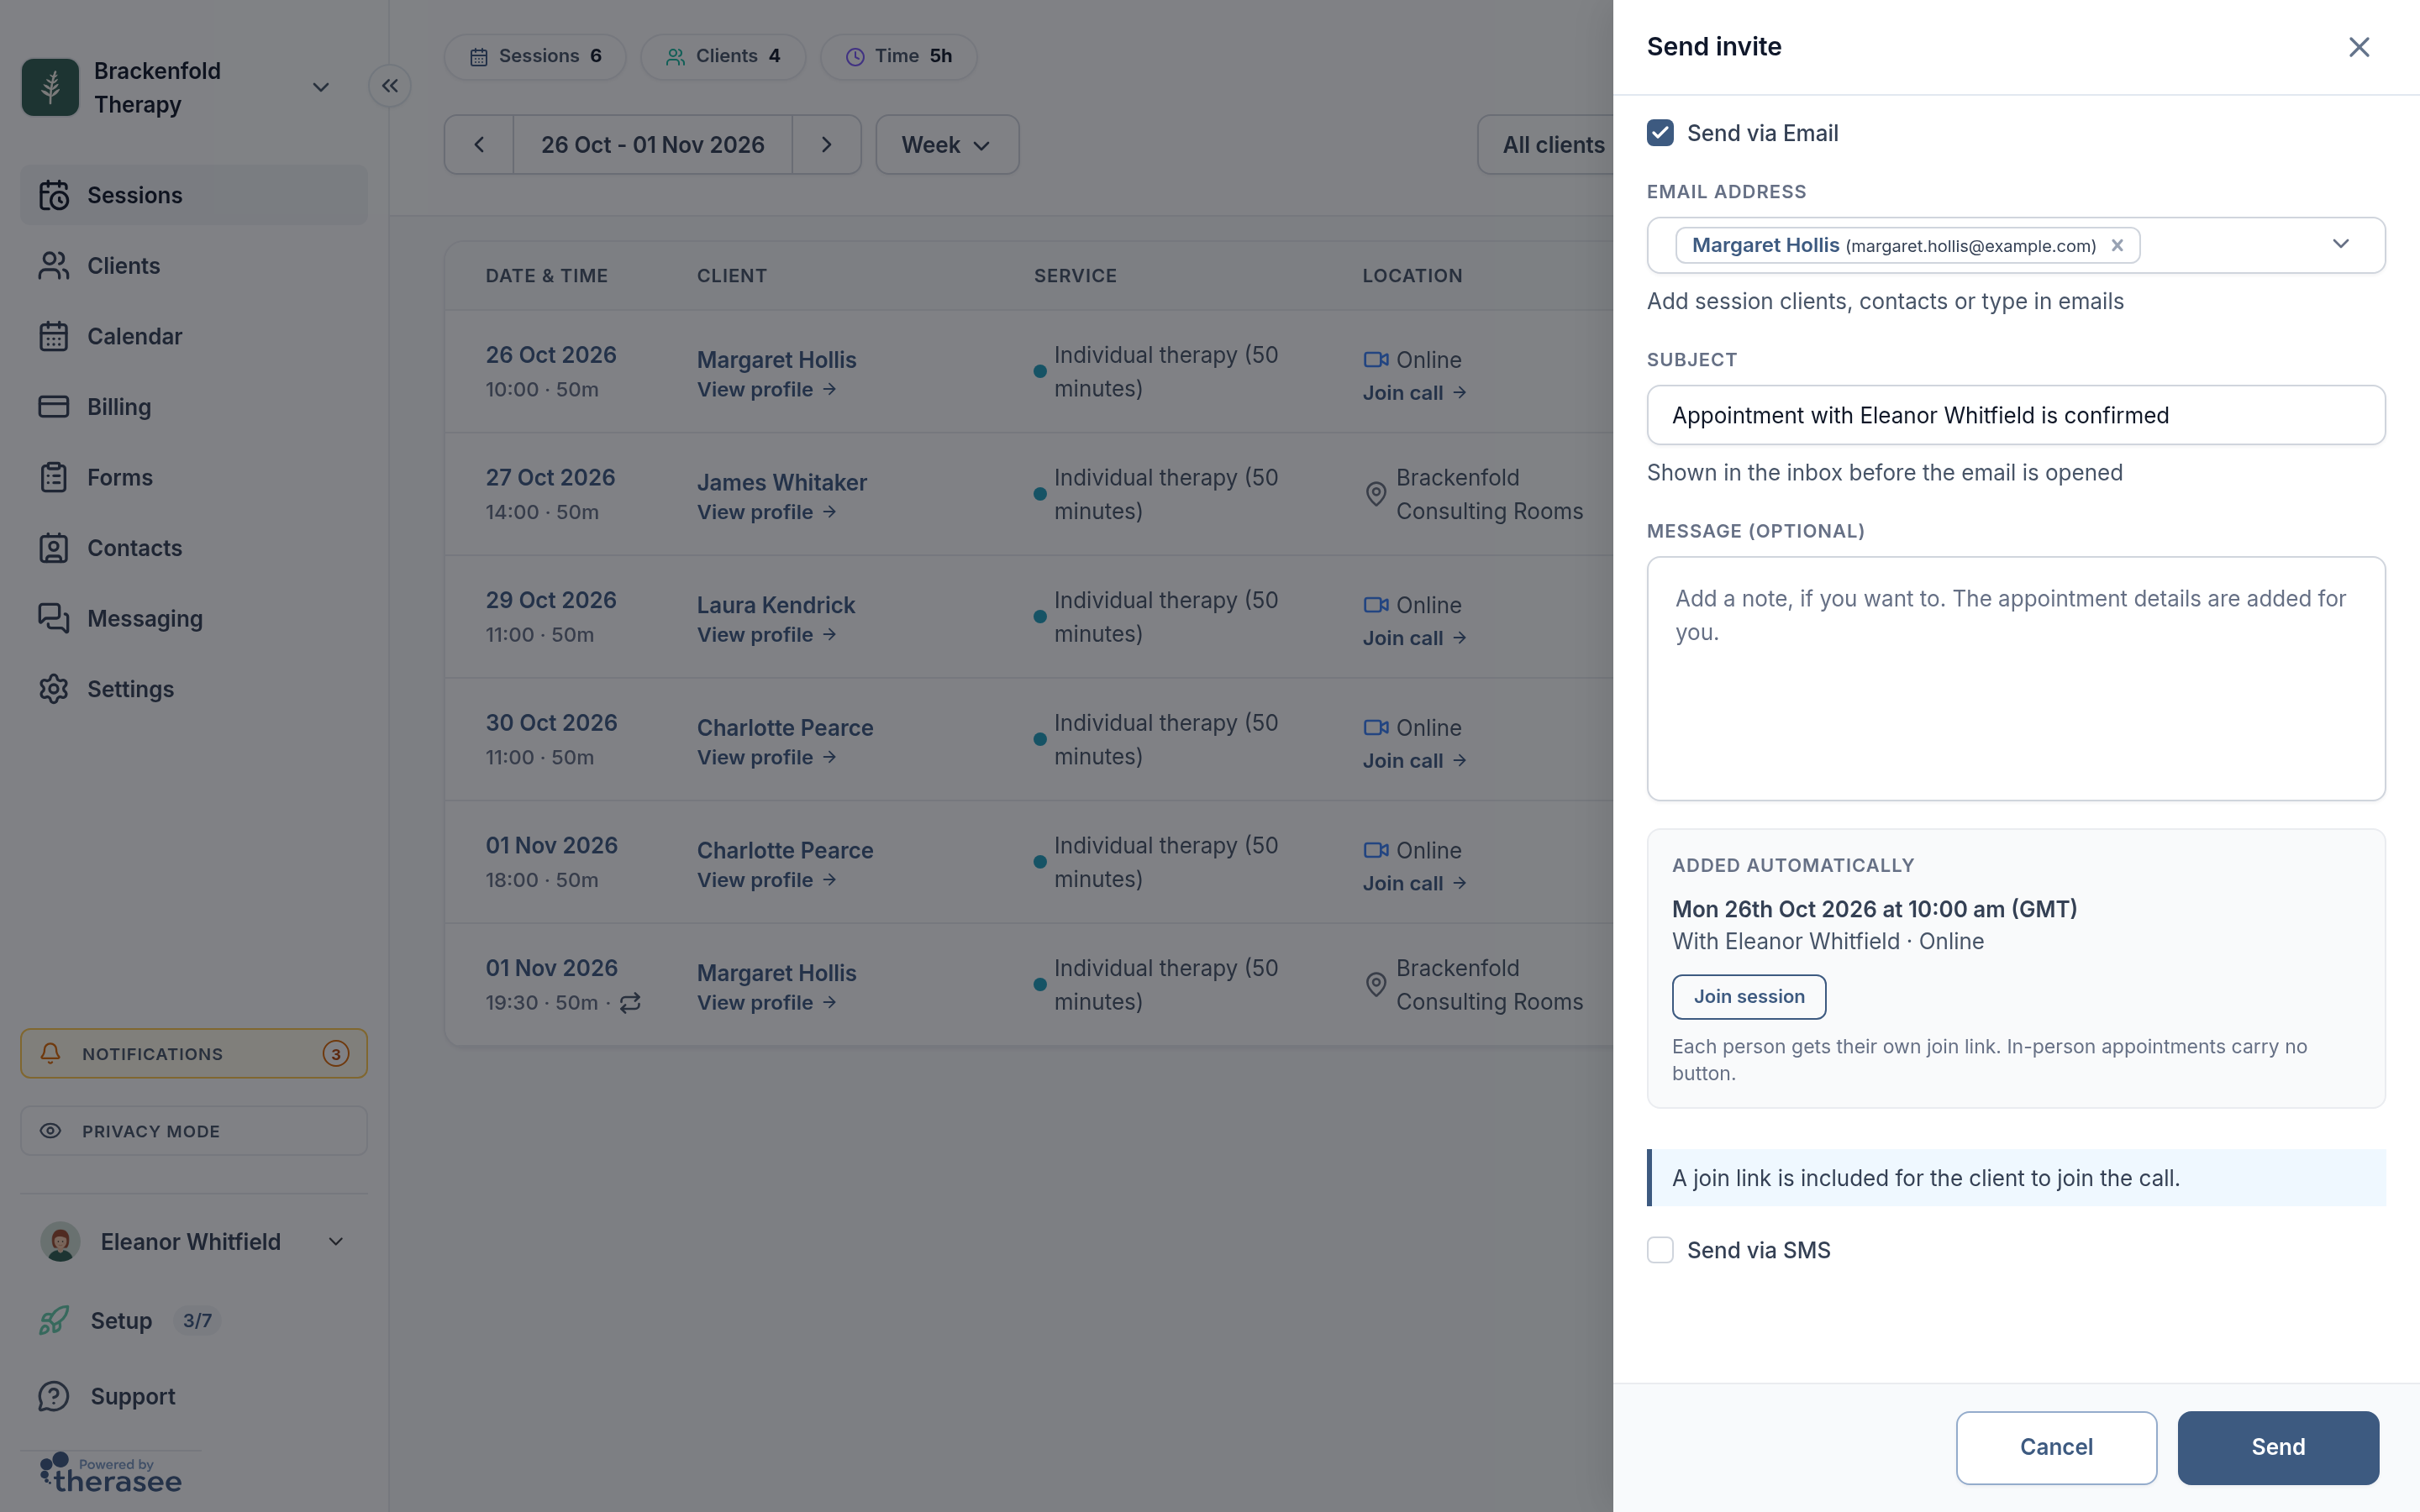
The email also carries a calendar file. When it goes to partners or responsible adults, each person gets their own copy, greeted by name, with their own joining link, so they join the session as themselves. A Send invite goes only to the people you pick in the panel; the client's Notifications card does not apply to it. A line on the client's Timeline tab records who it was sent to.
Choose who receives what for one client
Open the client from Clients. On their profile, the Notifications card (subtitle Automatic emails and texts, and who receives them.) shows a grid headed Who receives what. The rows are Confirmations, Reminders, Changes & cancellations, Invoices & receipts, Form requests and New portal messages. There is a column for the client and one for each responsible adult on the record.
- Click a tick to add or remove that person for that kind of message. Each click saves straight away; there is no Save button.
- A greyed-out column means that person has no email or phone number yet. Hover over it to see what to add.
- New portal messages reads Portal access is off until the client has portal access, because there is nothing to be notified about until then.
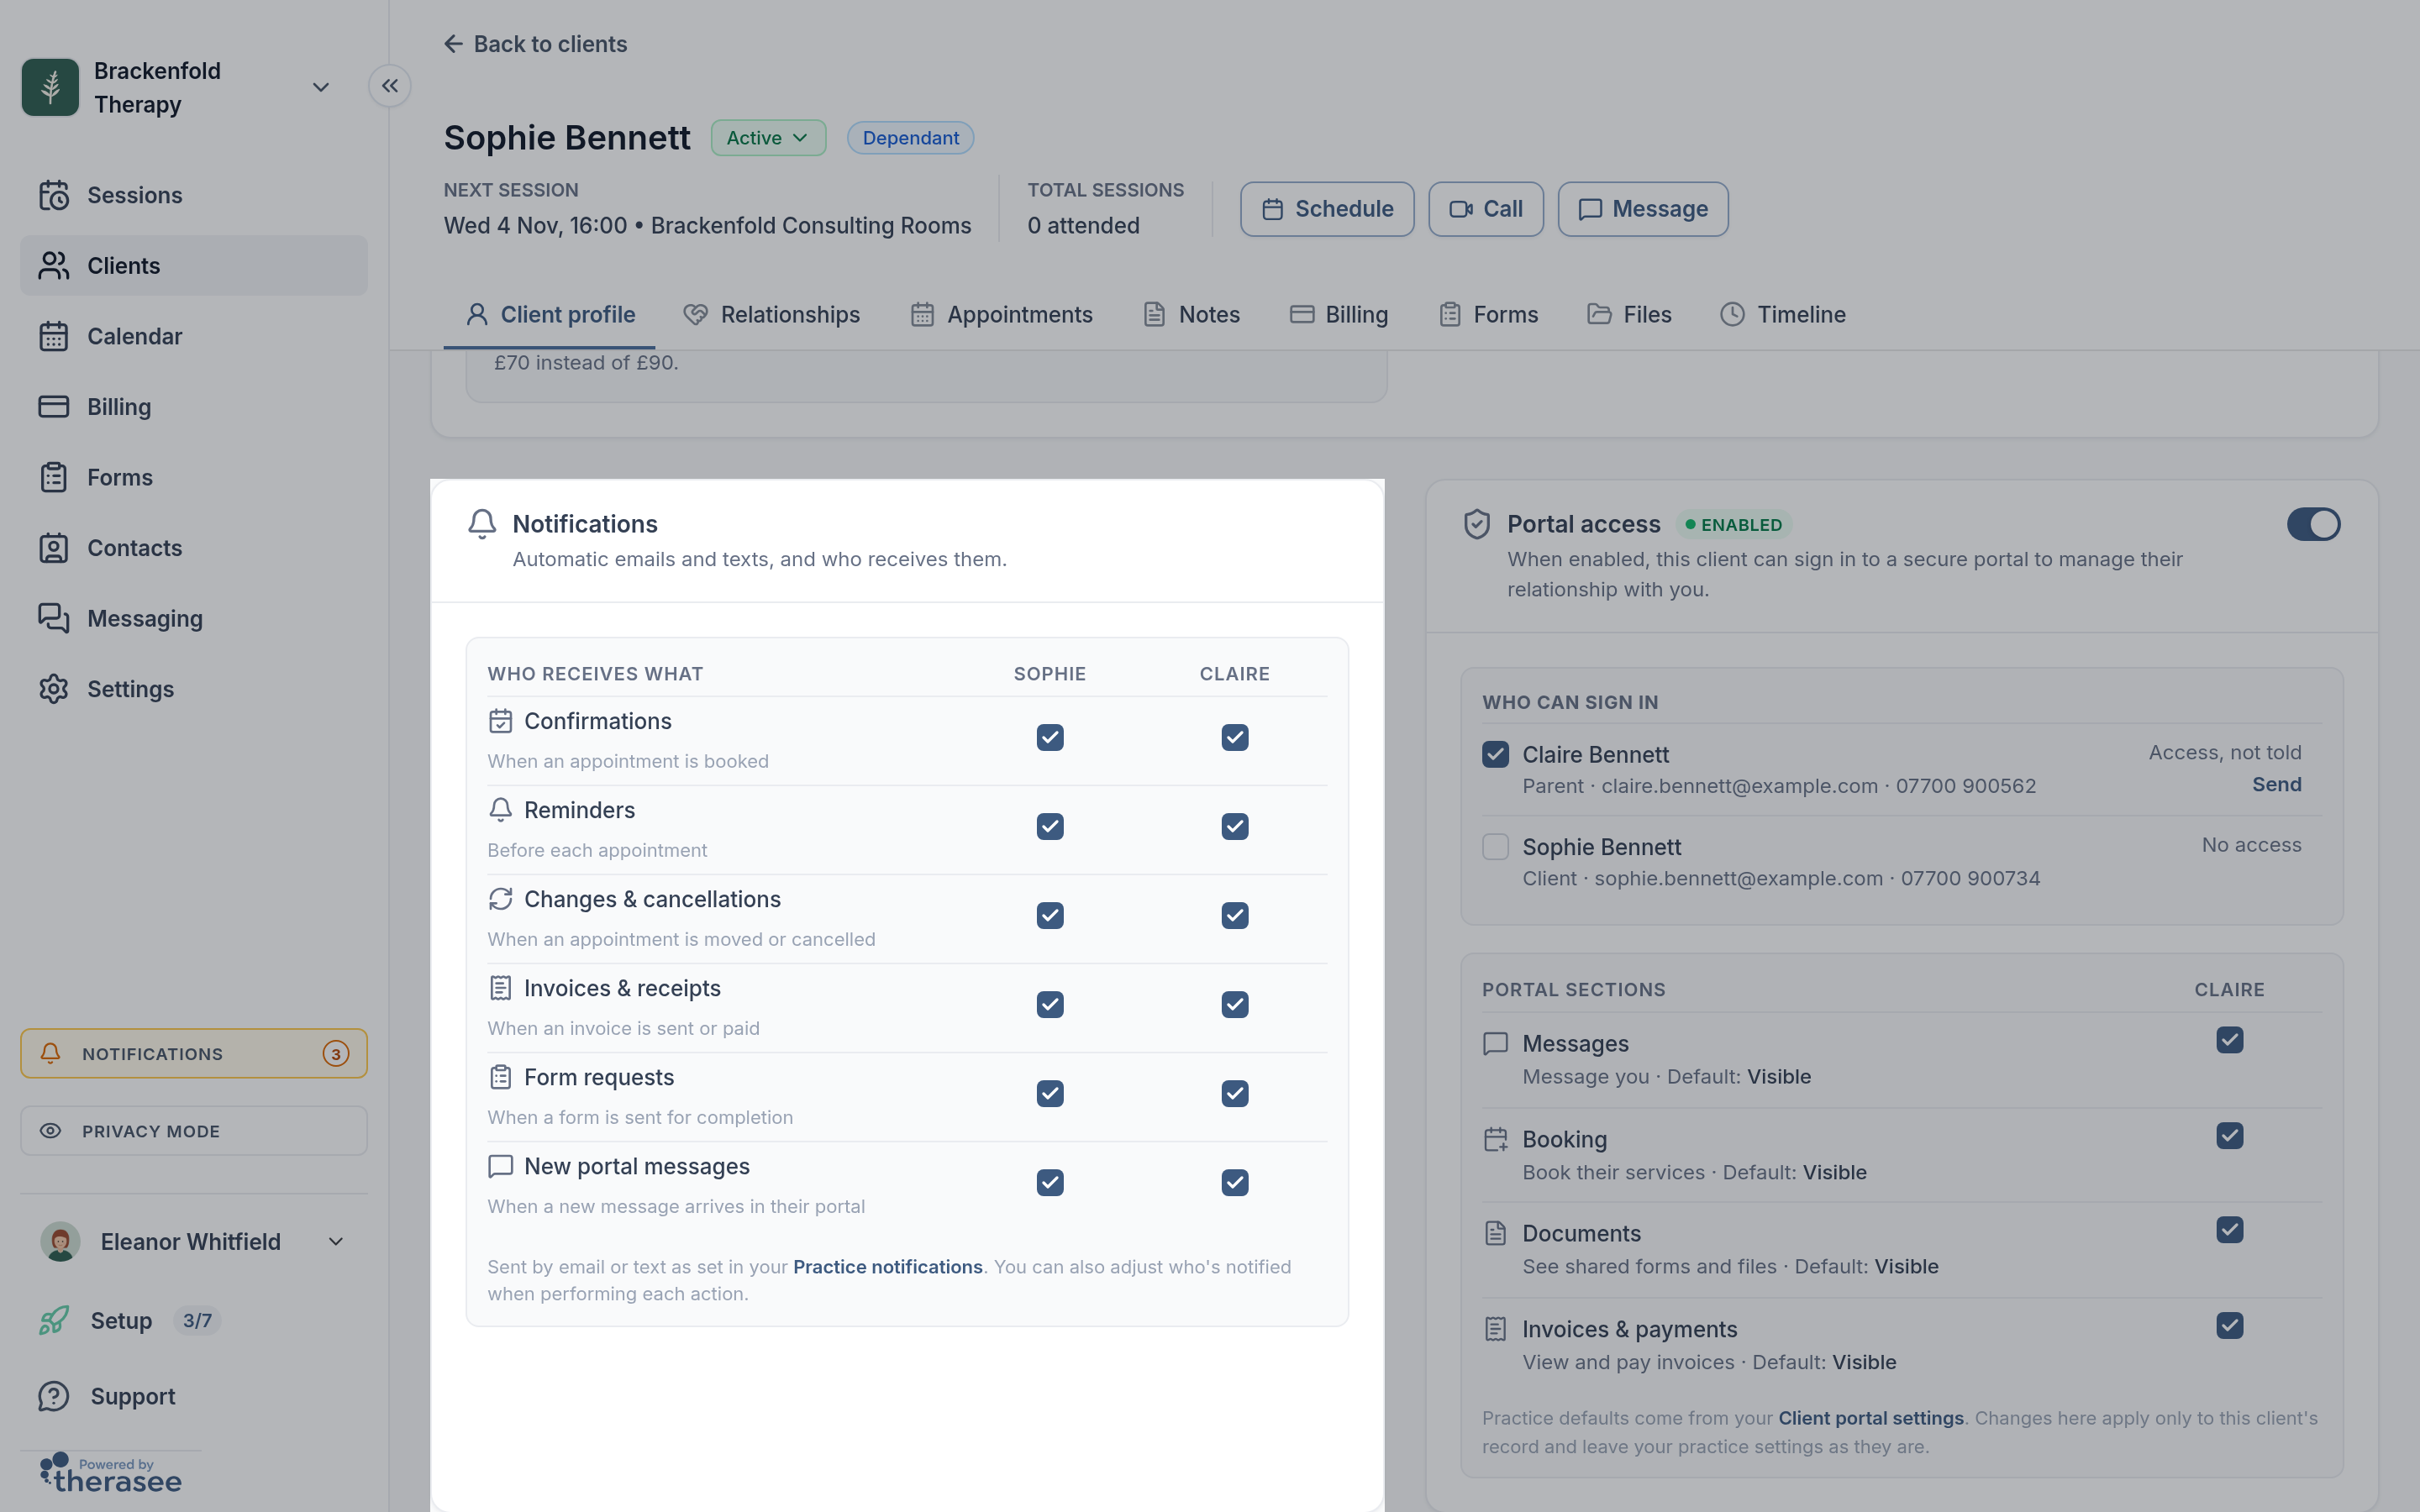
Until you change anything, the client receives everything. For invoices, the default is whoever pays the bill if one is named on the record. See Working with couples and Working with children and other dependants for setting up those records.
Reminders for a parent, carer or both partners
Reminders follow the Reminders row of the Notifications card, like everything else on it.
- A dependant: reminders go to the responsible adults to begin with. Tick the young person's own column as well once they have an email or phone number, or untick an adult who should not be reminded.
- A couple: both partners are reminded to begin with. Untick a partner who should not be. A couple's record has no email or phone of its own, so reminders go only to the partners ticked in this row.
Each person ticked gets their own reminder, addressed to them, and for an online session their own joining link.
To change who is reminded for one appointment, look at the Reminders section of the booking form. When reminders go to more than one person, a line such as "Sent to Sam and Alex." shows who; click Change to tick Email and SMS for each person. If the section says No one is set to receive reminders yet. Choose who on the client's profile., tick someone in the Reminders row of the Notifications card.
Other people you add to an appointment's attending list, outside the client's record, receive appointment emails (not texts) with their own joining link. They appear in the booking and cancellation dialogs so you can untick them.
Portal invitations
When you turn on a client's portal access, Therasee asks whether to let them know. Tick Email and/or SMS for each person, or choose Don't send to switch access on without telling anyone yet. The email is titled Your client portal is ready and has a Sign in button. See Turning on the client portal.
How your messages look
Every client email carries your practice's name at the start of the subject line, for example "Your practice - Appointment confirmed", and your practice's logo or icon at the top. Which one appears follows the Clients see choice under Settings > Practice profile, which covers your booking page, client portal and emails. Invoice emails include the invoice as a PDF and a View and pay button when you take card payments. Text messages are short and include a link to the portal.
Changing the wording
The wording of automatic confirmations, reminders, change and cancellation notices, invoice emails and message notifications is fixed, and there is no editor for it. Each one carries your practice's name and logo and the appointment's own details: who it is with, the date and time, and the location or a Join session button.
When you want to say something in your own words, there are three places to do it:
- When you change or cancel an appointment, type in Optional message. It appears in the email under "Message".
- When you send an appointment's details again with Send invite, you write the subject, a note and the text message yourself (see Send the details or joining link again above).
- For anything else, such as directions, what to bring or your cancellation terms, send a message in the portal. See Messaging a client.
The Send confirmation? dialog for a new booking has no message box. To add a personal note to a new booking, use Send invite or a portal message once it is booked.
What clients see in the portal
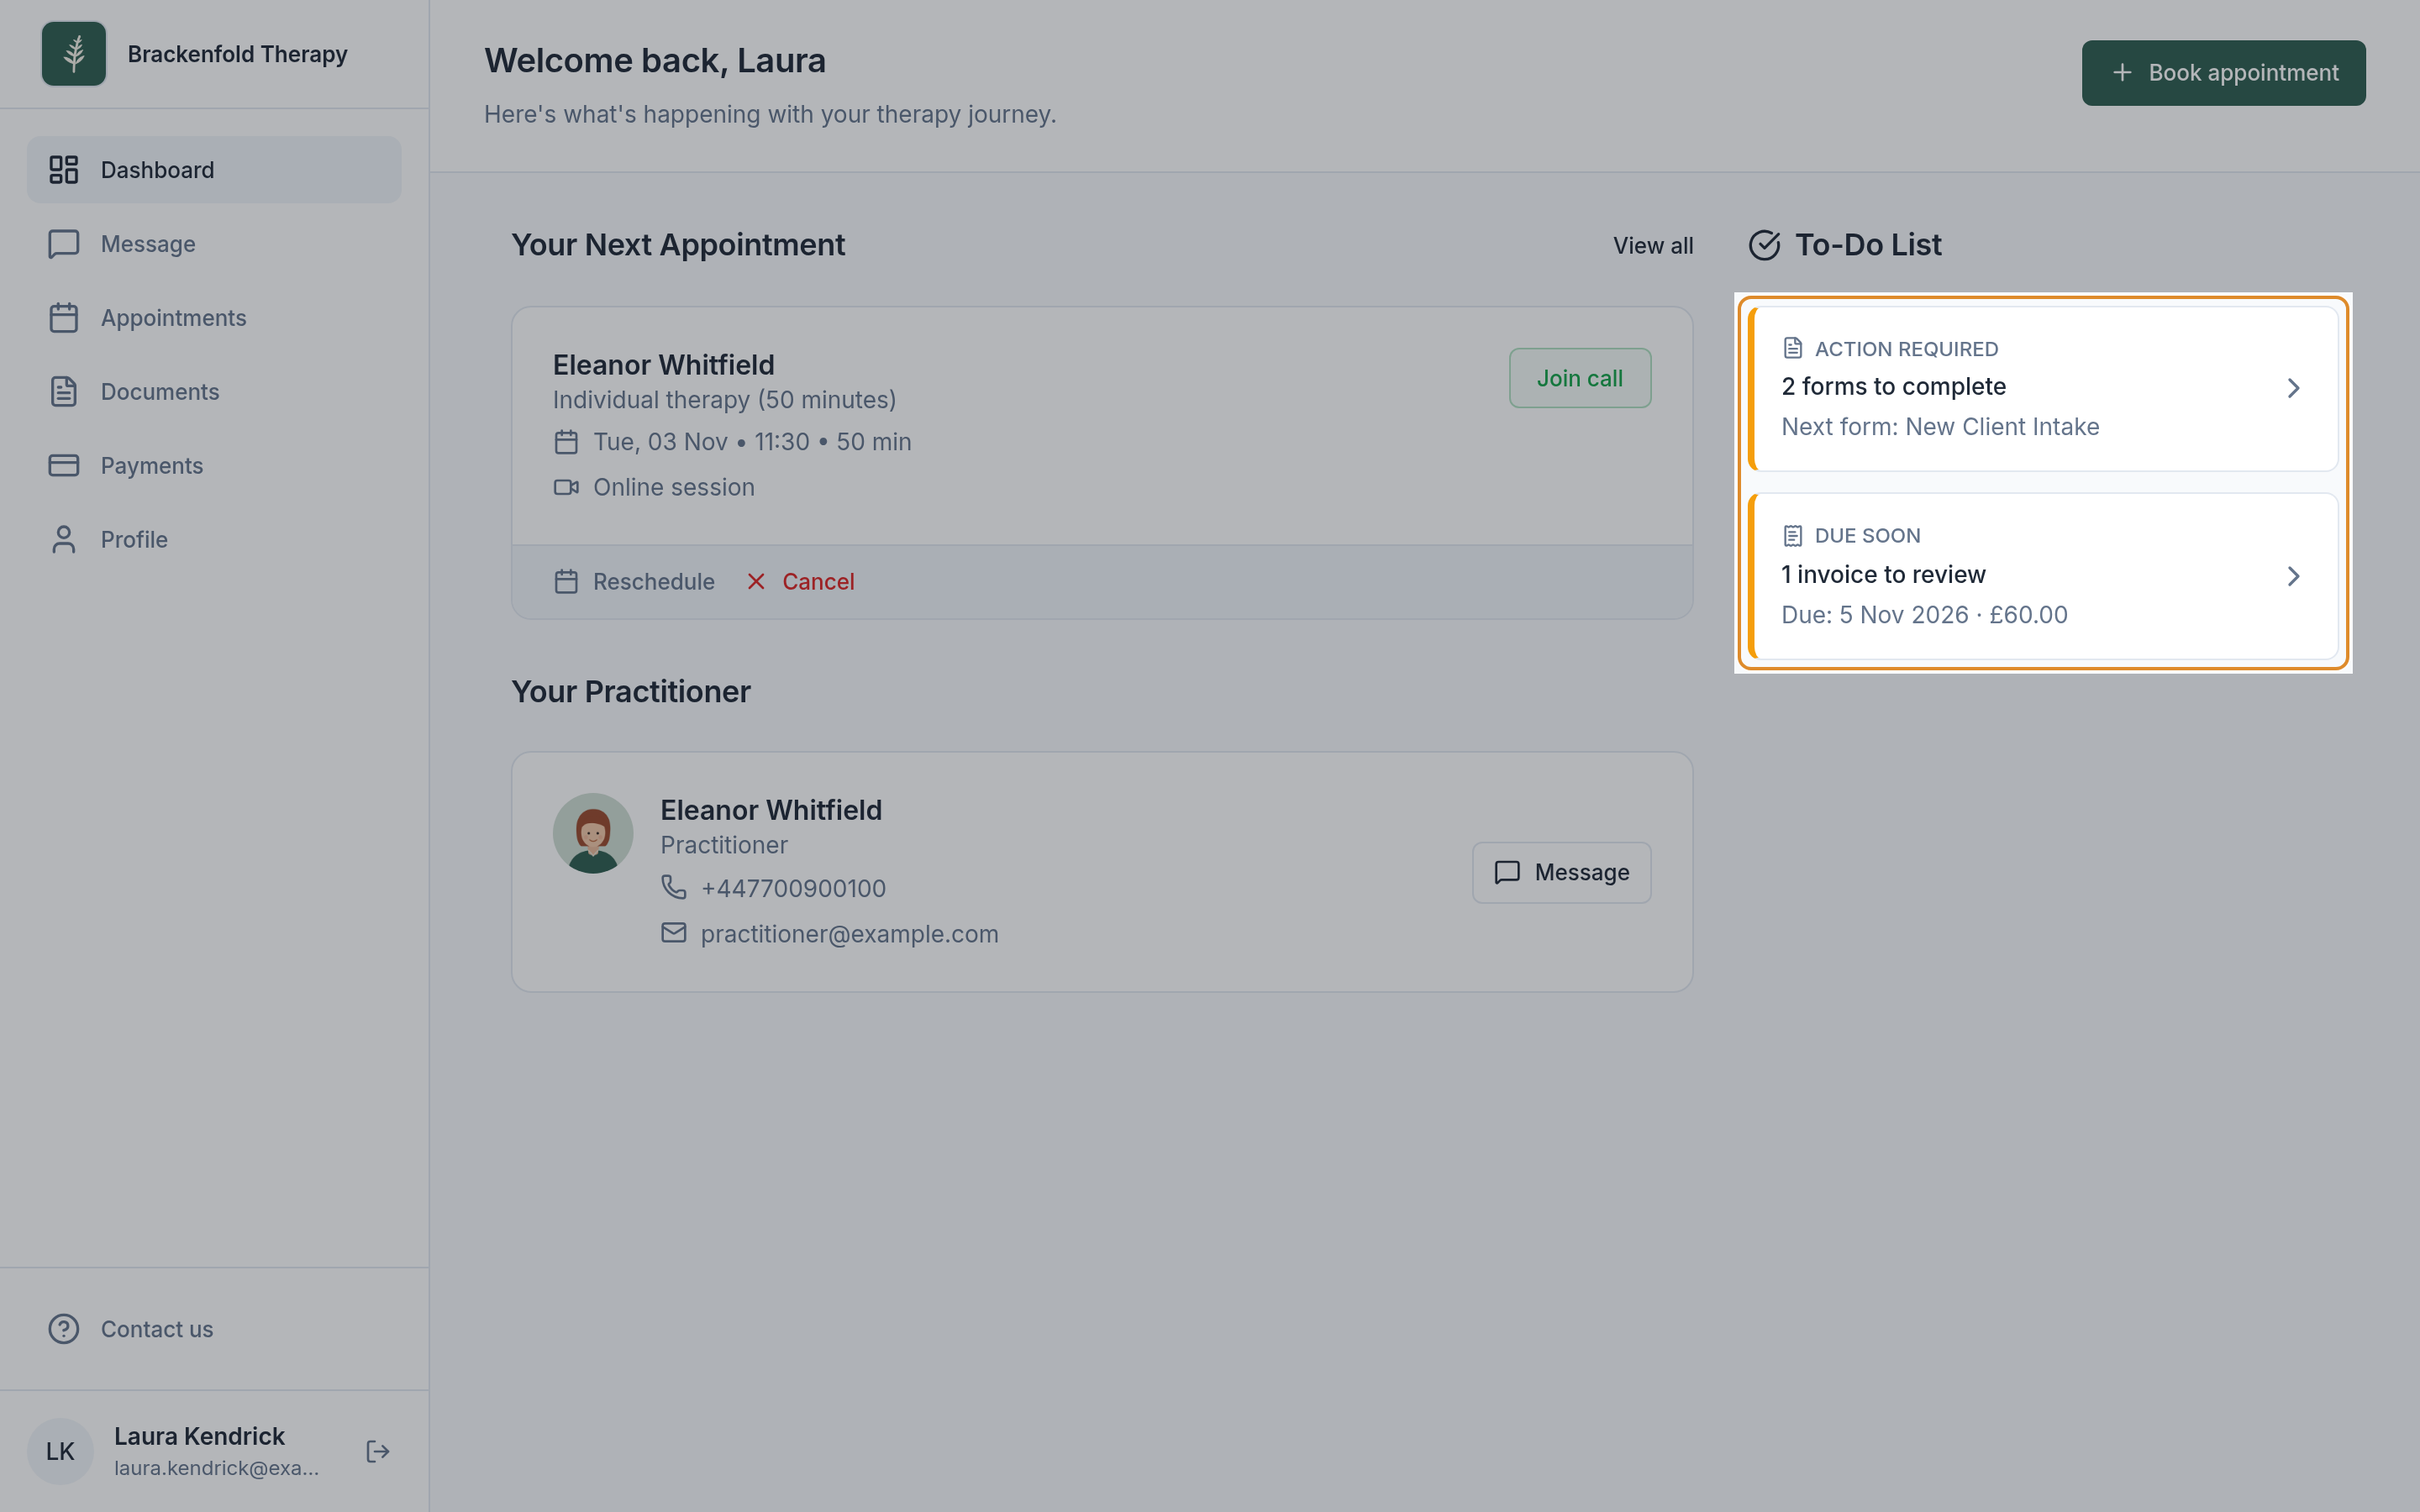
Forms to fill in, invoices to pay and unread messages also wait in the to-do list on the client's portal home page, whether or not they read the email. Clients can also turn on alerts from the portal on their own device.
What you receive yourself
Your own notifications are separate. Under Settings > My settings > Notifications you choose Email and In-app alerts for New message received, Appointment confirmed, Appointment cancelled, Appointment rescheduled, Form submitted, Appointment booked and New registration. Message emails go to the practitioner or team the conversation is assigned to, and are skipped if you have been active in Therasee in the last 15 minutes.
Was this helpful?