The sessions list, calendar views and reports
Find and review your sessions on the Sessions page and Calendar, understand session statuses, and see and export your session and billing numbers.
Updated 19 November 2026
This page shows you how to find and review your sessions, and how to see the numbers behind them. It covers the Sessions page, the Calendar's views and filters, session statuses, and the analytics and exports on the Sessions and Billing pages. To book, move or cancel a session, see Booking an appointment and Cancellations and no-shows.
The Sessions page
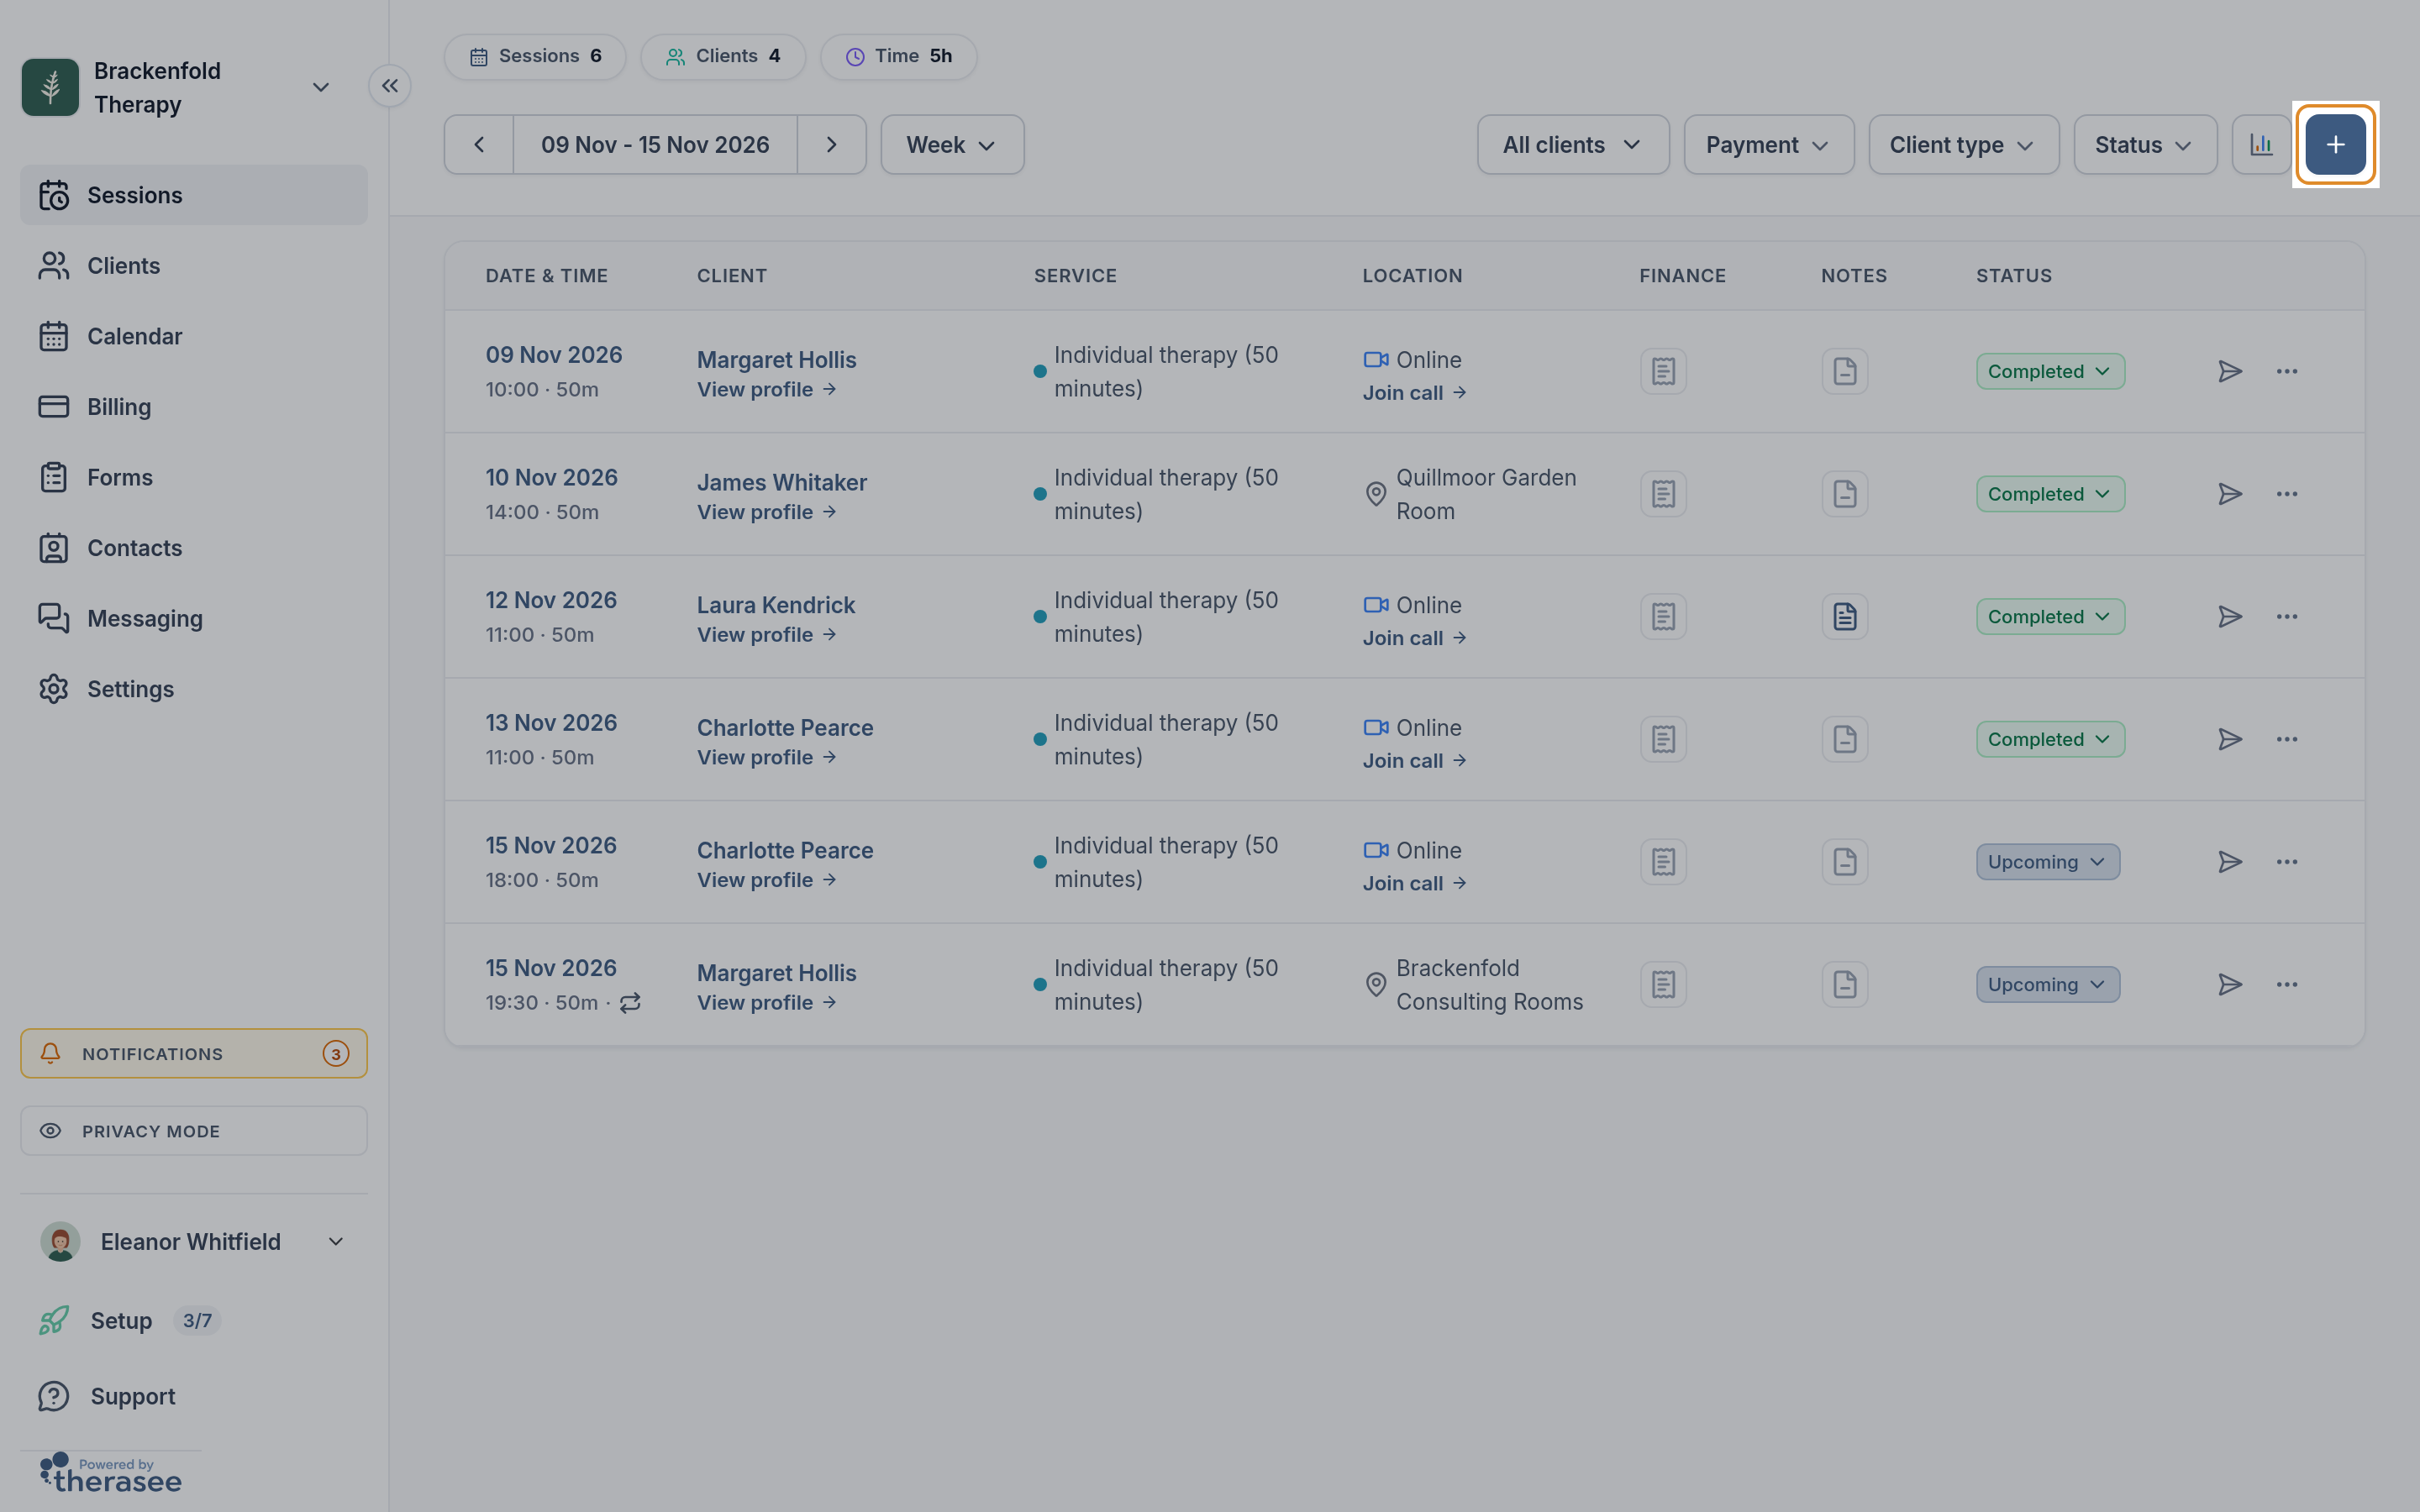
Open Sessions from the sidebar. It's the page you land on when you sign in, and lists every session in the period you choose.
The summary at the top
Three chips sum up whatever the list is showing right now:
- Sessions: how many sessions are in the list.
- Clients: how many different clients those sessions are with.
- Time: the total length of those sessions.
They follow your dates and filters.
Choosing the dates
The date picker sets which sessions you see. Choose Day, Week, Month, Quarter, Year or Custom to pick your own start and end dates. Use the arrows either side to step back or forward one period.
The list opens on Week the first time. After that it remembers your choice: a period such as Month reopens on the current month, and a custom range on the dates you picked.
Filtering the list
The buttons beside the date picker narrow the list, and you can combine them.
- Practitioner (the people icon): in a practice with more than one practitioner, choose All sessions, My sessions, particular colleagues or teams. You can pick more than one, and your choice is remembered.
- Client: pick one or more clients, or All clients. Type in Search for client to find someone quickly.
- Payment: Paid, Pending (invoiced and not yet due), Overdue (invoiced and past its due date) or Non invoiced (a session with a fee but no invoice yet). All clears it.
- Client type: if your practice works with couples and dependants, show only Individuals, Dependants or Couples. See Working with couples and Working with dependants.
- Status: Upcoming, Completed, No show or Cancelled. All clears it.
The list runs oldest first. When you filter by Completed, No show or Cancelled, it runs newest first, so your most recent sessions are at the top.

What each column shows
- Date & Time: the date, the start time and the length in minutes. Click it to open the session. A repeat icon here means the session is part of a series (see below).
- Client: click the name to open the client's details alongside the list, or View profile to go to their full record.
- Service: the service name, with a dot in the service's colour.
- Location: Online for video sessions, with a Join call link, or the phone or room you booked. For video calls, see Running a video session.
- Finance: the invoice icon. A coloured dot shows the invoice's state: green for paid, orange for pending, red for overdue. Hover to see the status, plus the due date if it isn't paid yet, and click to open the invoice. With no invoice yet, the tooltip reads Create invoice and clicking it starts one for that session. A session with no fee shows No charge. See Creating and sending an invoice.
- Notes: View note opens the session's note, and Add note starts one. See Writing session notes.
- Status: the session's status, which you can change from here (see below).
At the end of each row, the paper-plane icon (Share) sends the client the session details, and the menu beside it has Edit and Delete.
On a phone or tablet, each session shows as a card. Tap it to open the session.
Opening a session
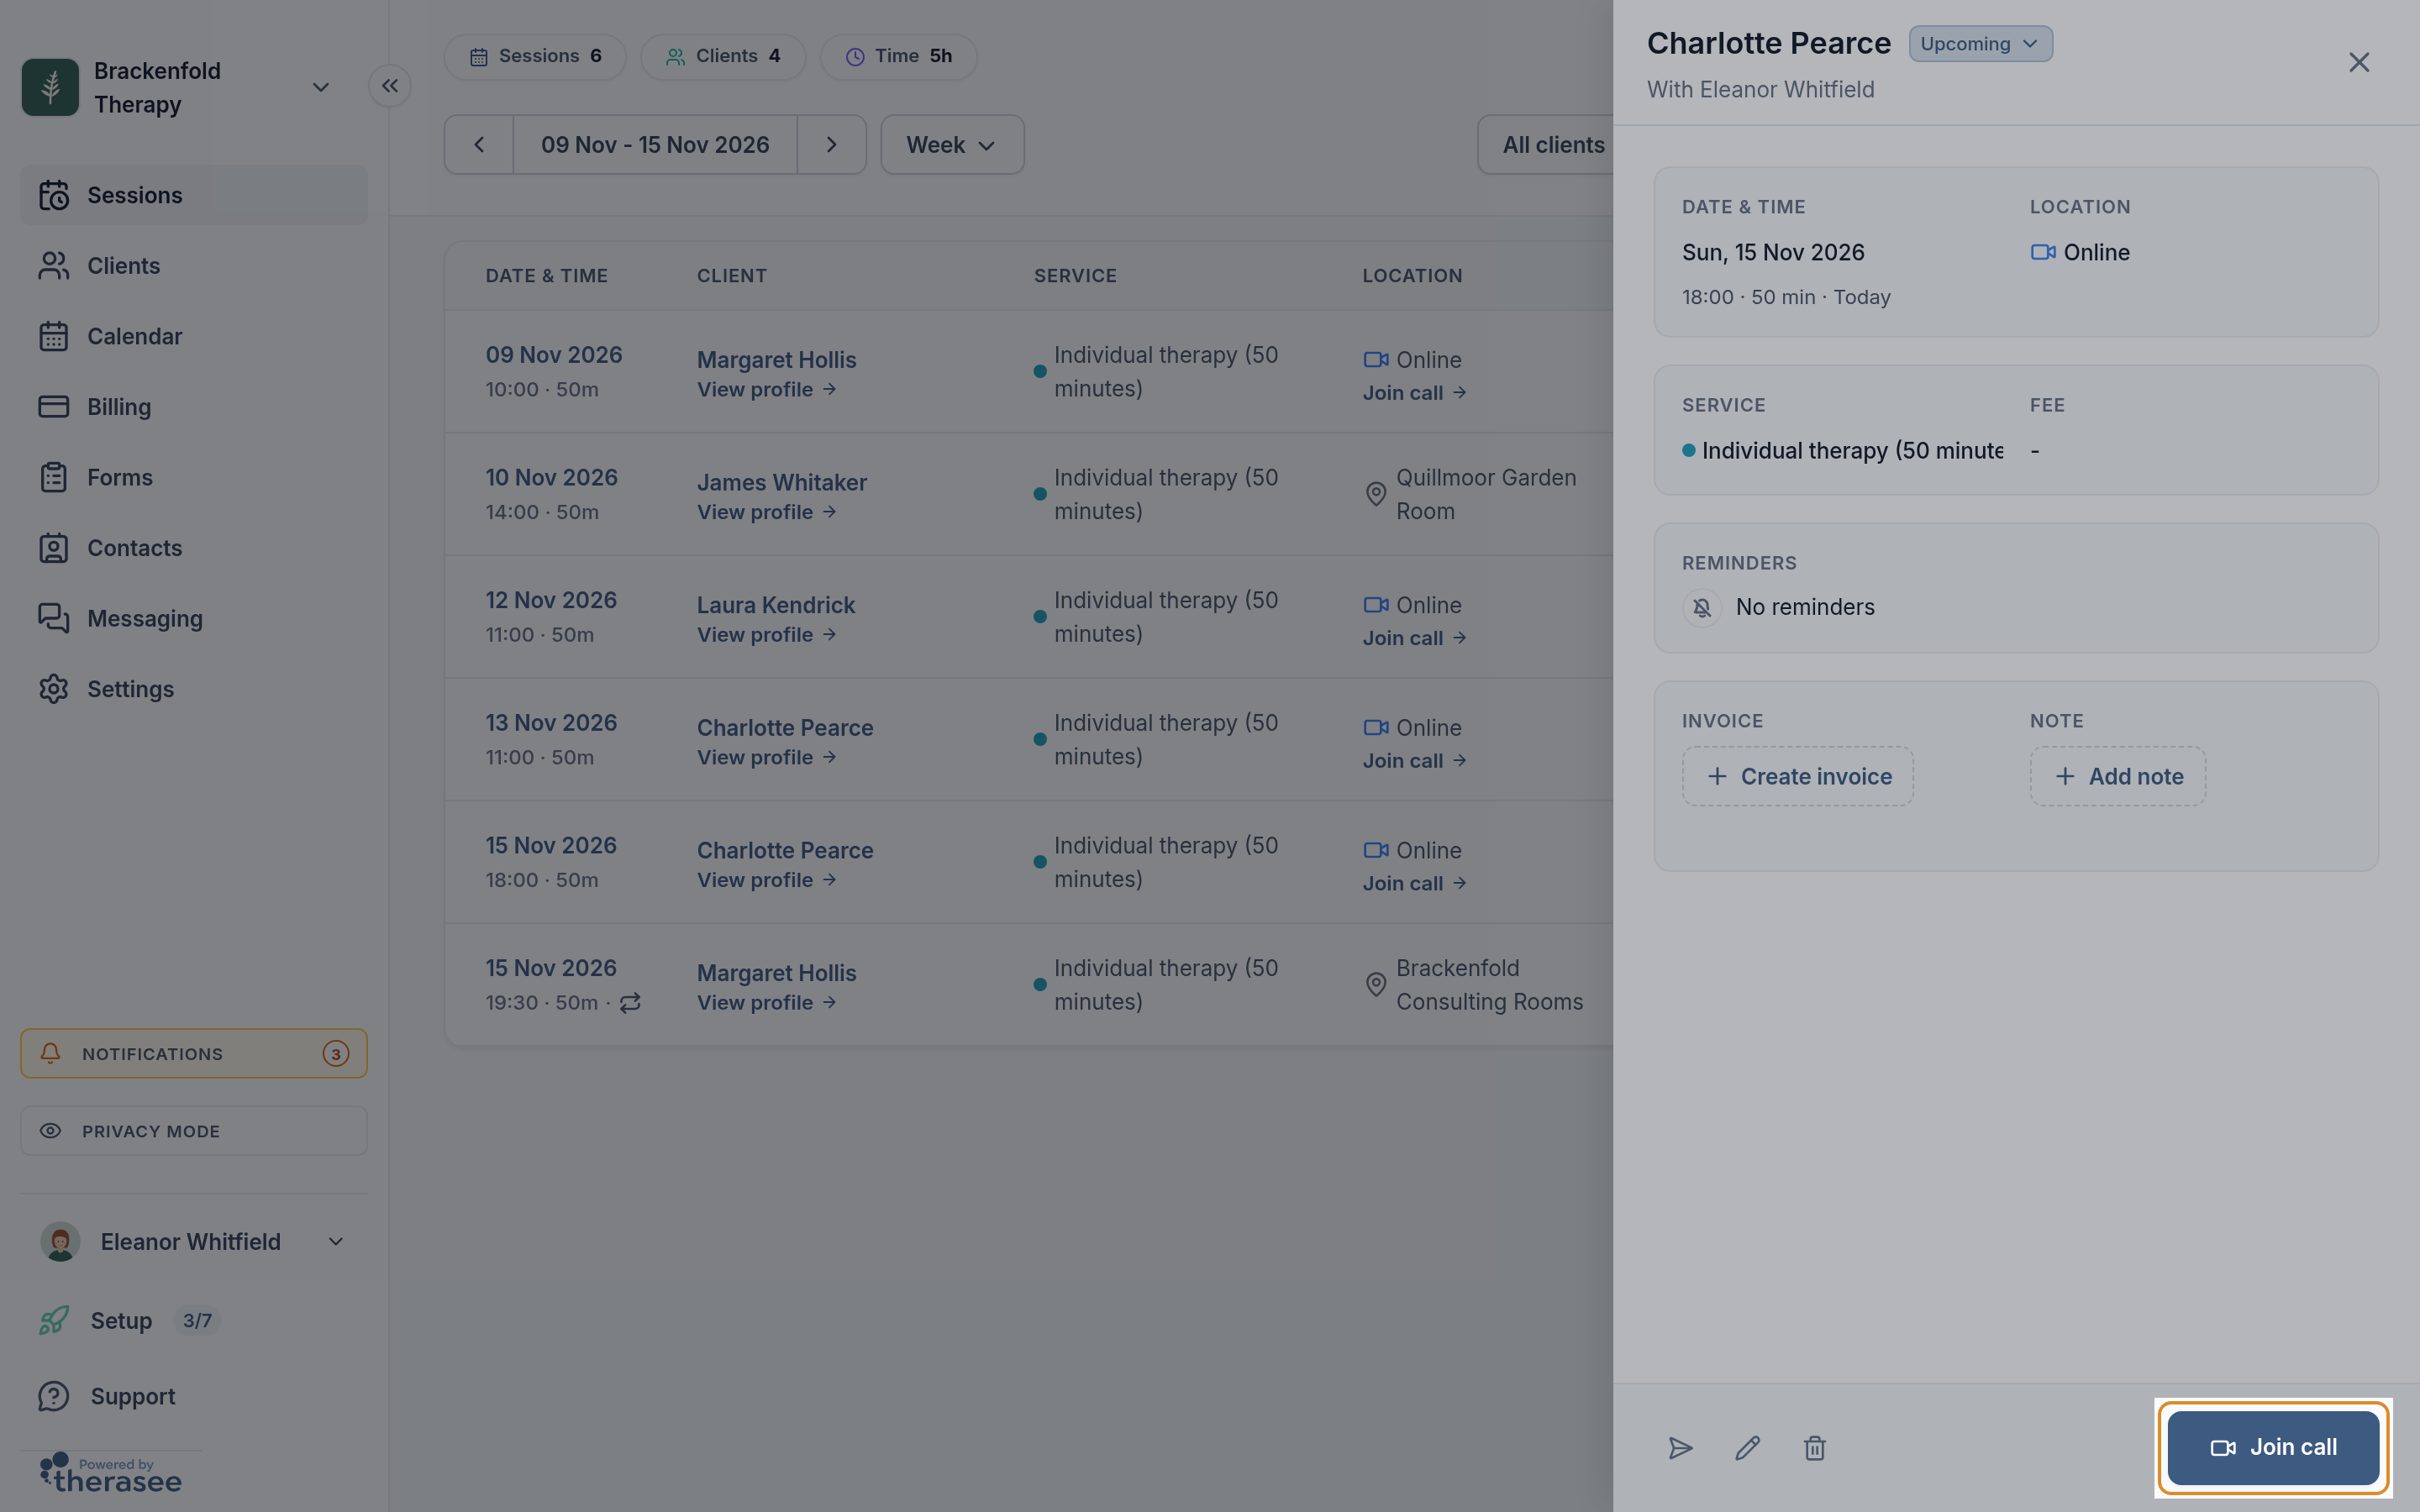
Click the date and time in a row, or a session on the Calendar, to open its panel. Below the client's name, status and practitioner it shows:
- Date & time: the day, start time and length, with a hint such as "Today", "Tomorrow" or "In 3 days".
- Location and Service.
- Fee: the price, or No charge.
- Attending: for couples and dependants, who is coming and their role.
- Reminders: the reminders set for the session. Hover one to see whether it has been sent yet.
- Recurrence: for a series, how it repeats and where this session falls in it.
- Invoice: the invoice and its status, or Create invoice. An Automatic label means the invoice will be created for you.
- Note: the session's note, or Add note.
The buttons at the bottom are Send invite (online sessions), Edit event (the pencil) and Delete event (the bin). Online sessions have Join call; other sessions have Close.
Session statuses
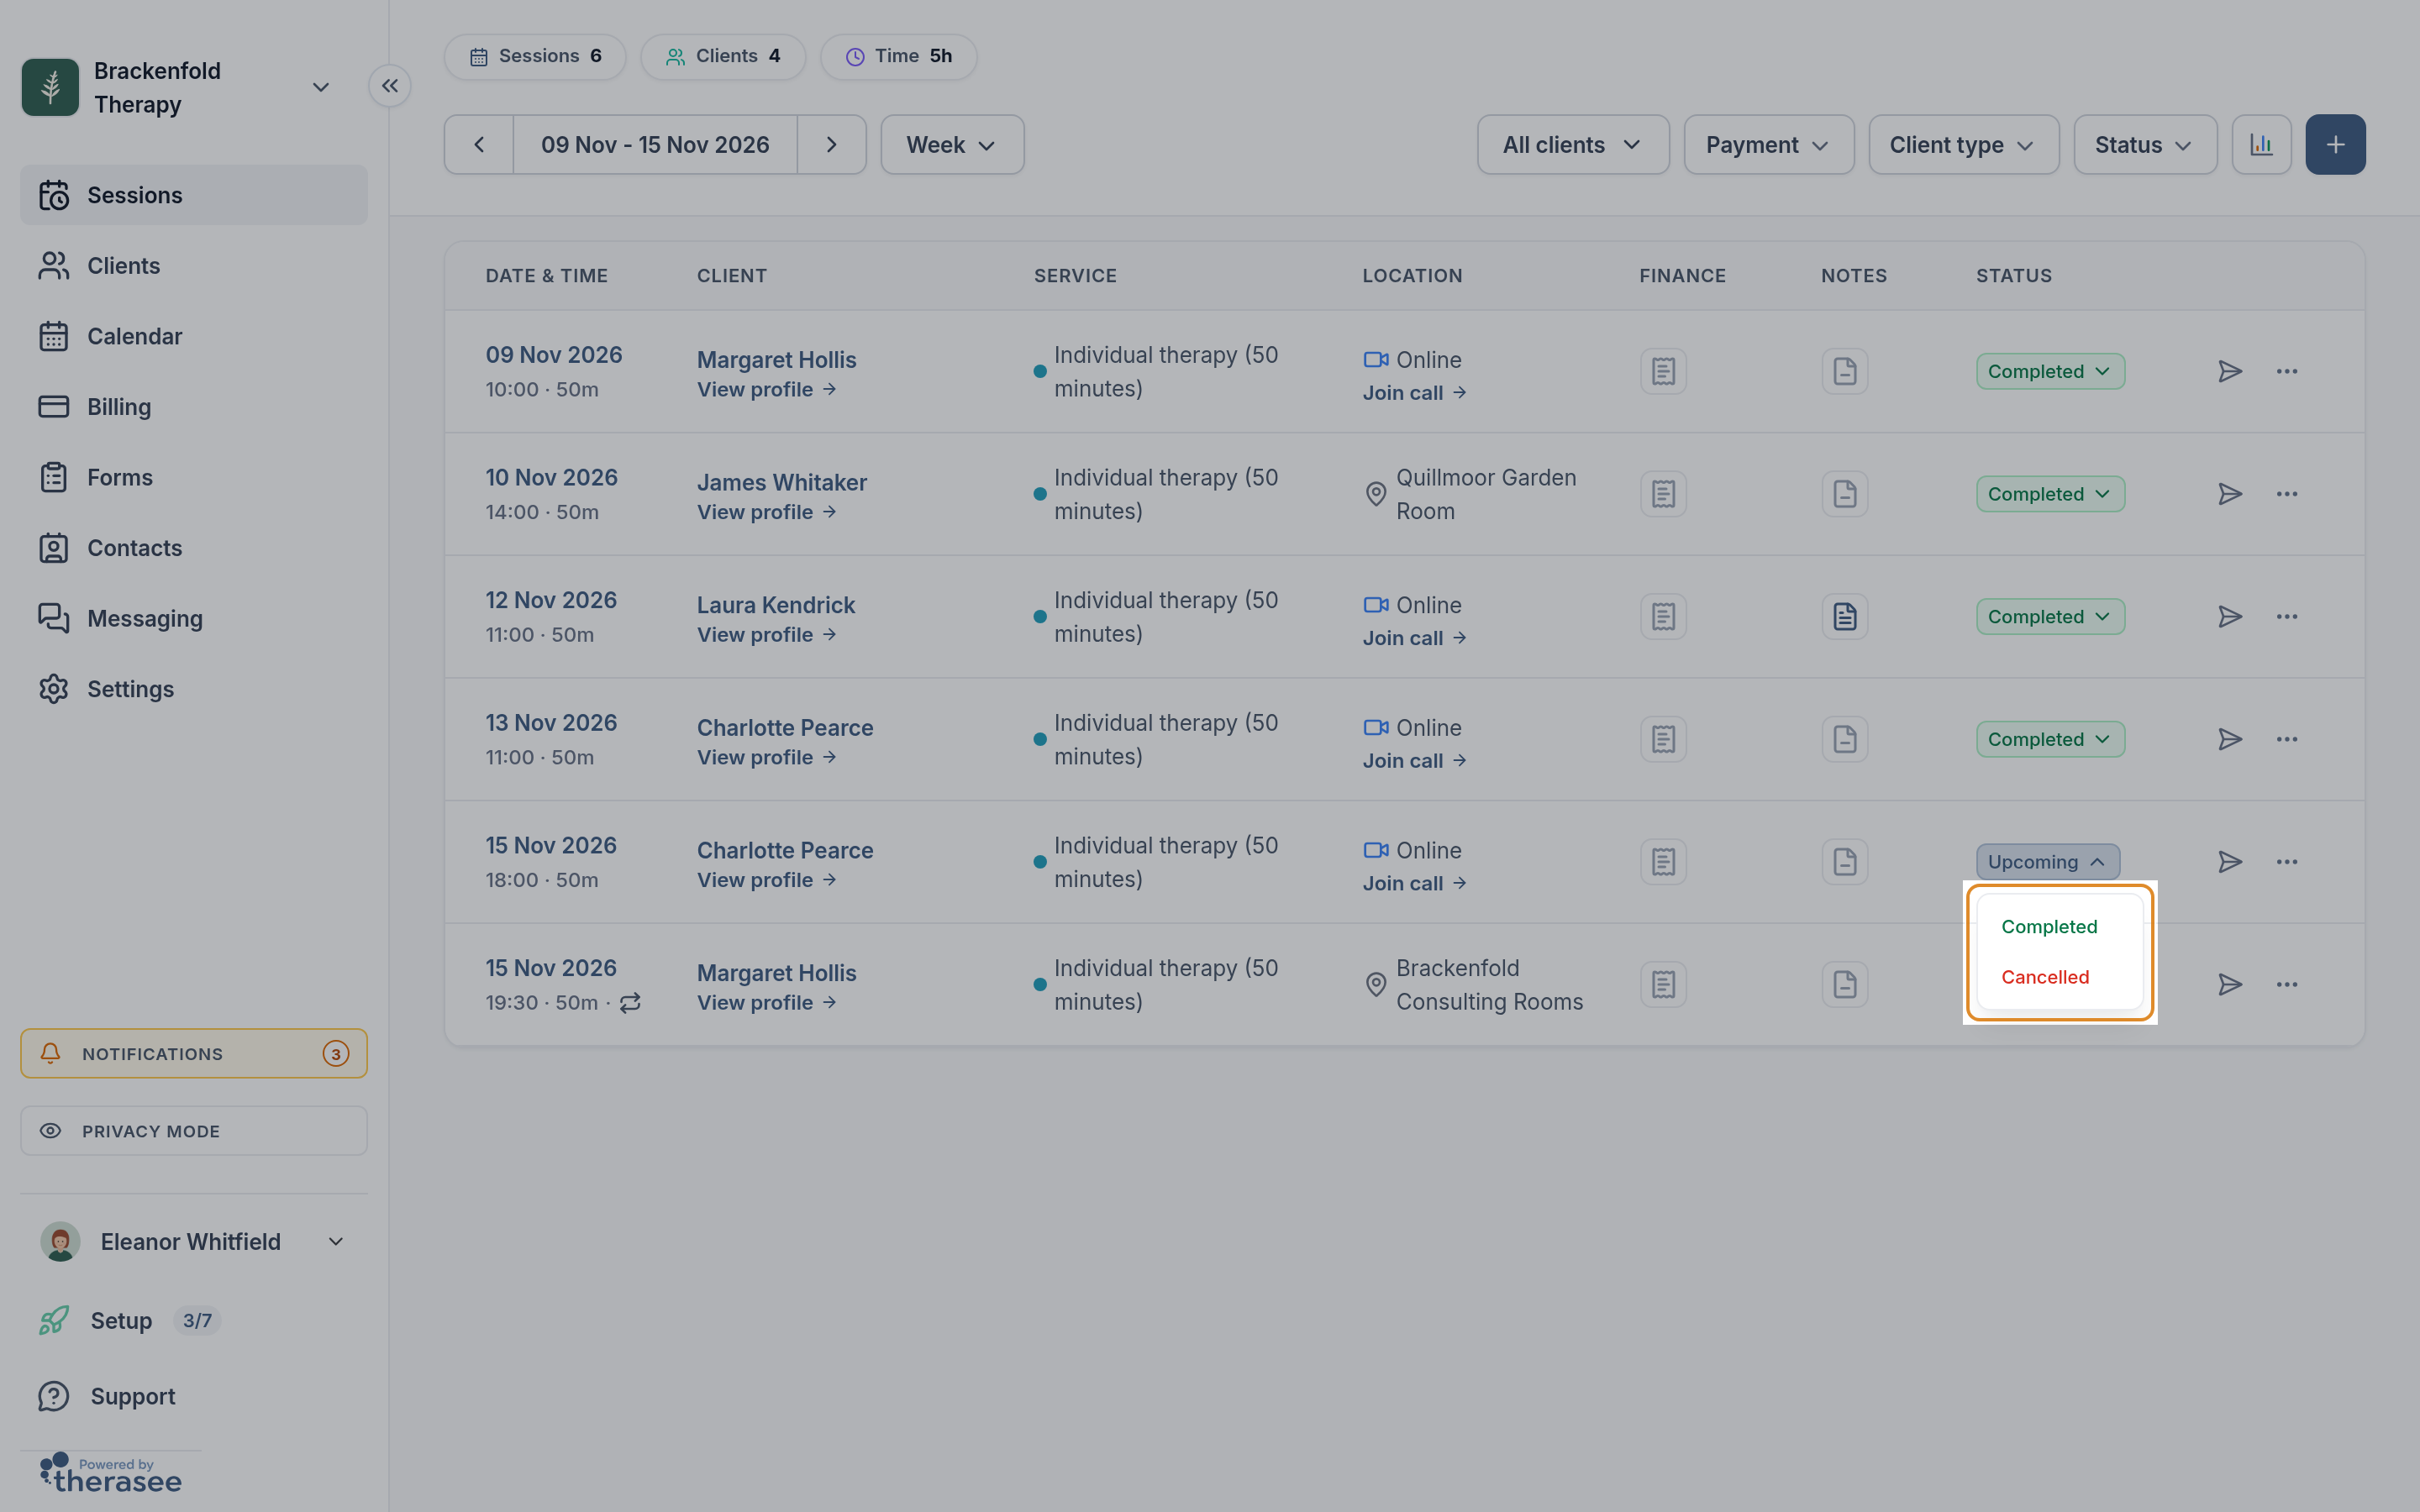
Every session has one of five statuses, shown as a coloured badge.
- Upcoming: the session hasn't started yet.
- Ongoing: the session is happening now.
- Completed: the session has ended. Once its end time passes, a session shows as Completed on its own, so you don't need to mark every session.
- No show: you marked that the client didn't attend.
- Cancelled: the session was cancelled.
To change a status, click the badge and choose another one. Upcoming and ongoing sessions offer Completed, No show and Cancelled. A completed session offers No show and Cancelled, and a no-show offers Completed and Cancelled, so you can correct a mistake. You'll see "Appointment status updated" when it's saved.
Choosing Cancelled opens the usual cancellation steps, where you decide who is told. A cancelled session keeps that status. See Cancellations and no-shows.
In a series, marking a session Completed or No show changes that session only. Cancelling asks which sessions in the series you mean.
Recurring sessions in the list
Each session in a series has its own row, so you can mark, invoice and note each one separately. A repeat icon after the time marks a series. Hover it to see where the session falls, for example "1 of 5 · Daily · until 17 Jul".
The Calendar
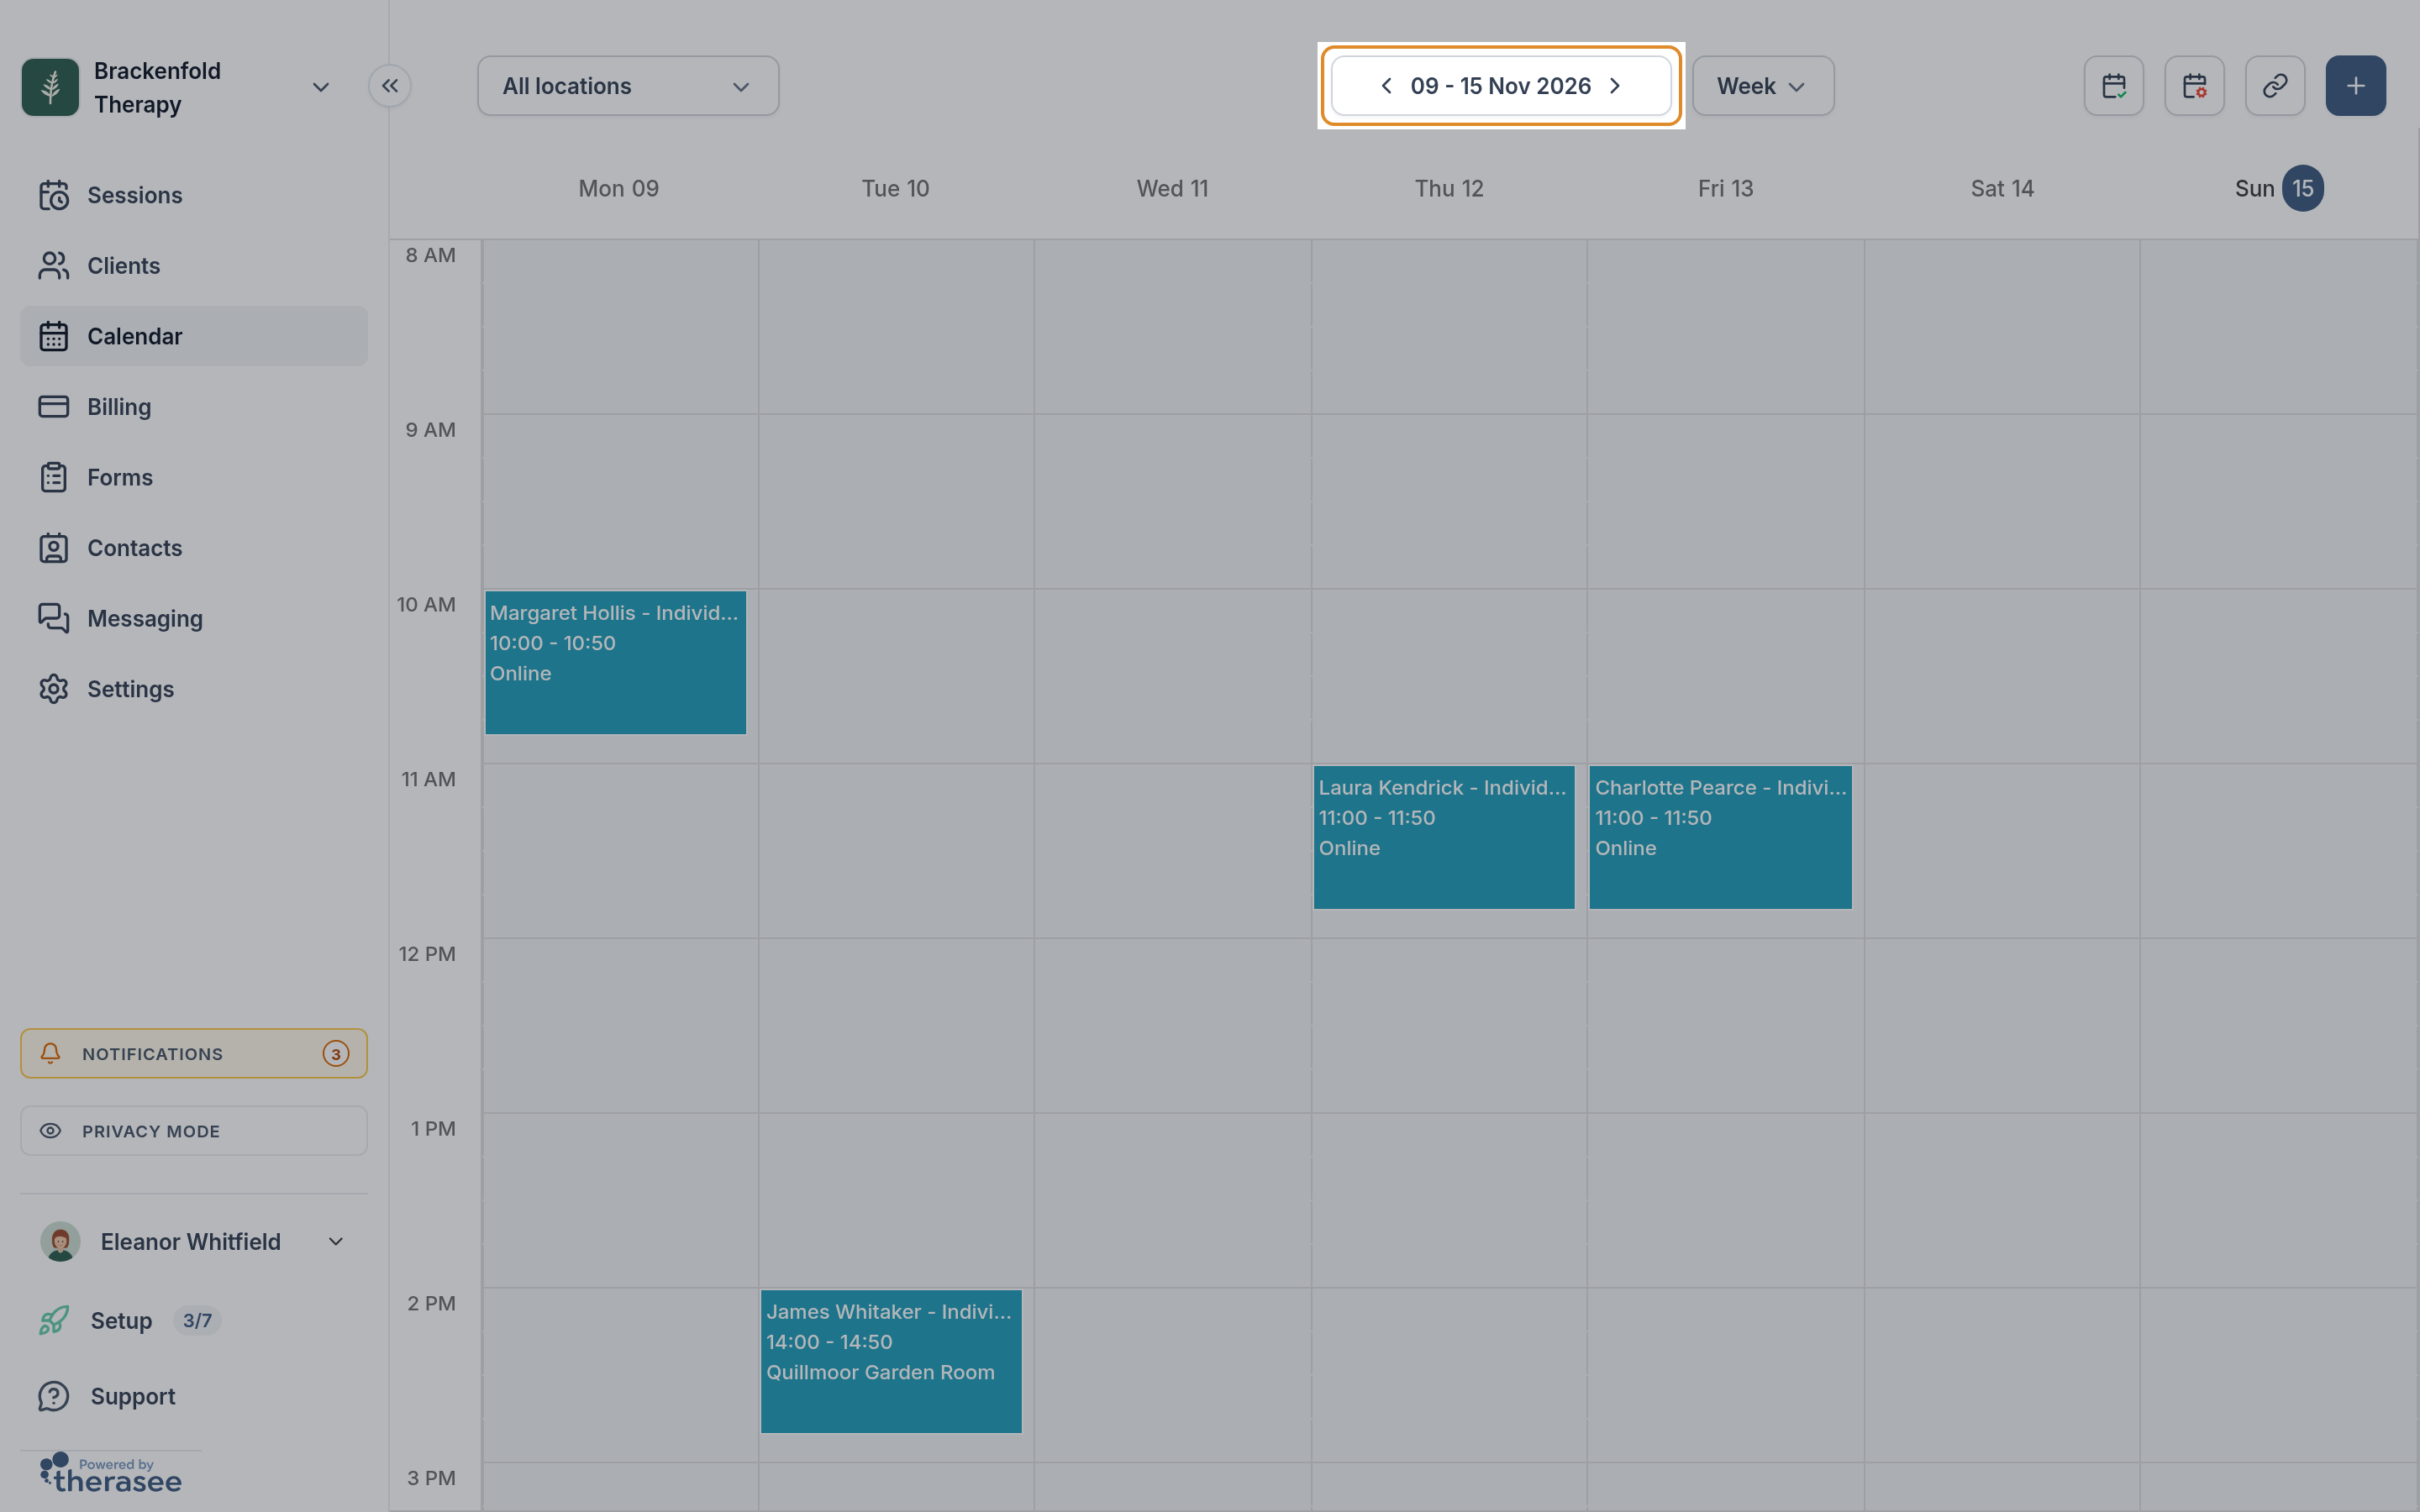
Open Calendar from the sidebar to see your sessions laid out in time.
Views and moving around
Use the view menu to switch between Day, Week and Month, or choose Today to jump back to the present. The Calendar opens in Week view, with weeks starting on Monday, and scrolls to the current time.
Use the arrows either side of the date to move back or forward. In Day or Week view, click the date itself to pick any day from a small calendar.

Filtering the Calendar
- Location: if your practice has locations, the location button shows sessions and availability for the locations you tick. All locations ticks them all. The button reads All locations, the location's name, or Multiple locations. Therasee remembers your choice, and new locations are added to it.
- Practitioner: in a practice with a team, and if you can see everyone's calendar, choose My Calendar, a colleague, a team or All calendars. Type in Search for user or team to find someone. See Adding team members.
What you see on the Calendar
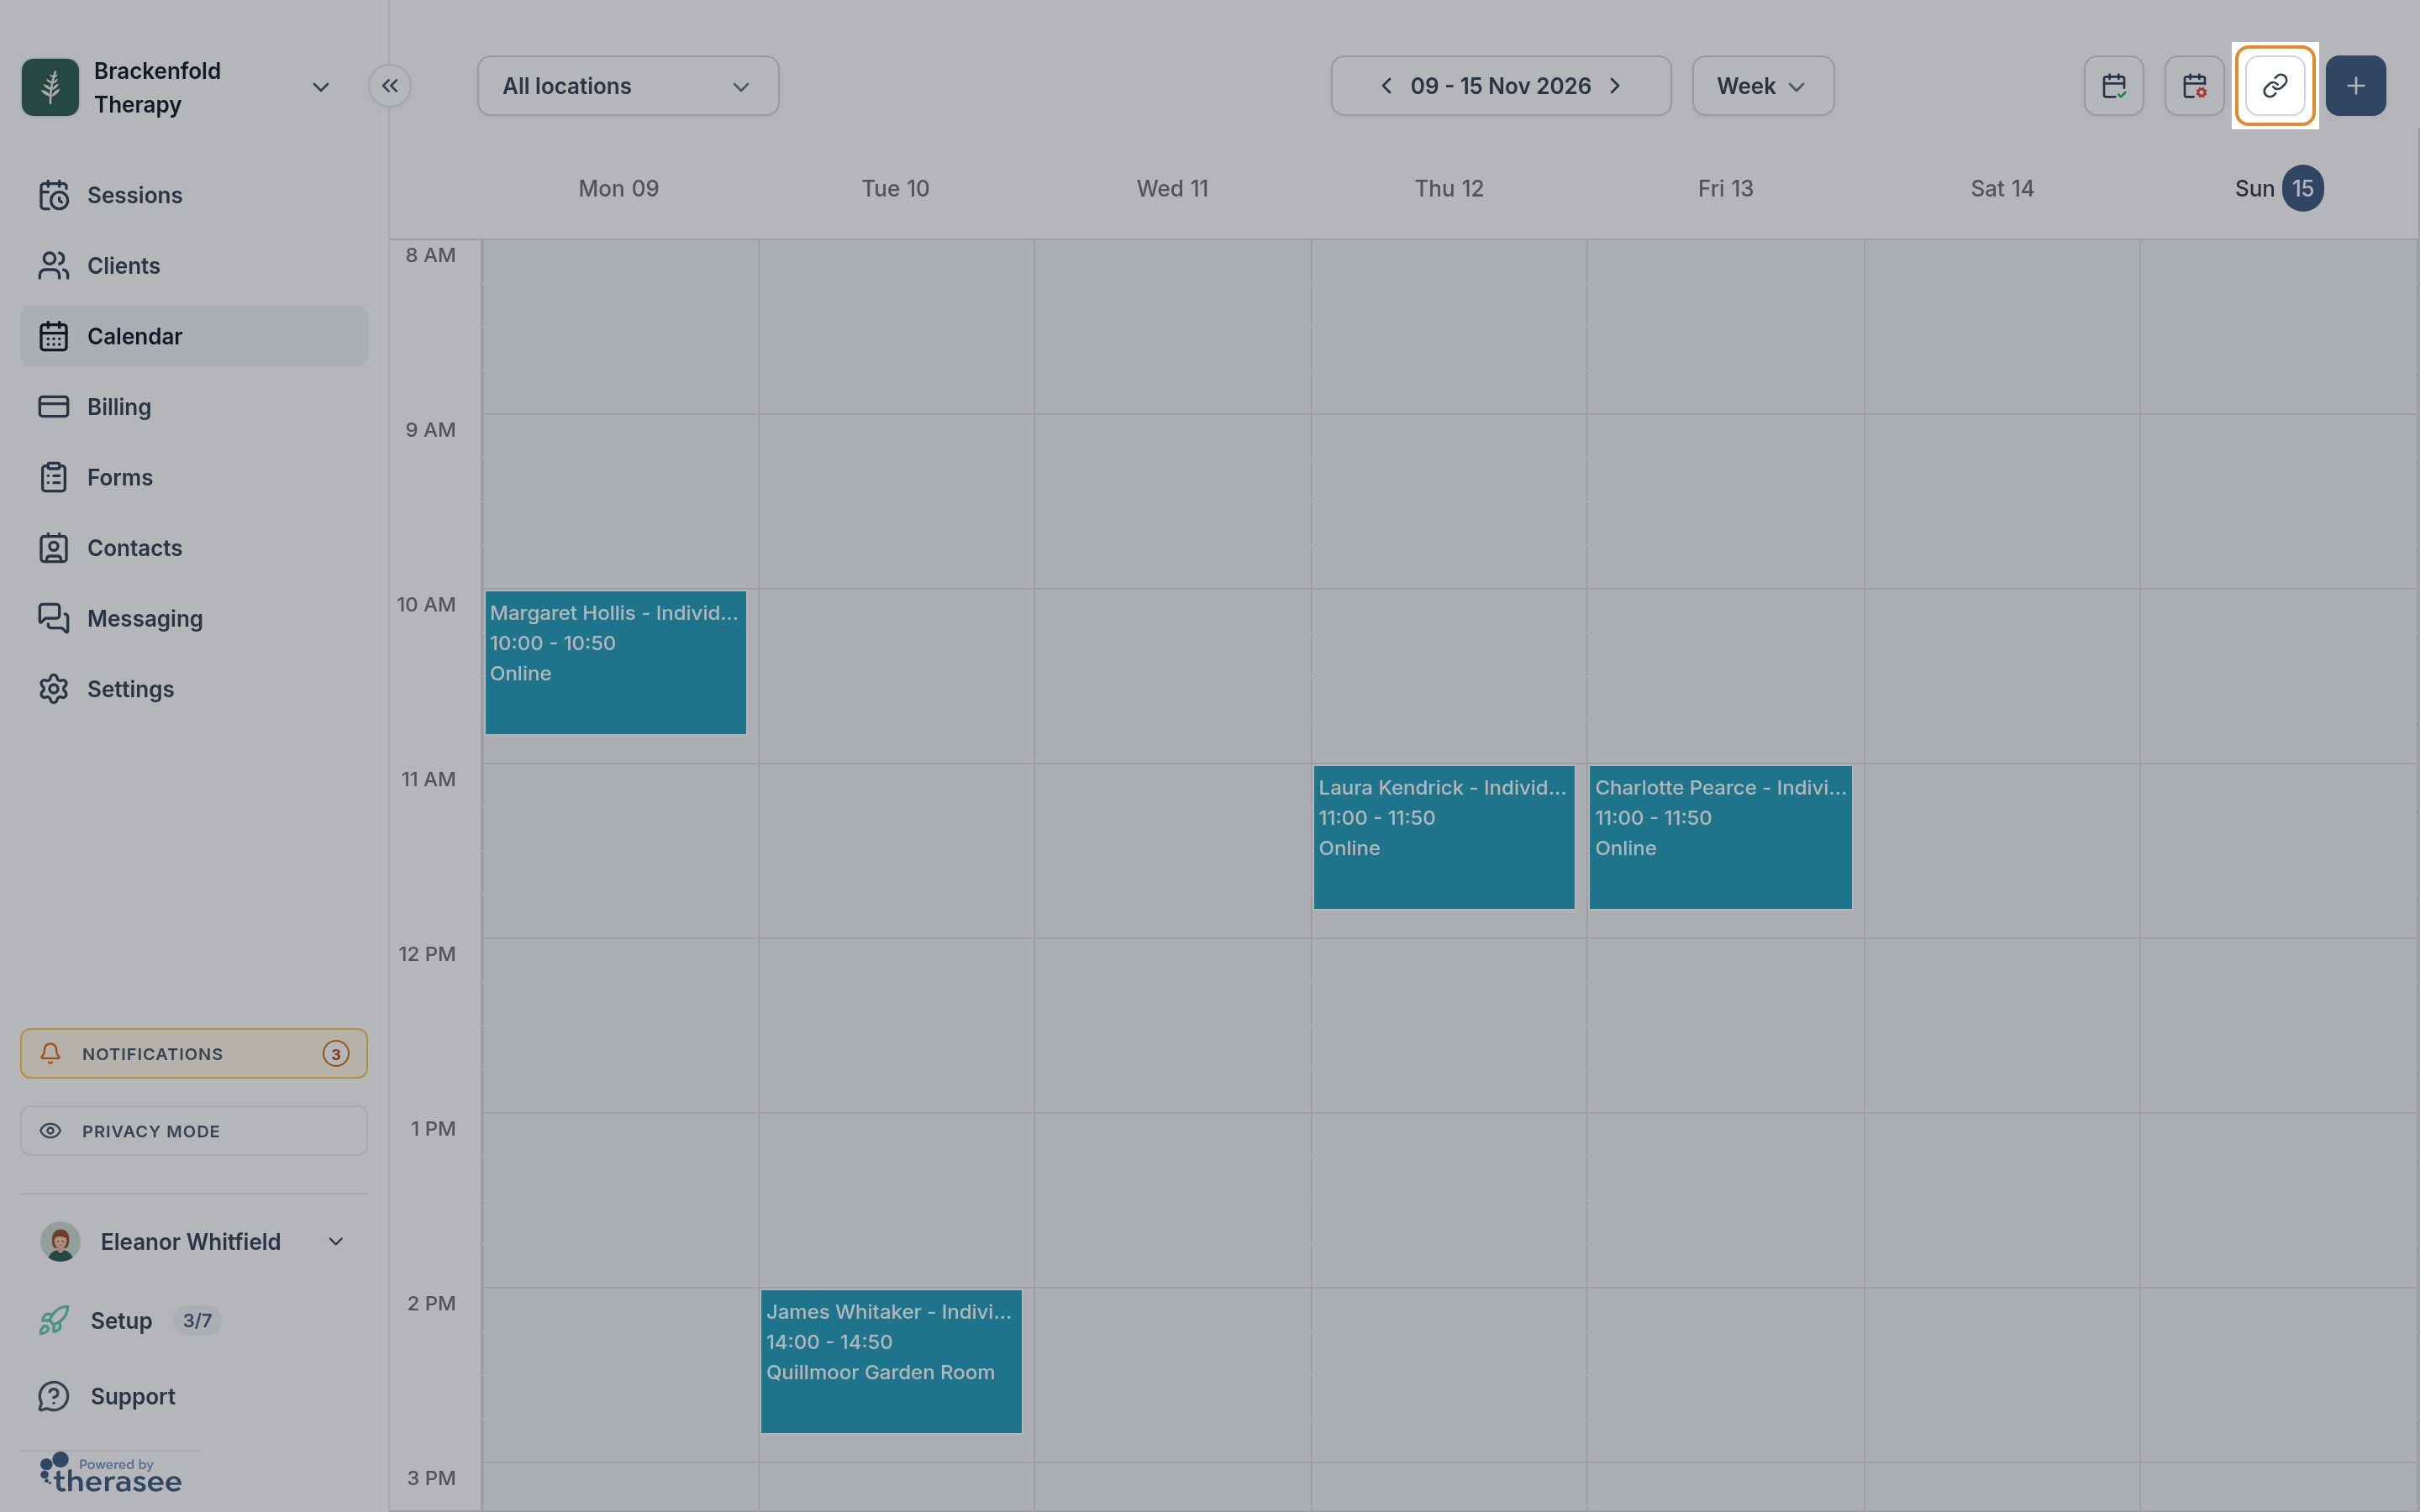
- Sessions are shown in their service's colour, with the client's name, service, time and location. To change a service's colour, see Setting up your services. A repeat icon marks a session that's part of a series.
- Cancelled and No show sessions lose their colour and are struck through, with a label saying which.
- Your available times: when you're looking at one practitioner's calendar, the times they can be booked show in white against a grey background, from now onwards. This includes any custom hours. See Setting your working hours.
- Blocked time shows as a grey block with its reason, or "Block Time" if you didn't give one. Hover it to see the times and locations, and click it to change it. See Blocking out time.
- Google or Outlook events show when you've connected that calendar and turned its events on with the icon at the top. See Syncing Google or Outlook calendar.
The icons at the top
- Set Availability (a calendar with a tick) opens your weekly working hours.
- Block Time & Custom Hours (a calendar with a cog) opens your blocked time and custom hours.
- Booking Link for and your name (a link icon) copies the address of your booking page. You'll see "Copied". See Letting clients book.
- Once you've connected Google or Outlook, its icon turns that calendar's events on or off. The tooltip reads Show Google Calendar events or Hide Google Calendar events (and the same for Outlook).
- The plus button books a new session.
Clicking on the Calendar
Click a session to open its panel. Click an empty slot, or drag across several, to book a session at that time. In Month view, clicking a day starts a booking at 9:00 that day. See Booking an appointment.
Session analytics and exports
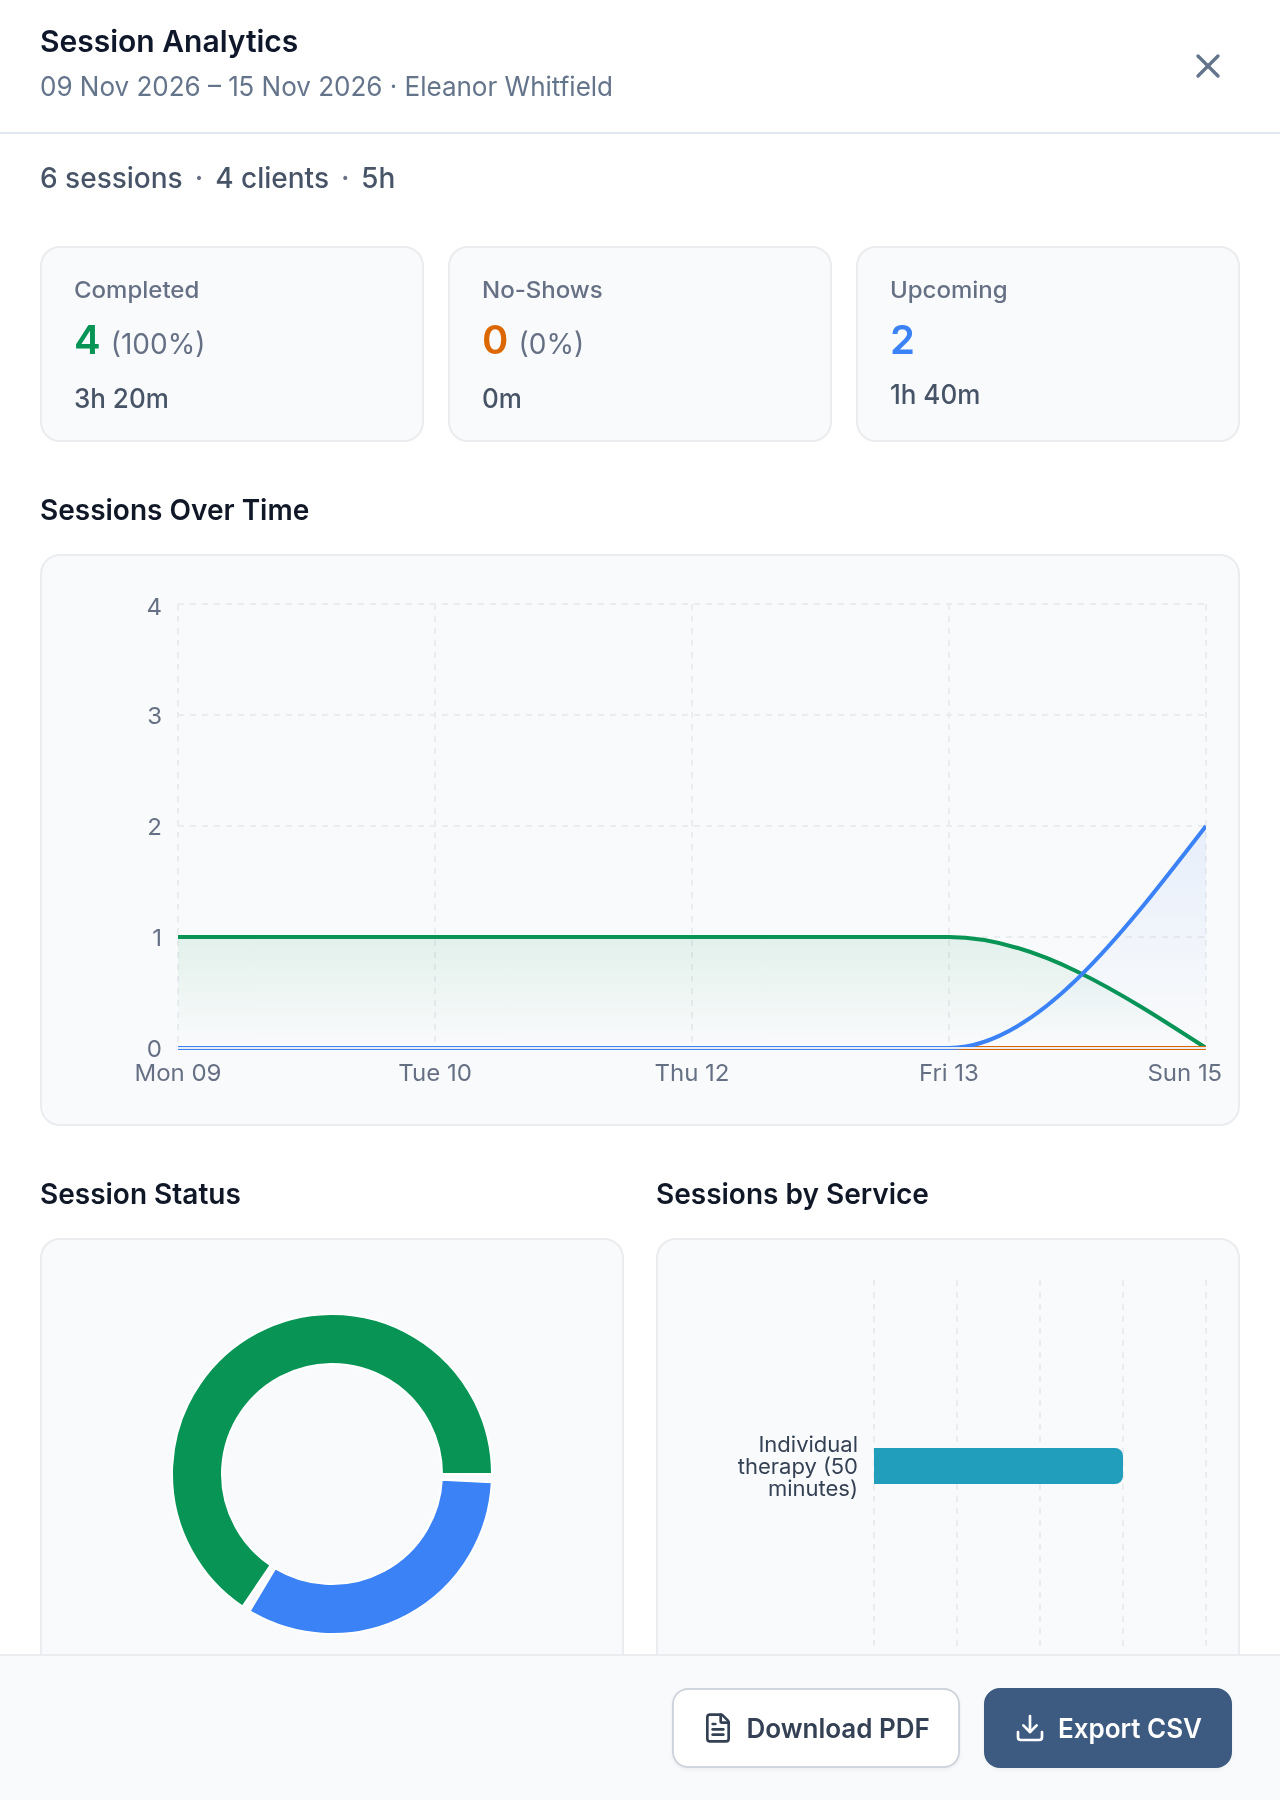
On the Sessions page, the chart icon (Analytics & Export) opens Session Analytics for exactly the sessions in your list. Set the dates and filters first, for example Quarter and one client. The subtitle shows the date range covered.
It shows:
- The number of sessions, clients and the total time.
- Completed, No-Shows and Cancellations, each with a count, a percentage of past sessions and the time involved, plus Upcoming.
- Sessions Over Time: a chart by day, week or month, depending on how far apart the sessions are.
- Session Status, Sessions by Service, Busiest Days and Location Type.
- Client Distribution: sessions per client, with the busiest first. The button underneath lists every client when you have more than ten.
At the bottom:
- Export CSV downloads a spreadsheet with one row per session: Date, Time, Duration (mins), Client, Service, Status, Location Type, Price and Invoice Status, with a totals row at the end.
- Download PDF opens your browser's print window, where you can save the charts as a PDF.
Billing analytics
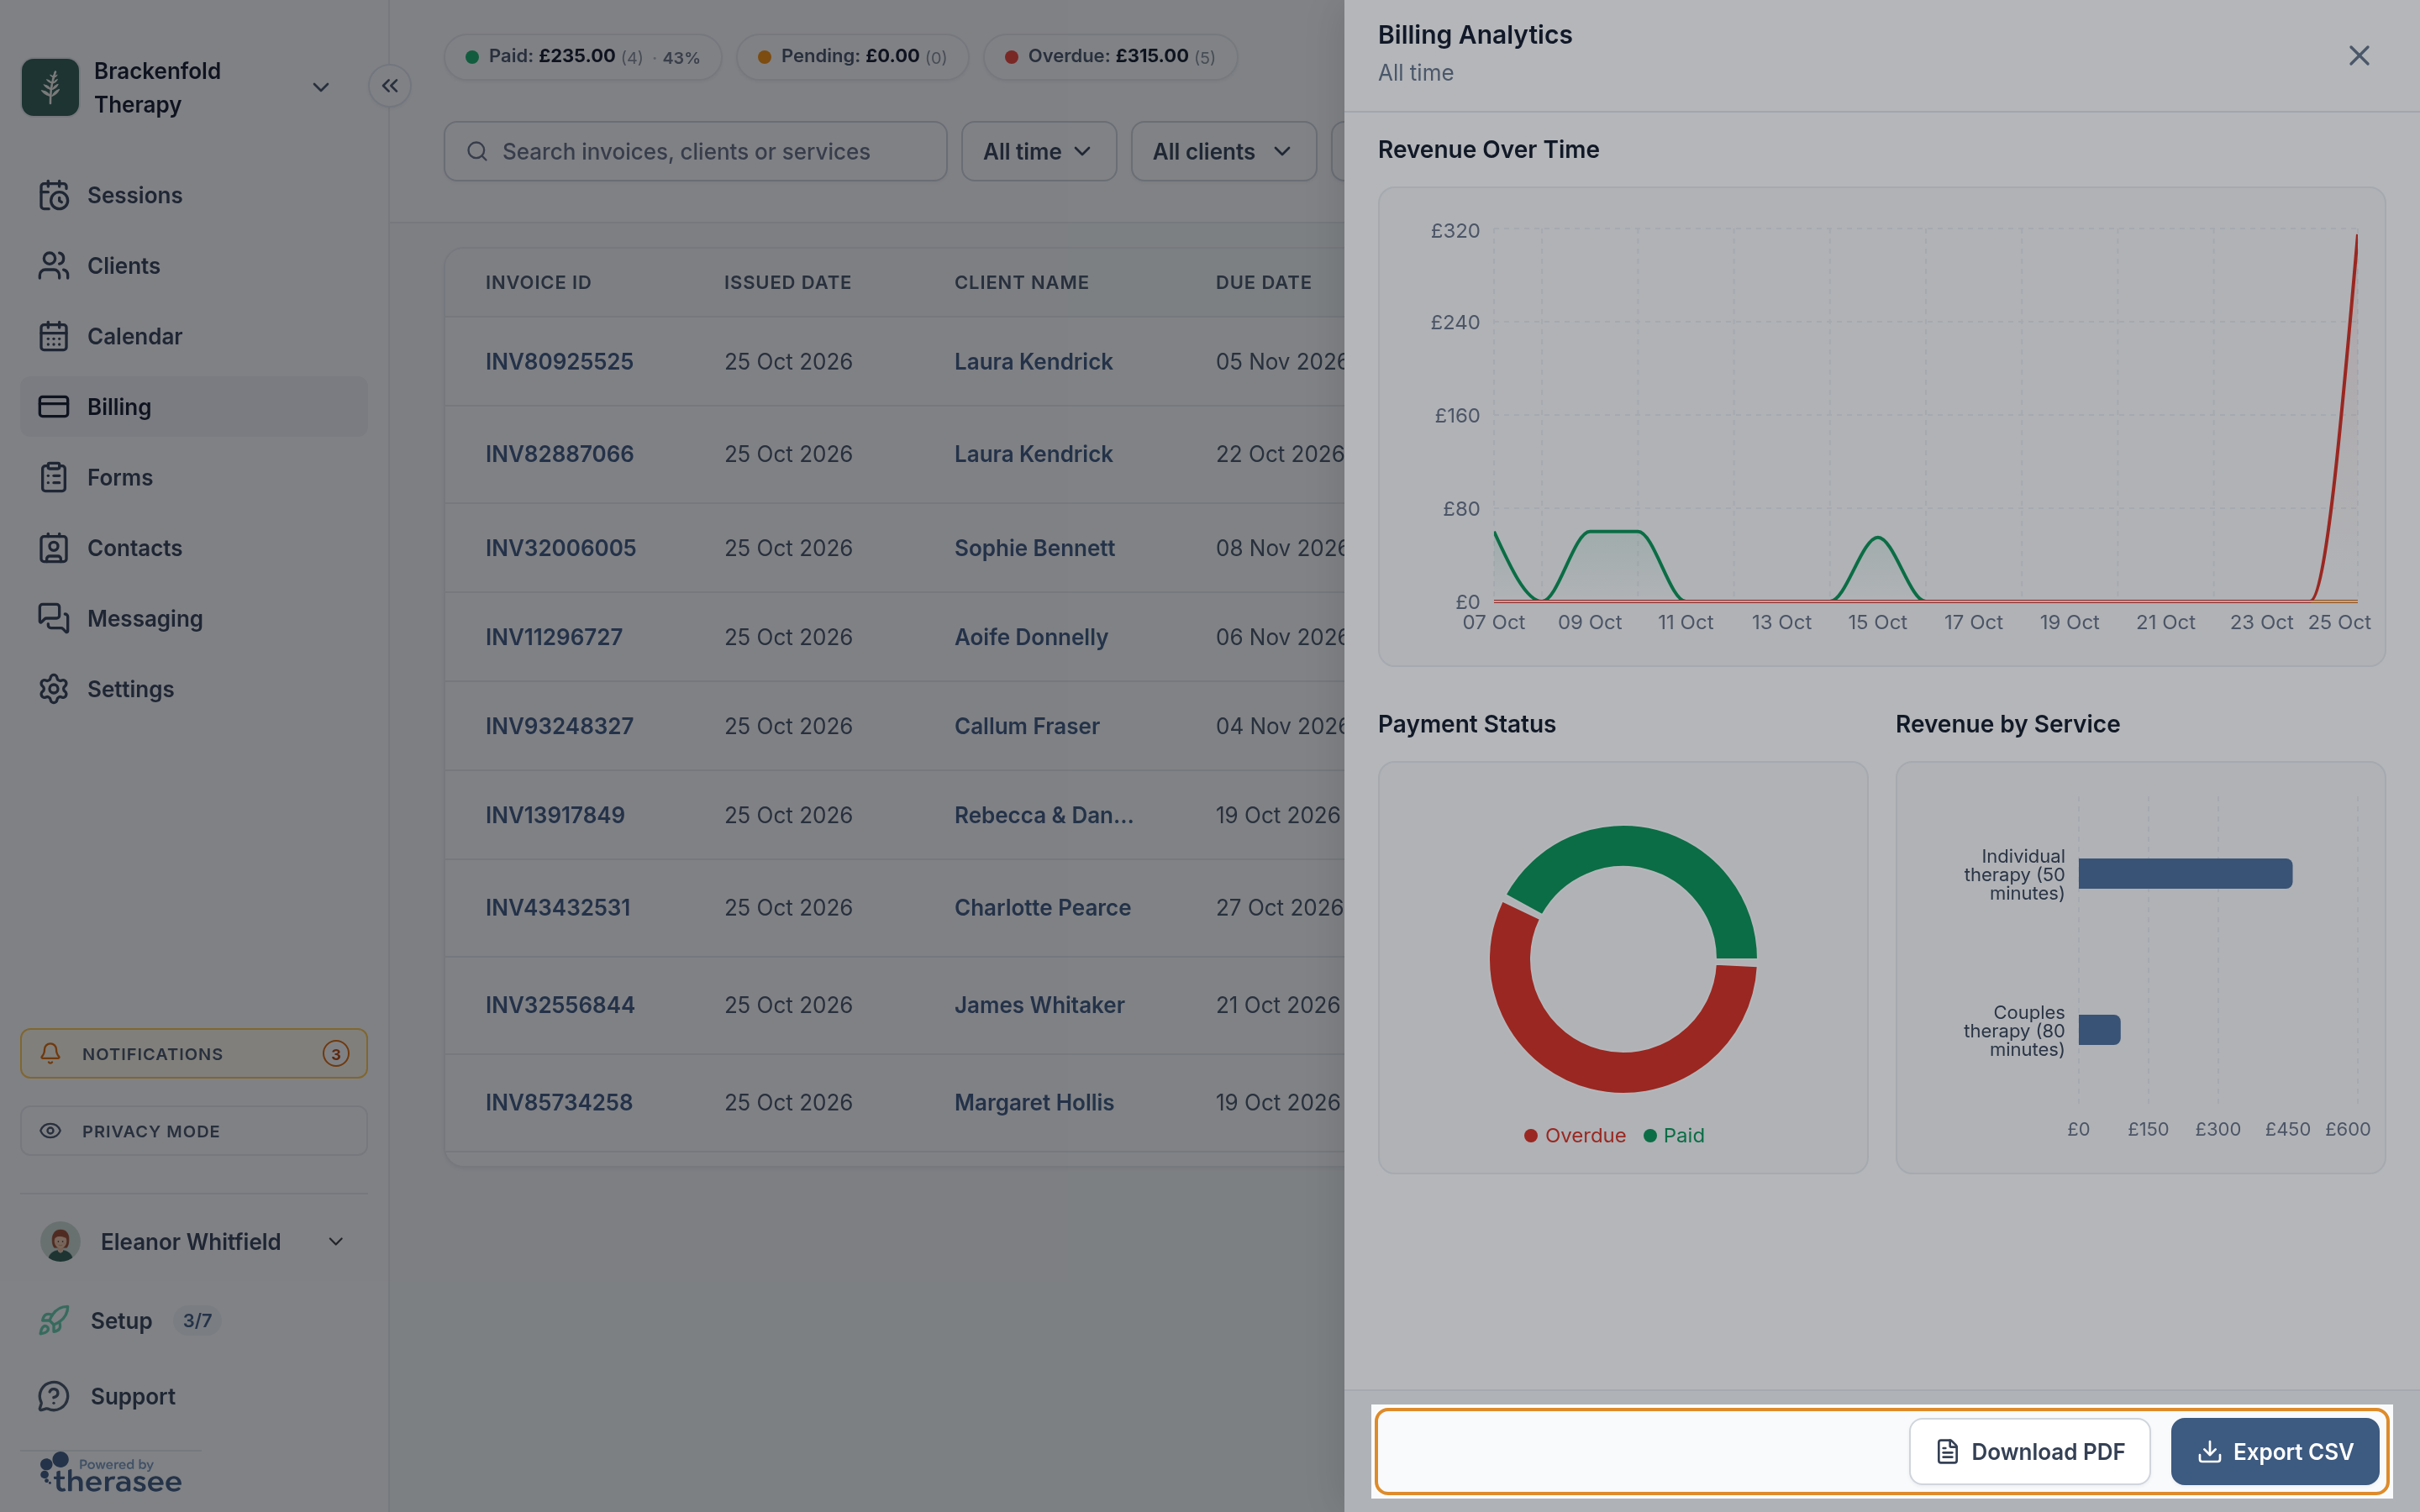
On Billing, the same chart icon (Analytics & Export) opens Billing Analytics for the invoices you're viewing. It follows the Billing page's date, client and service filters, the Paid, Pending and Overdue buttons and the Search invoices, clients or services box. Its subtitle names what's included, and the icon is greyed out when no invoices are showing.
- Revenue Over Time: paid invoices by the date they were paid, and pending or overdue invoices by the date they were raised.
- Payment Status: how much is paid, pending and overdue.
- Revenue by Service: your top ten services by amount invoiced.
Export CSV downloads one row per invoice: Invoice ID, Issued Date, Client Name, Due Date, Date Received, Services, Status and Amount. Download PDF works as it does for sessions. For raising and chasing invoices, see Creating and sending an invoice.
What team members see
In a practice with a team, what each person sees depends on their Calendars access. See Adding team members for how to set it.
- All: they can see everyone's sessions. On the Sessions page they can choose All sessions, colleagues or teams, and on the Calendar they can switch between calendars.
- Own: the Sessions page and Calendar show only their own sessions. The practitioner filter offers just My sessions, and the Calendar's practitioner filter isn't shown. Their analytics and exports cover only their own sessions too.
Client details, invoices and notes in each row follow the person's other permissions, such as seeing only clients assigned to them.
Was this helpful?