Your practice details, branding and locations
Set your practice name, logo, contact details and practice URL, choose your brand colour and invoice style, add in-person locations, and switch on online and telephone sessions.
Updated 8 November 2026
This page covers how your practice looks to clients and where you see them. Your practice name, logo, contact details and web address go on the Overview tab. Your brand colour and invoice style go on Branding, and the places you see clients (in person, online and by telephone) go on Locations.
Where to find it
Go to Settings, Practice profile. The tabs along the top are Overview, Branding, Public Pages, Client Portal, Locations and Services. This guide covers Overview, Branding and Locations. The others have their own guides:
- Adding Therasee to your website covers Public Pages: your booking page, waitlist and contact form.
- Turning on the client portal covers the Client Portal tab.
- Setting up your services covers Services.
Your practice identity
The Practice Identity card at the top of the Overview tab holds your logo, your practice name and how clients can reach you. To change anything on it, click the pencil at the top right of the card, make your changes, then click Save. Cancel puts everything back as it was.
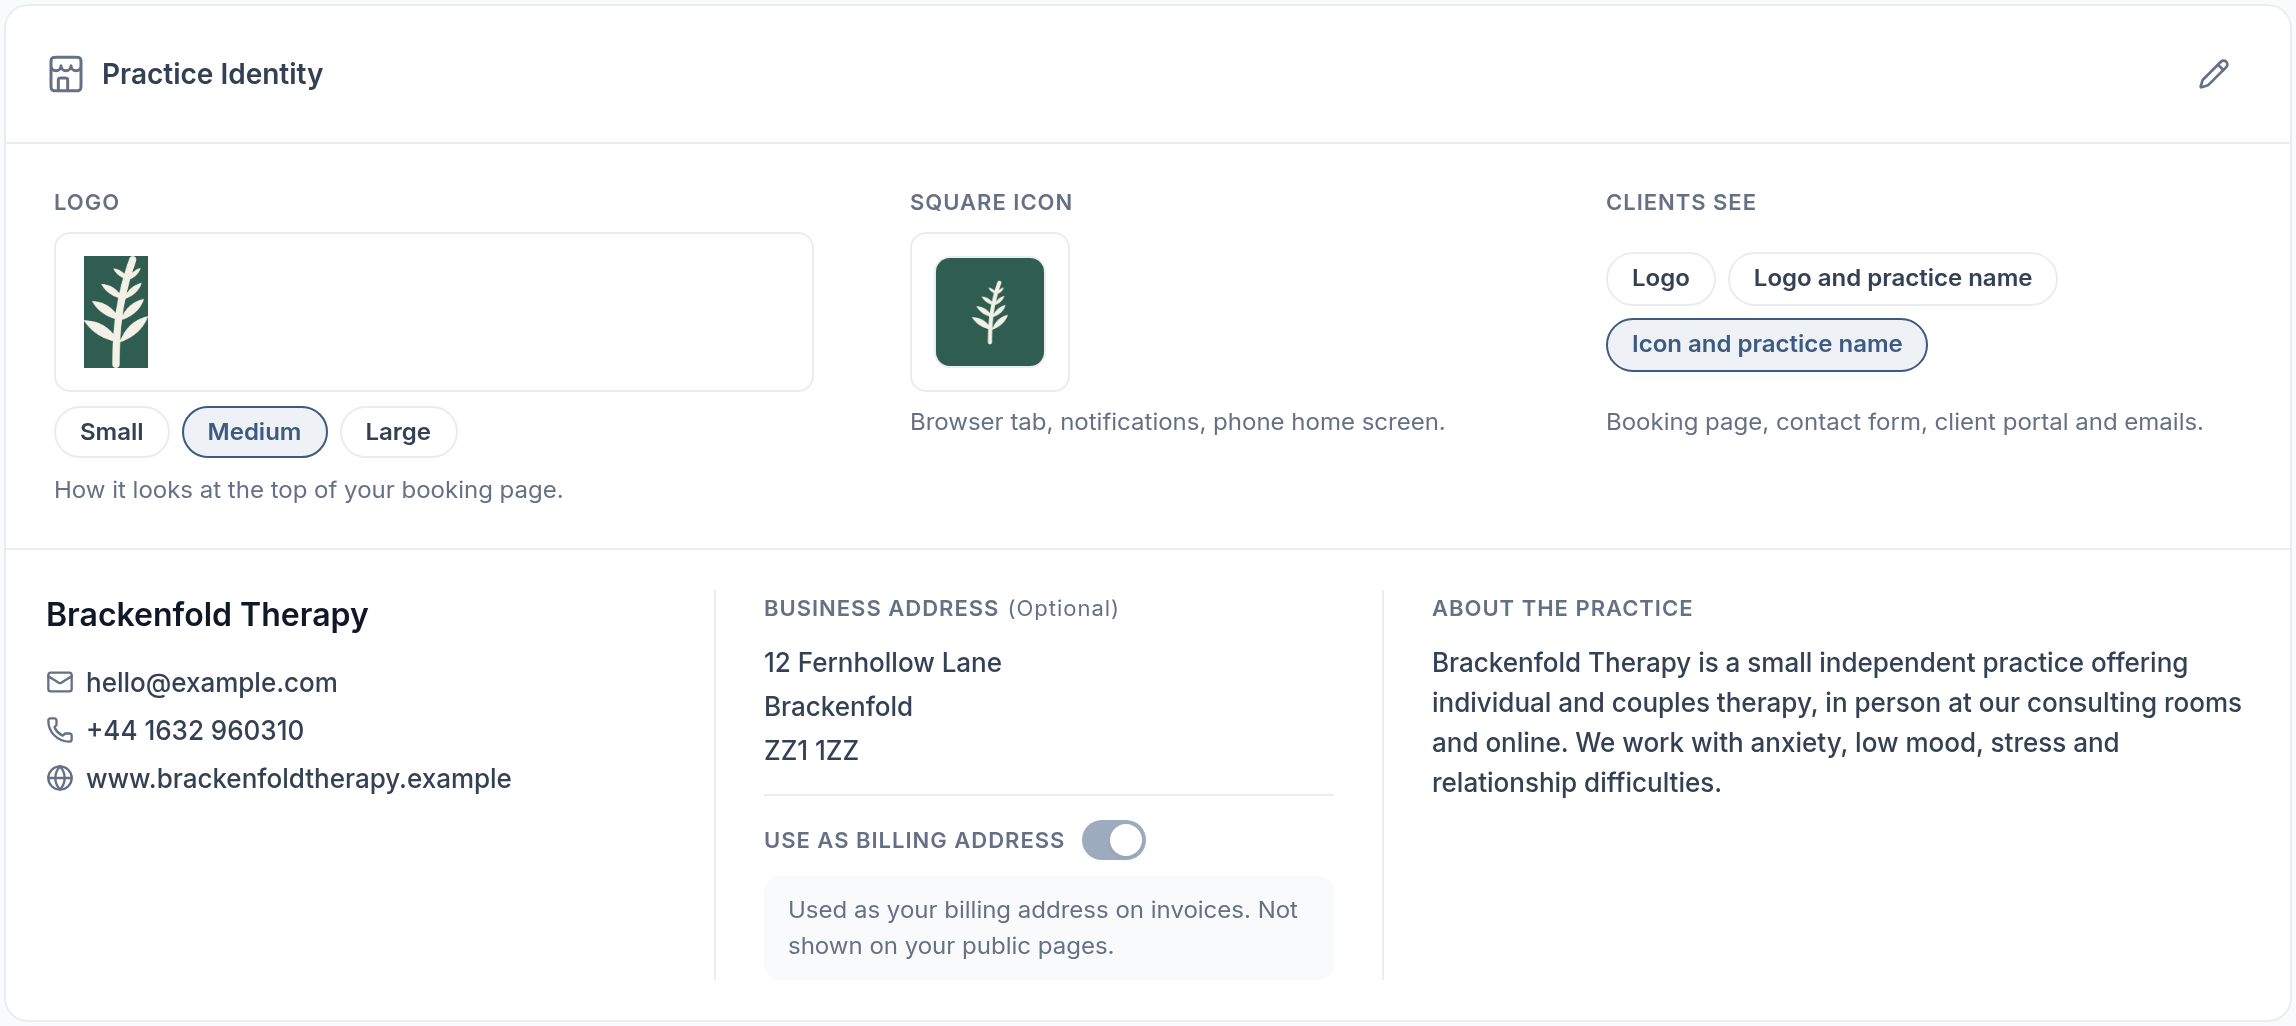
Logo and square icon
Your practice can have two images:
- Logo: your full, wide logo. Depending on your Clients see choice (below), it can head your booking page, contact form, client portal and emails, and it can appear on invoices. Use a PNG or JPG at least 600 pixels wide and 120 pixels tall, up to 5 MB. Drag it onto the logo area or click the area to choose a file.
- Square icon: a small square image for the browser tab, notifications and a client's phone home screen. Use a PNG or JPG, up to 5 MB. After you choose a file, you crop it to a square, and Therasee saves it at 512 pixels square.
While you're editing, Change and Remove under each image replace or delete it. Once you have a logo, choose its size with Small, Medium or Large. Outside editing, a size you click saves straight away.
What clients see
Clients see sets what heads your booking page, contact form, client portal and emails:
- Logo: your full logo on its own.
- Logo and practice name: your full logo with your practice name beside it.
- Icon and practice name: your square icon with your practice name beside it.
The first two need a full logo. Until you add one, clients see your icon and practice name. When you add your first logo, Therasee switches this to Logo, and you can change it. Outside editing, your choice saves as soon as you click it; while you're editing, it saves with Save. Invoices have their own logo setting on the Branding tab (see Invoice appearance below).
Name and contact details
- PRACTICE NAME: required, up to 64 characters. Letters, numbers and common punctuation (& - ' . , and brackets) are allowed.
- SUPPORT EMAIL: clients signed in to the client portal see it in the Contact us panel.
- PHONE: shown to clients in the client portal's Contact us panel.
- WEBSITE (optional): shown at the bottom of your booking page, contact form and practice page, as a link back to your site. You can type it without
https://, for examplewww.yourpractice.com.
Business address
BUSINESS ADDRESS is optional: ADDRESS LINE, TOWN/CITY, COUNTY/STATE and POSTCODE/ZIP. It isn't shown on your public pages. With USE AS BILLING ADDRESS switched on (the default), it's also your billing address on invoices, and clients see it in the client portal's Contact us panel. Switch it off if you bill from a different address, and set that address in Settings, Practice settings, Billing.
About the practice
ABOUT THE PRACTICE is a short description of up to 500 characters, for example your approach or what you specialise in. It appears under About the practice on your practice page, the page clients reach at your practice URL.
Your practice URL
Below Practice Identity, the Practice URL card sets the name in your web address. Every link you give clients is built from it: your booking page, contact form, waitlist and client portal, as well as each practitioner's own booking link.
- Type a new name in URL NAME. Spaces become hyphens, capitals become lower case, and anything other than letters, numbers and hyphens is left out.
- Therasee checks the name as you type. You'll see This name is available or This name is already taken.
- Check the full address under PREVIEW. The copy button beside it copies the address.
- Click Save. Save and Cancel appear once you've changed the name.
Changing the name changes all of these links. Links that use the old name no longer reach your practice, so update your website, email signature and anywhere else you've shared your booking link or portal address.
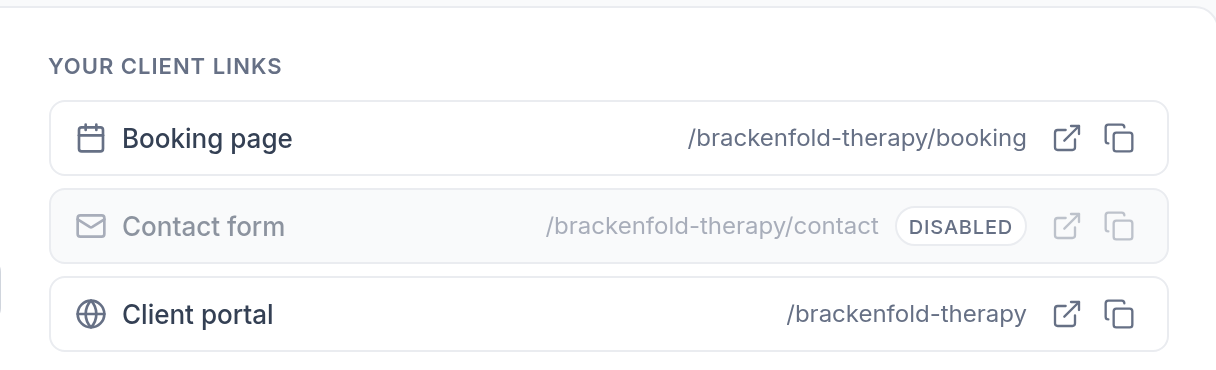
YOUR CLIENT LINKS, beside the URL name, lists your Booking page, Contact form and Client portal, each with buttons to open it or copy its link. A link marked Disabled belongs to a page that's switched off. You switch these pages on in Public Pages and Client Portal.
Branding
The Branding tab sets the look of your public pages, client portal and invoices. Your name, logo and contact details stay on Overview; Go to Overview takes you there.
At the top, Where your branding is applied lists your Booking page, Waitlist, Contact form and Client portal, each marked Enabled or Disabled so you can see which ones clients can reach right now.
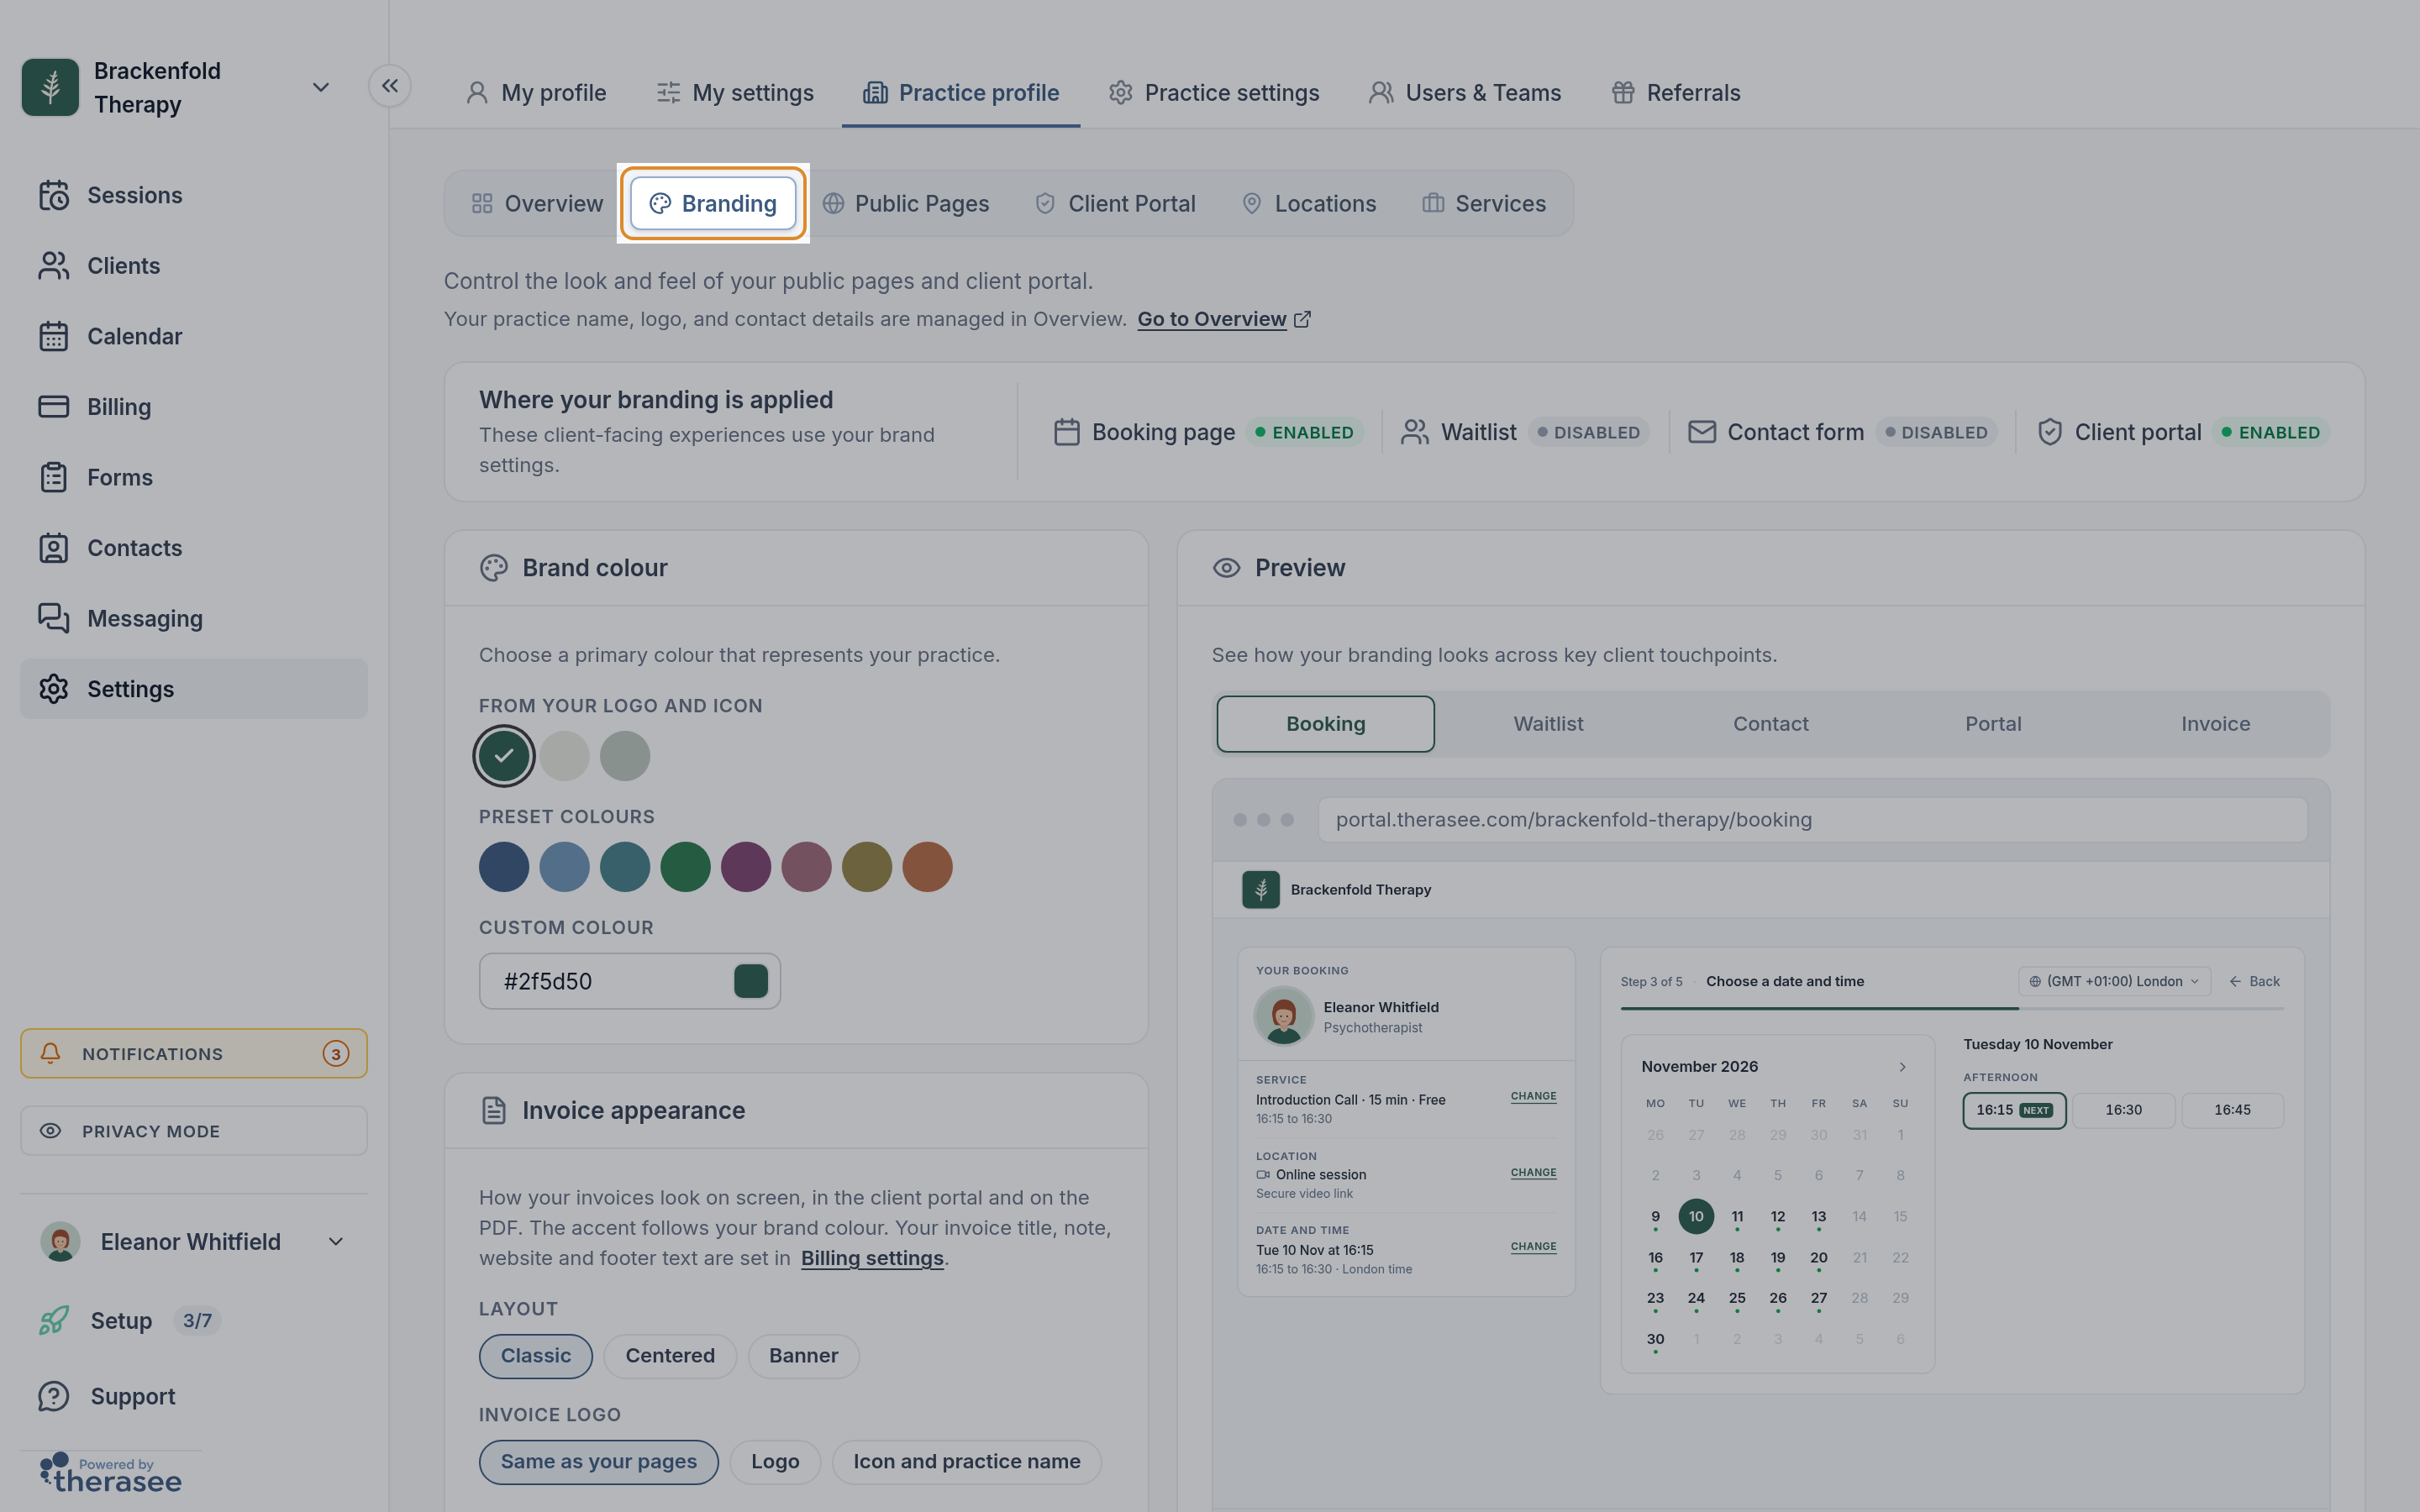
Brand colour
Your brand colour is used on your booking page, waitlist, contact form, client portal and as the accent on your invoices. Choose it in one of three ways:
- From your logo (or From your logo and icon): up to three colours taken from the images you've uploaded.
- Preset colours: eight ready-made colours. Hover over one to see its name.
- Custom colour: type a six-digit hex code such as
#4f46e5, or click the colour square beside it to pick a colour.
There's no Save button. A preset or logo colour saves when you click it, a typed hex code saves when you leave the box, and a picked colour saves when you click away from the picker. You'll see Brand colour updated.
Invoice appearance
Invoice appearance sets how invoices look on screen, in the client portal and on the PDF. Each choice saves straight away, and you'll see Invoice style updated:
- Layout: Classic, Centered or Banner.
- Invoice logo: Same as your pages follows your Clients see choice on Overview. Logo uses your full logo (or your icon, if you haven't added a logo), and Icon and practice name uses your square icon and name.
- Logo size: S, M or L.
- Background: white, cream, sage or slate.
- Density: Compact, Standard or Roomy.
Your invoice title, note, website and footer text are set in Settings, Practice settings, Billing. For sending invoices, see Creating and sending an invoice.
Preview
The Preview card shows your brand colour and logo on sample pages, with sample client details. Switch between Booking, Waitlist, Contact, Portal and Invoice to check each one before clients see it.
Your locations
The Locations tab lists everywhere you see clients. The table shows each location's Location, Details (its address, or how the session works), the Practitioners who work there (in a practice with more than one practitioner) and its Status. Each row has a menu at the end with what you can do to it.
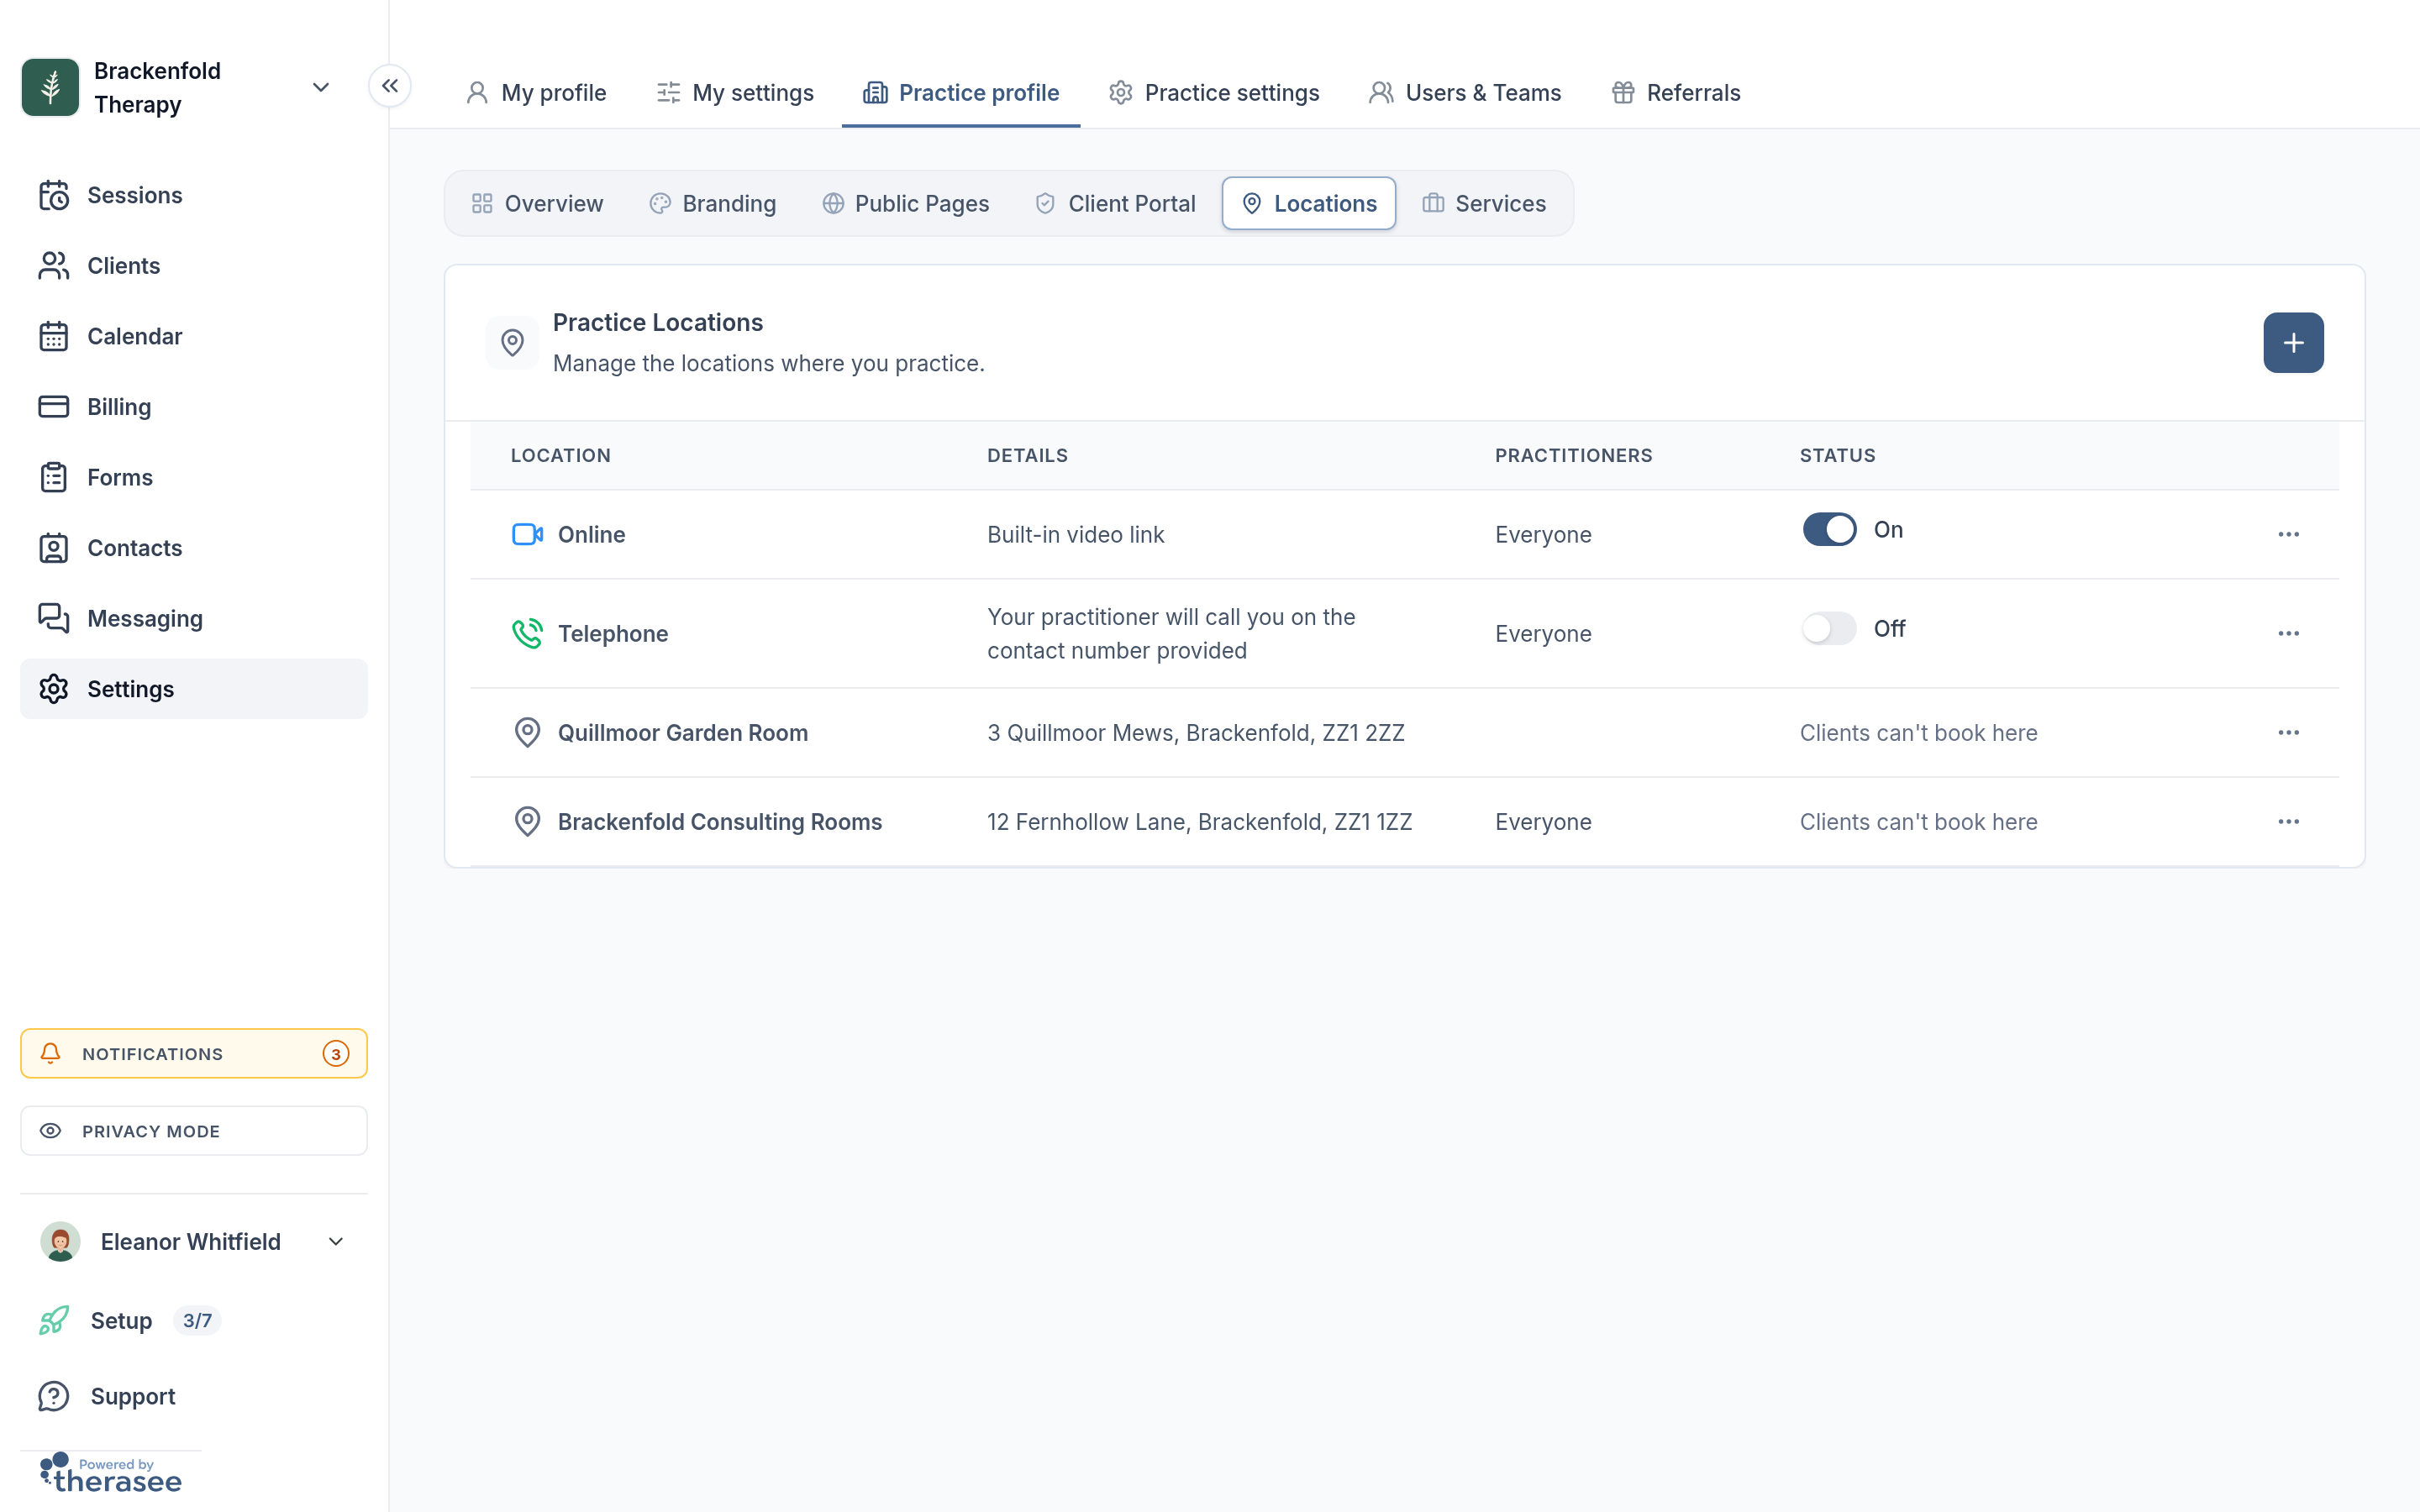
Online and Telephone
Every practice has an Online row and a Telephone row. Each has a switch in the Status column, showing On or Off. Switching either one off asks you to confirm first.
- Online is video sessions, using the built-in video link. While it's off, clients can't book online sessions. For running a session, see Running a video session.
- Telephone is telephone sessions. Switch it on to offer them. To write call instructions for clients, choose Edit from the row's menu and fill in CALL INSTRUCTIONS. When clients book a telephone session, they see your call instructions, or "Your practitioner will call you on the contact number provided" if you haven't written any.
Adding an in-person location
- Click the + button (Add location) at the top right of Practice Locations. A panel titled Add Practice Location opens.
- Enter a LOCATION NAME clients will recognise, for example "Redland Practice".
- Under Physical Address, enter the ADDRESS LINE, TOWN/CITY and POSTCODE/ZIP. COUNTY/STATE is optional.
- Leave Clients can book here ticked if clients can book this location themselves. Untick it if only you will book clients in here.
- Under WHO WORKS HERE?, choose the practitioners who see clients here. It starts as all practitioners; remove anyone who doesn't work at this location.
- Click Add.
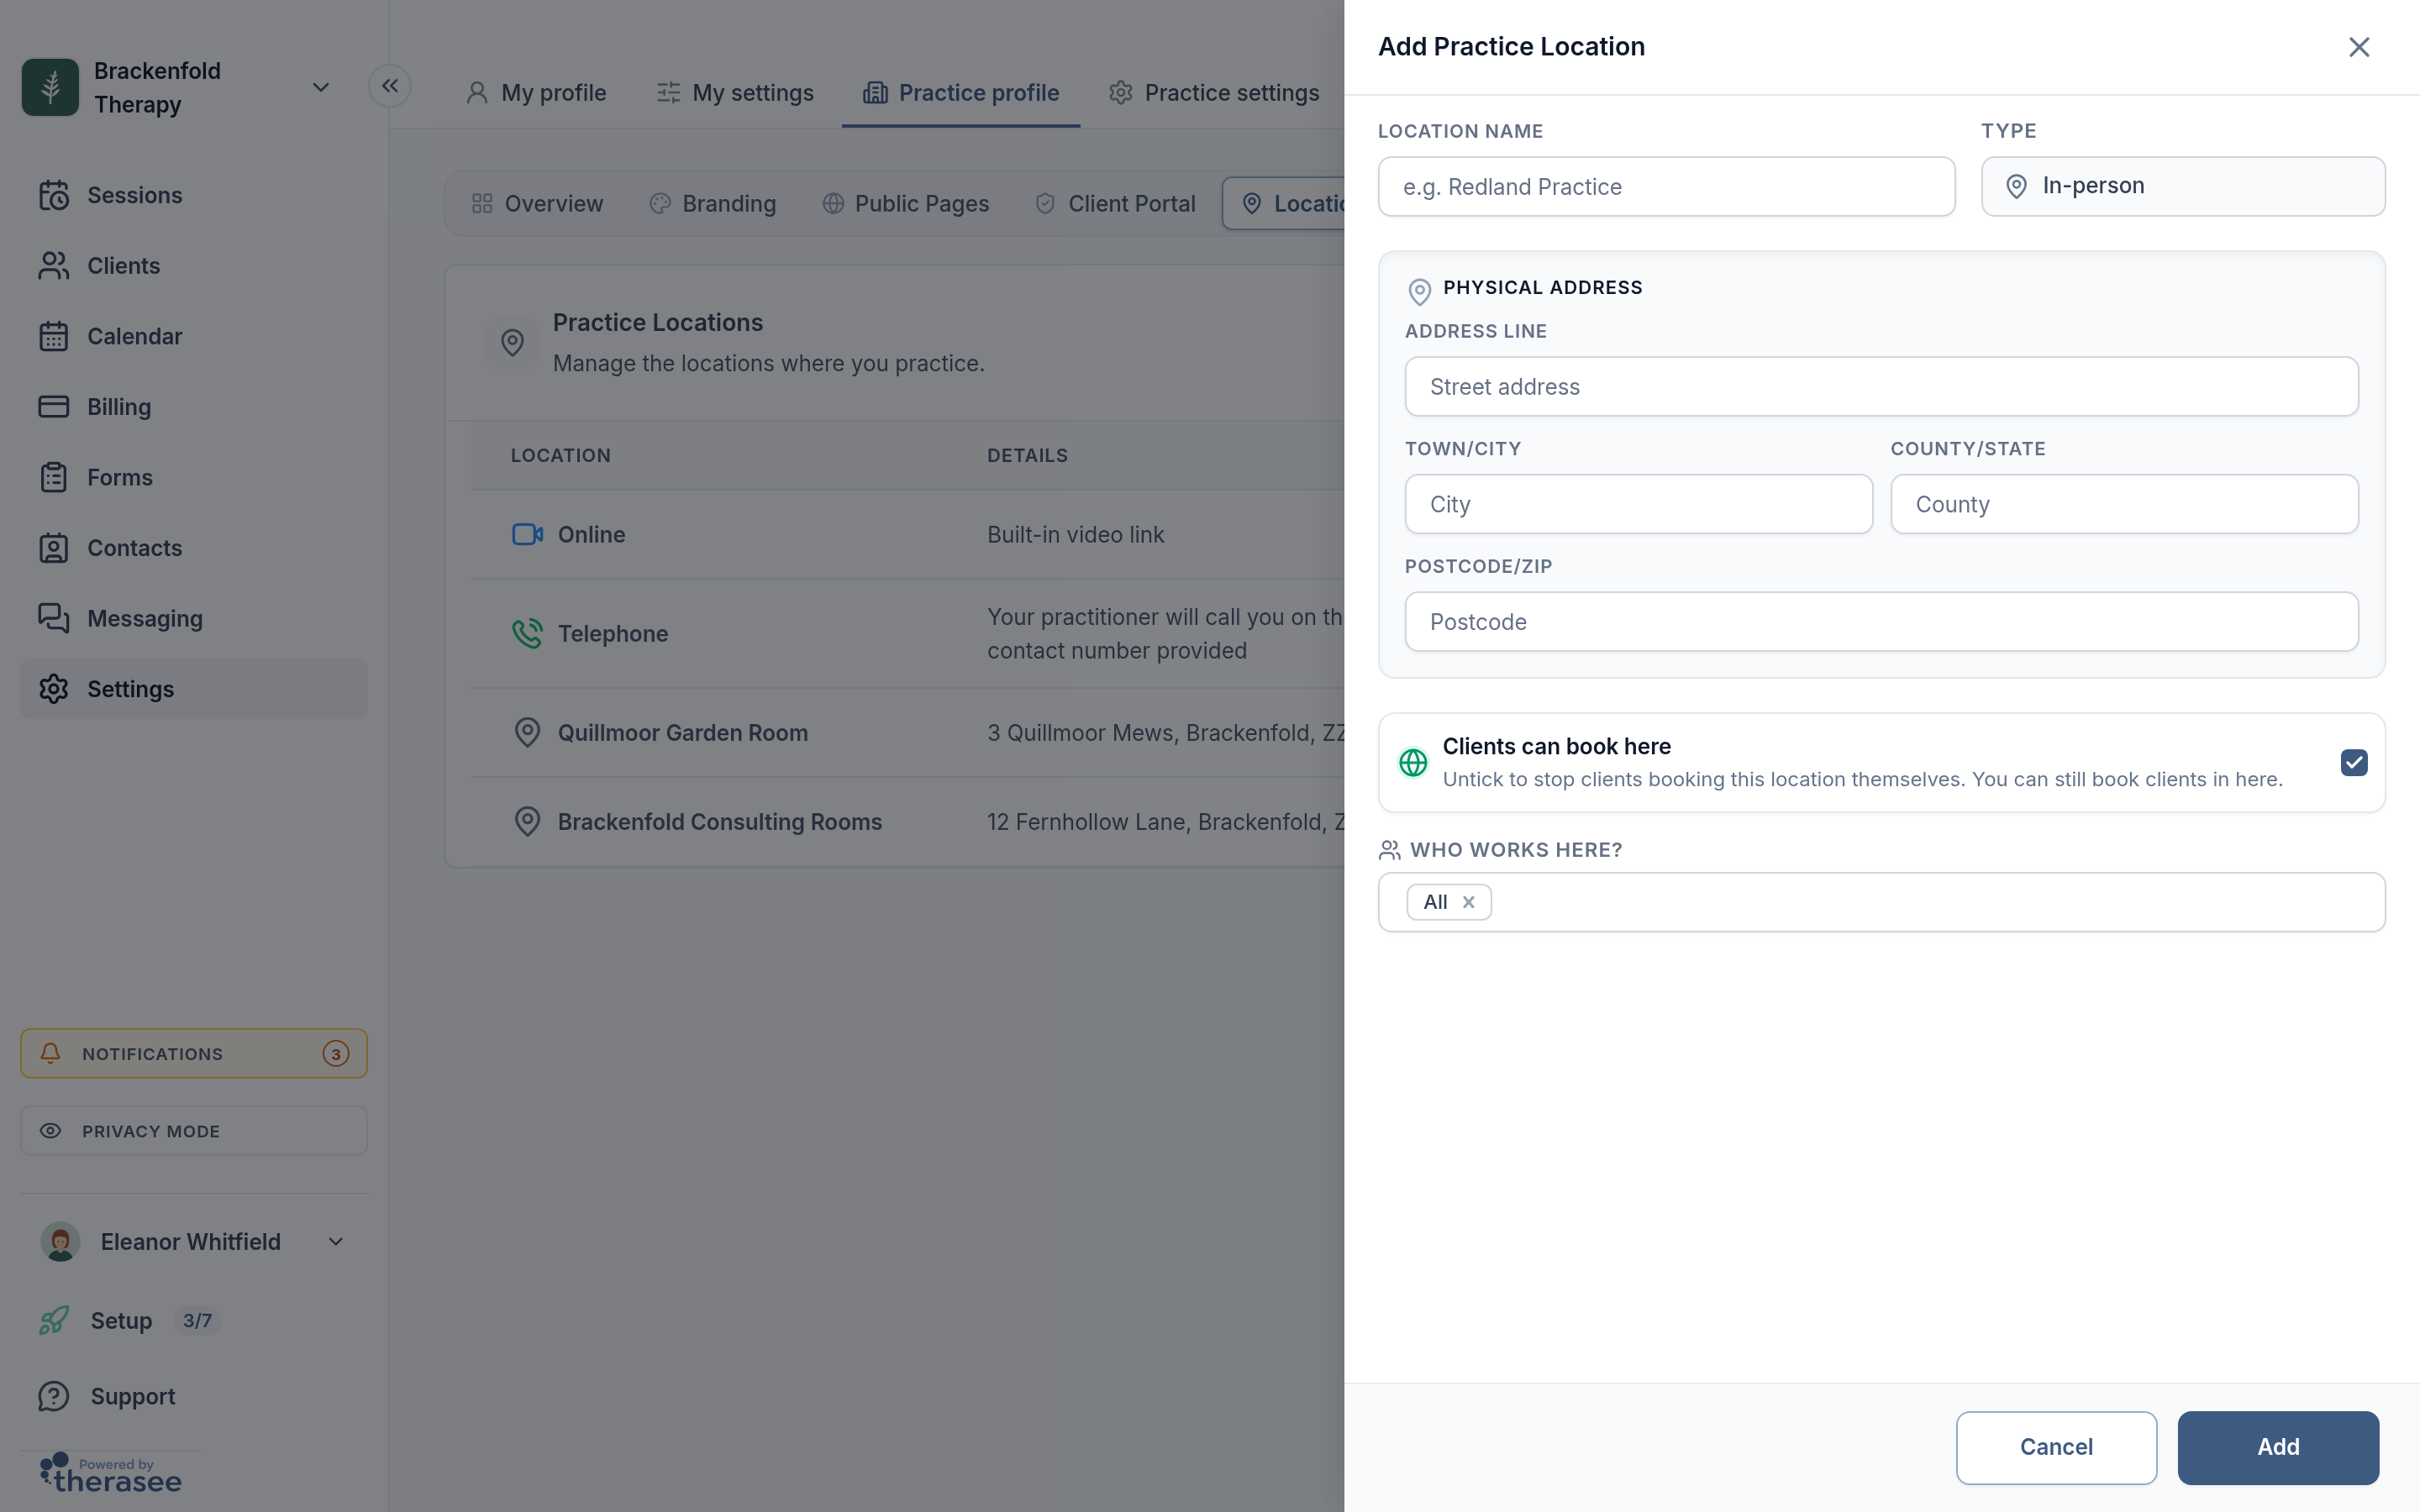
A new location is added to the practitioners you chose. To take bookings there, each practitioner includes it in their working hours and in where clients can book them: see Setting your working hours and Letting clients book. To offer a service only at some locations, see Setting up your services.
Editing a location
Choose Edit from the location's row menu. The Edit Location panel has the same name, address, Clients can book here and WHO WORKS HERE? settings. Make your changes and click Save.
If you change the name, address line or town, Therasee asks Update location?. The box to update appointments already booked there starts ticked. Leave it ticked and click Update location to update those appointments too, or untick it so only new bookings use the new details.
Letting clients book a location, or not
To stop clients booking an in-person location themselves, choose Stop clients booking here from its row menu. Its Status then reads Clients can't book here, and it no longer appears when clients book online. You can still book clients in there yourself. To open it to clients again, choose Let clients book here.
Each practitioner also chooses which of their own locations clients can book; see Letting clients book.
Deleting a location
Choose Delete from the location's row menu, then Yes, delete. The location is removed from the practice and from every practitioner who worked there, so clients can't book it any more.
Before you delete a location, move or cancel any appointments booked there from your calendar: see Cancellations and no-shows. If you only want to stop new bookings for a while, use Stop clients booking here instead.
Where new client messages go
In a practice with more than one person, you can choose who new clients' conversations are assigned to. Go to Settings, Practice settings, Messaging. Under Default message settings ("Define where first-time or unassigned messages are sent"), pick a person or a team in Choose a user or team, then click Save. When a member who sees only their assigned clients adds a client, that client is assigned to them instead. For sending and replying to messages, see Messaging a client.
Who can change these
Anyone with permission to view practice settings can open Practice profile. Changing anything on Overview, Branding or Locations needs Edit access for Practice settings. The practice owner has it, and admin users have it by default. Practitioners start with view-only access, so they can see these pages, but the pencil, the add button and the edit options aren't shown to them. To change what someone can do, see Adding team members.
Was this helpful?